smartdroid: flash huawei
Showing posts with label flash huawei. Show all posts

Friday, 24 November 2017

How to Update Stock EMUI 4.1 B895/B896 Huawei P8Lite Via TWRP Recovery.

How to Update Stock EMUI 4.1 B895/B896 Huawei P8Lite Via TWRP Recovery.

Update EMUI 4.1 Huawei P8Lite. The following guide will show you how to update stock EMUI 4.1 on Huawei P8Lite. We use TWRP recovery to install or flash this zip file. Make sure the TWRP recovery already installed on your device. If TWRP is not installed yet, you can try to read the following guide to install it on your phone (how to install TWRP recovery on Huawei P8ite). EMUI update is one of the requirements to upgrade Huawei P8Lite to GZOSP Android Oreo 8.0.

Ok, let's the tutorial begin.

Prerequisite.

  • Stock EMUI 4.1
  • Enable USB debugging on your phone.
  • D0wnl0ad ADB and fastboot from Here 
  • Enable OEM unlock
  • TWRP recovery already installed on Huawei P8Lite. See this guide how to do it?

Installation Guide.

1. Reboot into Fastboot Recovery.

  1. Connect your Huawei P8Lite to the computer via USB cable.
  2. Copy Stock EMUI 4.1 to the internal phone storage.
  3. Boot your device into fastboot recovery.
    • Open a command prompt from ADB and fastboot folder. 
    • Press and hold shift + right click
    • Select open command here
    • Type the following command.
      • adb device
    • If your device successfully connected, you will see a device ID number at the command prompt.
    • Then type the following command to reboot into fastboot recovery.
      • adb reboot recovery
    • Now your device will reboot into TWRP recovery
  4. Done

2. Flash EMUI 4.1

  1. Once your device successfully reboots into TWRP recovery, you will see the following image comes up on your screen.
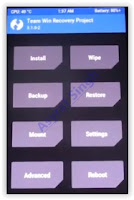
    how to enter recovery mode huawei P8Lite
    enter recovery P8Lite
  2. Tap Wipe
  3. Tap Factory Reset - Swap to Wipe - Tap Back to the main menu
  4. Tap Install.
  5. Then browse to find EMUI 4.1 Zip (B895_update.zip or B896_update.zip)
  6. Once this file found, now swap to confirm flash.

Thursday, 23 November 2017

How to Upgrade Huawei P8Lite to GZOSP Android Oreo 8.0

How to Upgrade Huawei P8Lite to GZOSP Android Oreo 8.0.

GZOSP Oreo on Huawei P8Lite. Feel the experience of the latest Android operating system on your Android phone is a fun thing. from one of the surdu_petru threads present in the XDA forum, the idea for the following guides comes up. In this guide, we will simply explain How to Upgrade Huawei P8Lite to GZOSP Android Oreo. This is not an official ROM, but this is The Ground Zero Open-Source Project (GZOSP) ROM. Because this is not official ROM, you will definitely find some features that are not working properly.

Below is a list of some features that really working on your Android Oreo Huawei P8Lite devices.
  • Touchscreen - Working
  • GPS - Working
  • WiFi - Working
  • adb & mtp connectivity -working
  • Audio & Video playback - working
  • Internal & External Storage - working
  • Lights - working
  • Bluetooth - not working
  • NFC Connectivity - not working
  • Radio Interface Layer - not working
  • Camera - not working
  • Sensor - not working
    Huawei P8Lite Android Oreo
    Huawei P8Lite Android Oreo

Prerequisite.

  1. Downl0ad Gzosp-alice-8.0.Beta.zip Here
    • md5 : 114e72d50148c24a991f4e2209603ad3
  2. TWRP must be installed on your Huawei P8lite. See this guide on how to install TWRP on Huawei P8Lite. 
  3. The Bootloader is Unlocked. See this guide to unlock bootloader Huawei phone.
  4. Your device must be updated to EMUI 4.1

Installation.

  1. Make sure your battery is fully charged, or at least have half of full battery capacity.
  2. Boot your device into TWRP recovery.
  3. If your device didn't come from AOSPA/RROS Android N, you need to format data into TWRP.
  4. Now, perform a factory reset on your P8Lite.
  5. Then, install GZOSP ROM via TWRP recovery.
  6. At last, reboot your device into the system.
  7. Enjoy it.

Monday, 20 November 2017

Guide | Install Android Oreo on Huawei Honor 9 Smartphone.

Guide | Install Android Oreo on Huawei Honor 9 Smartphone.

Android Oreo Huawei Honor 9. By default, Huawei Honor 9 Smartphone comes with Android 7.0 (Nougat). And now, we try to install Android Oreo on this device. This trick comes from the XDA forum proudly presented by XDA member, OldDroid. You must read carefully this article, in order to get the best result on your upgrade. And you need to know, all the risks that occur after installing Android Oreo on Huawei Honor 9 are your own responsibility.

Make sure device is Huawei Honor 9 to follow this guide, here are some specifications about Honor 9. This device is released on 2017, July. Comes with 5.15 inches LTPS IPS LCD capacitive touchscreen, 16M colors. Powered by Octa-core (4x2.4 GHz Cortex-A73 & 4x1.8 GHz Cortex-A53) CPU, HiSilicon Kirin 960 Chipset, and Mali-G71 MP8 GPU.

Now, just follow this step by step guide.

Prerequisite.

  1. At least 8 GB MicroSD card.
  2. D0wnload the C432 firmware and extract it from Here.
  3. Once it successfully downloaded, you must extract to the root of your MicroSD.
  4. Other files needed for this process are available at this Here.
  5. Make sure ADB installed on your computer. If not, you can see this guide.

Instruction guide.

First Part.

  1. Put the Firmware on MicroSD card.
  2. Then, if your device run Android Nougat you must flash TWRP via Fastboot. See this guide on how to flash TWRP recovery Huawei Honor 9.
    • twrp-3.1.1-nougat-stf.img
  3. This TWRP file also available at prerequisite no. 4 above.
  4. Then, boot your Huawei Honor 9 to the recovery and connect your smartphone to the computer.
  5. Once your phone connected. Now start the command prompt to activate ADB shell. How to do it?
    • Press and hold shift + right click, and click open command prompt here.
    • You can perform this task where the ADB folder is located.
  6.  Then execute the following commands.

    • dd if=/external_sd/STF_RECOVERY_NoCheck.img of=/dev/block/bootdevice/by-name/recovery_a

      dd if=/external_sd/STF_RECOVERY_NoCheck.img of=/dev/block/bootdevice/by-name/recovery2_a
      echo --update_package=/sdcard/update.zip > /cache/recovery/command
      echo --update_package=/sdcard/update_data_full_public.zip >> /cache/recovery/command
      echo --update_package=/sdcard/update_full_STF-L09_hw_normal.zip >> /cache/recovery/command
  7. Then reboot your Honor 9 via shell ADB, type the following command to do it.
    • reboot recovery
  8. At this step, the installation should start, and then boot your Huawei Honor 9 into Android Oreo. But this step is not done yet.

Second Part.

  1. Now your Huawei Honor 9 is run on Android Oreo.
  2. In this part, you will see that boot animation is missing, and few other things don't work properly.
  3. Then, you must install TWRP for Android OREO on your Huawei Honor 9 using this command. See this guide how to flash TWRP recovery Huawei Honor 9.
    • fastboot flash recovery_ramdisk twrp-3.1.1-oreo-stf.img
  4. This TWRP file also available at prerequisite no. 4 above.
  5. Then, Boot your Huawei Honor 9 into TWRP and flash the provided SuperSU zip
  6. You can use root browser - free or root explorer - paid or any root browser to open it.
  7. Go to /cust/hw rename "normal" folder to "eu" (without the quotes)
  8. Then go to /version/special_cust/STF-L09/hw rename "normal" folder to "eu" (without the quotes)
  9. Now, reboot your Huawei Honor 9.

Third Part.

  1. Actually, this part is not needed, but it's recommended.
  2. First thing you need to take action at the 3rd part is flash stock ramdisk to ramdisk partition using fastboot, type the following command at the fastboot;
    • fastboot flash ramdisk RAMDISK.img
  3. Then, flash stock recovery ramdisk using fastboot, for that you must type this command.
    • fastboot flash recovery_ramdisk RECOVERY_RAMDISK.img
  4. RAMDISK.img and RECOVERY_RAMDISK.img file also available at prerequisite no. 4 above.
  5. Then, boot your Huawei Honor 9 into recovery. How to do it?
  6. Once your Huawei Honor 9 enter recovery mode. Now, you must perform a factory reset.
  7. Reboot your phone, then setup your device.