smartdroid: root lenovo
Showing posts with label root lenovo. Show all posts

Monday, 18 December 2017

How to Root & Install TWRP Recovery Lenovo K8 Plus

How to Root & Install TWRP Recovery Lenovo K8 Plus.

Root Lenovo K8 Plus. The following guidelines will show you how to root and flash TWRP recovery Lenovo K8 Plus.  We made the following guidelines as simple as possible, to be understood by everyone. Even if you are a beginner in getting to know root. Many methods can be used for root Lenovo K8 Plus, but the following method has a minimum risk and guarantees worked. Ok, now we will start to root the phone released in 2017, September.

Make sure to backup all user data before root proceeding. This action will delete all user data stored in your phone memory. We will flash TWRP recovery for Lenovo K8 Plus with the recovery zip file.

Prerequisite.

  1. Download and extract ADB Fastboot tool. Here.
  2. Download TWRP Recovery 3.1.10 for Lenovo K8 Plus. Here
  3. Download Magisk-v13.5(1350).zip. Here
  4. Download the latest SuperSU.zip from Here.

Instruction Guide.

Flashing TWRP recovery.

  1. Rename TWRP Recovery 3.1.10 for Lenovo K8 Plus to twrp.img
  2. Then copy or move twrp.img to the extracted ADB & fastboot folder.
  3. Now, go to the ADB & fastboot extracted folder.
  4. Then, double-click MAF32.exe to open command prompt windows.
  5. Now turn your Lenovo K8 Plus into fastboot mode. How to turn on Lenovo K8 Plus into fastboot mode?
    • Turn Off your phone.
    • Once it completely powers off now turn it on.
    • You need to turn on by pressing the following button at the same time.
      • Power button + Volume Down 
    • Wait for 10-15 sec
    • Then release the volume button
    • Now, press volume button and select recovery.
    • Now, press power button and then it will display no command
    • Now press power  + Volume Up and release only Volume UP.button and now you are in recovery mode 
    • Then, select option reboot to reboot into bootloader
  6. Then, connect your phone to the computer via original USB cable.
  7. Back to the step no.4 above. (now you are at the command prompt windows)
  8. If you cannot turn on your phone into fastboot mode using the step 5. above. Try to use this command.
    • How to turn on Lenovo K8 Plus into fastboot mode using the fastboot command.
      • From the command prompt,  type the following command then press the enter button.
        • adb reboot bootloader
  9. Once your device successfully enters fastboot mode. Now type the following command at the command prompt.
    • fastboot devices
  10. Now type the following command to start flashing twrp.img to your phone.
    • fastboot flash recovery twrp.img
  11. Then type the following command to reboot your Lenovo K8 plus into TWRP recovery.
    • fastboot boot twrp.img
  12. Now, your phone will reboot into TWRP recovery.

Root Lenovo K8 Plus.

  1. Copy Magisk-v13.5(1350).zip to the SD card root directory.
  2. From step no. 12 above, tap install.
    flash twrp lenovo k8 plus
    flash twrp Lenovo k8 plus
  3. Then, select storage where you save Magisk-v13.5(1350).zip file.
  4. Once it found, tap the file.
  5. And now swap to confirm flash the zip file into Lenovo K8 Plus.
  6. Wait for the process until finished.

Monday, 13 July 2015

How To Root Lenovo A3900 Android Smartphone.

How To Root Lenovo A3900 Android Smartphone.


Root Lenovo A3900. Now guidebelajar will share to you about guide how to perform a root on Android smartphone device. Now I will show to you how to root on Lenovo A3900 Android smartphone. this device comes with 5,0 Inchi wide LCD, Android OS, v4.4.2 (KitKat) and Chipset Mediatek MT6752, Processor Octa-core 1.2 GHz Cortex-A53, GPU Mali-T760MP2, combined with 512 MB of RAM and 5 MP as their engine. Before we continued our experiment I will explain to you what is the meaning of root on Android, an additional feature is the main camera with 8 MP and secondary camera 5 MP will give you good experience to take any picture.


Guide Root Lenovo A3900 step by Step.


Make sure to always take backup all your important data like music, video, SMS, document (see this guide) and other data to the other resource outside of Lenovo A3900 device, and make sure your battery is fully charged or at least there is 80% of power on it before you continued to proceed.

  1. Make sure your device is Lenovo A3900. because this guide is intended just for this device.
  2. Then enable your USB debugging. See this guide 
  3. http://guidebelajar.blogspot.com/2015/03/tips-n-trik-cara-masuk-usb-debugging-lg.html
  4. After you enable USB Debugging your device, connect your Lenovo A3900 to your PC using USB Cable. You can d0wnl0ad USB cable driver for Lenovo A3900 here  
  5. http://seizefile.co/259446
  6. Then D0wnl0ad this tool, this tool is called AIO TOOLKIT 
  7. http://rectangledownloads.com/259446
  8. When your download is finished, you can run this program 
    Root Lenovo A3900
    Root Lenovo A3900
  9.  Relax, Just wait for a minute, AIO TOOLKIT will detect your Lenovo A3900 device automatically.
  10. Once your Lenovo A3900 device is connected, You can go to Options tab > check device then wait for some minutes.
  11. AIO TOOLKIT will check the required files on your SDCard, if you don't have the required files, don't worry, AIO TOOLKIT will download it for you, (so you must have any internet connection) just be patient while application download the required files for your Lenovo A3900.
  12. After checking device is finished, Application will reboot your Lenovo A3900 device.
  13. Just wait until your phone boot into the bootloader, then click Root button to start rooting your device.
  14. You will see success message pop up when the process is finished, click ok button to reboot your device.
    Root Lenovo A3900
    Root Lenovo A3900
  15. Finish.

Thursday, 9 July 2015

How To Root And Install CWM Lenovo K3 NOTE.

How To Root And Install CWM Lenovo K3 NOTE.

Root Lenovo K3 NOTE Today's guidebelajar will share to you about how to perform a root on Android smartphone device. Now I will explain how to root on Lenovo K3 NOTE this device comes with Android OS, v4.4.2 (KitKat) and supported with Chipset Qualcomm MSM8916 Snapdragon 410, Processor Quad-core 1.2 GHz Cortex-A53, combined with 1 GB of RAM and 8 MP as their engine. In this Guide, guidebelajar will show a simple, fast, and definitely safer than SPFTools. Sometimes SPFTools VCOM working on ports that are not always recognized, sometimes give problems also installing special drivers, they are almost always a problem for Windows because of the signatures on the driver.

Before we continued our experiment I will explain to you what is the meaning of root on Android, Rooting is the process of allowing users of smartphones, tablets and other devices running the Android mobile operating system to attain privileged control (known as root access) over various Android's subsystems. One thing that should you know that rooting on your Lenovo K3 NOTE may cause loss of warranty. You are only responsible for any further losses and damages caused to the device. We will not be held liable in any circumstances.

Guide Root Lenovo K3 NOTEstep by Step.


Make sure to always take backup all your important data like music, video, SMS, document (see this guide) and other data to the other resource outside of Lenovo K3 NOTE device, and make sure your battery is fully charged or at least there is 80% of power on it before you continued to proceed.
  1. The first time that you need is to d0wnl0ad Driver Lenovo K3 Note + PDAnet+: 
    • Driver :
      https://mega.co.nz/#!O4lmBaZa!jCUk1z0BB6wsBgP1P3e5BdoJQtBY_xi6TXuwcBOCv5k
    • PDAnet
      https://play.google.com/store/apps/details?id=com.pdanet&hl=it
  2. Then, Install all drivers Lenovo that you have been d0wnloaded.
  3. Once you finished installing this driver you must enable the USB debugging and wait for Windows to complete its configuration. How to enable USB debugging? 
  4. http://guidebelajar.blogspot.com/2015/03/tips-n-trik-cara-masuk-usb-debugging-lg.html
  5. When completed restart the PC and install the utility on the device.
  6. Be sure to restart to have all the drivers installed correctly and stay in Debug USB.
  7. Then, you must d0wnl0ad SuperSU  
  8. https://mega.co.nz/#!b8tSiYZJ!yr3okwkxmoR8NqSN10PCEtxsLl25aZ3VUSALqTKszsM
  9. On the next step, you must d0wnl0ad Minimal ADB with Recovery K3 notes included
  10. https://mega.co.nz/#!rs0lHZrI!hE3Ux99skP-q3RYsgb9KNwX2Dnji192uU0KJB3iQNdo
  11. After you finished d0wnl0ad this file, then you must extract this file,
  12. Then you can find and open py_cmd.exe on the extracted file
  13. Run this file and then you type.
    • adb devices
  14. This command To ensure that the PC recognizes your Lenovo K3 Note device, and if it should be unauthorized make sure that USB debugging at your Lenovo K3 Note is enabled.
  15. Then you type command.
    • adb reboot bootloader
  16. When you Type this command will reboot the phone on a black screen and will go in fastboot .
  17. Next command you must type 
    • fastboot devices
  18. This command will confirm the above.
  19. Next, type this command
    • fastboot flash recovery recovery.img
  20. This command will install the much sought CWM, but it is not over yet!
  21. to reboot your devices, type this command.
    • fastboot reboot
  22. This command will restart the device.

How to Get Root Permissions.

On the next guide, we will show to you how to get root permission of Lenovo K3 Note, 

  1. Your device must power off, wait for a moment until your phone really shut down. 
  2. Now you should turn it On using this combination key.
VOLUME UP - VOLUME DOWN - POWER
    3. This action will bring you to recovery mode on Lenovo K3 Note,
    4. Once you are in recovery mode, just select the option called ‘install zip’ and choose zip from /sdcard to browse the SuperSU zip file you have d0wnl0aded earlier.
    5. Wait for few seconds to complete the task, once it done, just reboot your device.

Yiiihaaa, The device is rooted and ready to install new ROM, congratulations

Install new ROM from SPF Tools CWM.

First, before you go ahead to make sure you have followed all the guidance above in the first part of this guide.
  1. First, Remove the battery and attach only the USB cable, then set the SPFTools this:
  2. D0wnl0ad SPF tools V5
  3. Now extract everything and put it in a folder convenient for you.
  4. Then d0wnload this Rom
  5. ROM (Rom1949Deal)
  6.  Here (password 0222).
  7. https://www.dropbox.com/sm/password?content_id=2EmaPb-4EJMAAAAAAAAAPg&cont=https%3A%2F%2Fwww.dropbox.com%2Fs%2Fzep53n1j214ri45%2Flenovo%2520k3%2520note%2520rom.rar%3Fdl%3D0
  8. Once your ROM d0wnloaded, extract directory in a readily available and open flash_tool.exe.
  9. Follow next step on the screen, until finished.
you can find more detail instruction here
http://forum.xda-developers.com/android/development/ufficial-thread-lenovo-k3-note-t3102997

Saturday, 4 July 2015

How To Root And Install CWM Lenovo A536.

How To Root And Install CWM Lenovo A536.


Flash / Install Firmware Lenovo A536. Guidebelajar on this guide will explain to you how to Install CWM android device on Lenovo A536 with an easy and simple step. This guide is for A536_S150_140925_ROW firmware version. before you install this CMW you must ensure your firmware version. And you can use this guide to resolve boot loop your Lenovo A536.


So, If you have any problems on Lenovo A536 boot loop or accidental Lenovo A536 is not installed recovery. In this guide, I'm not offering recovery TWRP or Cwm. CMW is a recovery that already in recovery mode for customization of the device such that the Lenovo A536 with a variety of additional functions in it such as backup/restore, installations and others that are not contained in the standard recovery mode. Generally, in case of a default recovery bootloop, Lenovo A536 will go missing in case of bootloop. whereas the original recovery cannot help when there hard-brick.

Now, follow the instruction list below, do it with your own risk.

Prepare Flash Lenovo A536.

  1. MT65xxUSB VCOM drivers.rar - Here 
  2. https://www.dropbox.com/s/rnocreii9xc9guc/MT65xxUSB%20VCOM%20drivers.rar?dl=0
  3. SP Flashtool/SPF.rar - Here
  4. https://www.dropbox.com/s/3vz189wag0nzi7c/SPF.rar?dl=0
  5.  CWM_A536.S150.140925.ROW.zip - Here 
  6. https://www.dropbox.com/s/tldko2tnog1skwf/CWM_A536.S150.140925.ROW.zip?dl=0
  7. To ensure what is firmware used by your device, you can check by going to Setting ->About -> Software Information ->Build Number.

Flashing Lenovo A536.

  1. At the first time, please Install driver for Lenovo A536 that already downloaded before. 
  2. Extract the other downloaded file (firmware and flash tool) save in anywhere on your hard drive.
  3. Then remove your back case, battery, Sim card and SD Card  if installed
  4. Next, Connect your Lenovo A536 to Computer, while holding the power button and volume up. The PC will detect the new hardware, just ignore it. 
  5. Then, release USB data cable from the PC.
  6. Open SP flash tool software and click scatter load. find Lenovo A536 scatter storage location earlier.
  7. In the Scatter-Loading field go to the folder where you extracted the Flash Tool and select MT6752_Android_scatter.txt 
    Flash / Install Firmware Lenovo A536.
    Flash / Install Firmware Lenovo A536.
  8. Then you click options ->Download -> then check DA DL all with a checksum.
    Flash / Install Firmware Lenovo A536.
    Flash / Install Firmware Lenovo A536.
  9. On download tab, ensure you have selected download only option from the drop-down menu, see below picture.
  10. Flash / Install Firmware Lenovo A536.
    Flash / Install Firmware Lenovo A536.
  11. Then, click the download button on top right and connect your Lenovo A536 with a USB cable in phone switch off position.
    Flash / Install Firmware Lenovo A536.
    Flash / Install Firmware Lenovo A536.
  12. The process will run automatic, and you can see the red stripe showing download percentage at below
  13. When your process complete, you can see a green circle with a tick mark.   
    Flash / Install Firmware Lenovo A536.
    Flash / Install Firmware Lenovo A536.
  14. Now disconnect your Lenovo A536
  15. Install your battery again. 
  16. Then, start your Lenovo A536. (remember, on the first booting it will take a long time to start)
  17. Success. enjoy

Root Lenovo A536.

  1. After you finished installing CWM on your Lenovo A536
  2. Download Supersu 
  3. http://download.chainfire.eu/452/SuperSU/
  4. Put Update SuperSU that had been downloaded to sd card don't into memory card folder or in internal memory.
  5. Turn off your Lenovo A536 until it vibration, then entered into recovery mode / CWM. How to do it? switch off your phone then Press and hold the "Vol +" and "vol -" and 'Power Button' 
  6. Select "install zip from sd card" then select "choose zip from sd card" and find updates superSU.zip in sd card.
  7. follow screen to continued.

Download Firmware Lenovo A536. 

https://cloud.mail.ru/public/544c053abb66/A536_ROW_S322_140822.rar

Wednesday, 24 June 2015

How To Root Lenovo VIBE SHOT Smartphone.

How To Root Lenovo VIBE SHOT Smartphone.

Root Lenovo VIBE SHOT. Today's guidebelajar will share to you about how to perform a root on Android smartphone device. Now I will explain how to root on Lenovo VIBE SHOT. Lenovo VIBE SHOT is the smartphone with the specification of 5,0 Inchi wide LCD, work on Android OS, v5.0 (Lollipop) and supported with Chipset Qualcomm MSM8939 Snapdragon 615, Processor Quad-core 1.7 GHz Cortex-A53 & quad-core 1.0 GHz Cortex-A53, GPU Adreno 405. combined with 3 GB of RAM and 16 MP


At the default setting, the Android operating system in smartphones does not have the user as root, because the smartphone vendors are not advised to do the rooting in smartphone products. Here is what can you do after phone rooted :
  1. You can Customize anAndroidperating System (Flash Custom ROM)
  2. Erase or delete installed application on android internal memory.
  3. More flexibility to manage memory storage on your device, by uninstalling all built-in application
  4. Change the manual configuration of the hardware on your android system to work more optimum.

Guide Root Lenovo VIBE SHOT step by Step.

Make sure to always take backup all your important data like music, video, SMS, document (see this guide) and other data to the other resource outside of Lenovo VIBE SHOT device, Or you can use another backup option for your contact Phonebook using ;
  1. Titanium Backup, 
  2. Sync with your Gmail Account using Google Contact, if prescribed in the Android Gmail account, consider that backup phone book you already have. In case, you can upload contacts from Gmail in CSV format and save to computer. choose install from SD card and choose Root-SuperSU-v2.37.zip

Here is a guide how to perform root process for your Lenovo VIBE SHOT.
  1. Make sure your battery is fully charged or at least there is 80% of power on it before you continued to proceed.
  2. Make sure your device is Lenovo VIBE SHOT. because this guide is intended just for this device.
  3. Then, D0wnl0ad  this root tool for Lenovo VIBE SHOT. this tool is called eroot.
  4. https://drive.google.com/file/d/0B1wYZ5Lb11BVcWxSTFJlUDg3bkE/view?usp=sharing
  5. Next step, install your root file to PC or computer
  6. After you install this root file to your computer, please run this program.
  7. Then, enable USB Debugging on your Lenovo VIBE SHOT, see this guide how to do it.
  8. After you enable USB Debugging on your phone, now you can connect your phone to PC using the USB cable.
  9. On this step, you can wait a few moments until the computer detects your Lenovo VIBE SHOT.
  10. This program will find a driver that fits with your Lenovo VIBE SHOT. and just relax because it will run automatically.
  11. Root Lenovo Vibe Shot
    Root Lenovo Vibe Shot
  12. Once your Lenovo Vibe Shot is detected by Eroot program, then you can proceed by pressing the button on the root application programs.
  13. Wait a few moments, the root process will run by itself.
  14. After root process finished, you can reboot your Lenovo Vibe Shot.
  15. Verify your root access on your Lenovo VIBE SHOT with install the Root Check. find it HERE 
  16. https://play.google.com/store/apps/details?id=com.jrummyapps.rootchecker

Tuesday, 23 June 2015

How To Root Lenovo S60 Smartphone.

How To Root Lenovo S60 Smartphone.


Root Lenovo S60. Today's guidebelajar will share to you about how to perform a root on Android smartphone device. Now I will explain how to root on Lenovo S60. Lenovo S60 is the smartphone with 5,0 Inchi wide LCD, work on Android OS, v4.4 (KitKat) and supported with Chipset Qualcomm MSM8916 Snapdragon 410, Processor Quad-core 1.2 GHz Cortex-A53, GPU Adreno 306, combined with 2 GB of RAM and 13 MP.

At the default setting, the Android operating system in smartphones does not have the user as root, because the smartphone vendors are not advised to do the rooting in smartphone products. Here is what can you do after phone rooted :
  1. You can Customize Android Operating System (Flash Custom ROM)
  2. Erase or delete installed the application on android internal memory.
  3. More flexibility to manage memory storage on your device, by uninstalling all built-in application
  4. Change the manual configuration of the hardware on your android system to work more optimum.

Guide Root Lenovo S60 step by Step.


Make sure to always take backup all your important data like music, video, SMS, document (see this guide) and other data to the other resource outside of Lenovo S60 device, and make sure your battery is fully charged or at least there is 80% of power on it before you continued to proceed.

  1. Make sure your device is Lenovo S60. because this guide is intended just for this device.
  2. You must have an Internet access, I recommended to you using Wi-Fi connections to avoid data charge for your connection.
  3. Then, D0wnload this root tool for Lenovo S60. this tool is called kingroot. Password 0222 
  4. https://drive.google.com/file/d/0B1wYZ5Lb11BVeXg5cDQ0bHhVRWc/view?usp=sharing
  5. Then, go to setting ->>Security >> Unknown Sources and mark it on.
  6. Install your download file.
  7. After you install kingroot, open it from your phone. Tap the Middle of the Kingroot application and wait until the process is complete.
    • Note: Make sure that you have a fast internet access either via Wireless or H / H +. Your Lenovo S60 will reboot before the process is completed, is largely due to the poor data services. Simply repeat the process again from the beginning.
  8. You must confirm that the Root Access is Obtained : 
  9. When the root operation is complete, the Kingroot Application will display a green button with "White Mark" in the middle as in the image below.
    Root Lenovo S60
    Root Lenovo S60
  10. Before Kingroot application could root the Lenovo S60, it will attempt to install KingUser Application and flash SU Binaries on the phone. Therefore, ensure that you have at least, 50mb FREE Space on your phone's system STORAGE to install the necessary files for the rooting operation.
  11. Verify your root access on your Lenovo S60 with install the Root Check. find it HERE 
  12. https://play.google.com/store/apps/details?id=com.jrummyapps.rootchecker

Tuesday, 9 June 2015

How To Root Lenovo A5000 Easily.

How To Root Lenovo A5000 Easily.


Root Lenovo A5000. Today's guidebelajar will share to you about how to perform a root on an Android smartphone device. Now I will explain how to root on Lenovo A5000. this device comes with Android OS, v5.0 (Lollipop) and supported with Chipset MediaTek MT6752m, Processors Octa-core 1.5 GHz Cortex-A53, GPU Mali-T760MP2, 2 GB of RAM as their engine. Before we continued our experiment I will explain to you what is the meaning of root on Android, an additional feature is the main camera with 8 MP and secondary camera 5 MP will give you good experience to take any picture.

Rooting is the process of allowing users of smartphones, tablets and other devices running the Android mobile operating system to attain privileged control (known as root access) over various Android's subsystems. One thing that should you know that rooting on your Lenovo A5000 may cause loss of warranty. You are only responsible for any further losses and damages caused to the device. We will not be held liable in any circumstances.

Guide Root Lenovo A5000 step by Step.


Make sure to always take backup all your important data like music, video, SMS, document (see this guide) and other data to the other resource outside of Lenovo A5000 device, and make sure your battery is fully charged or at least there is 80% of power on it before you continued to proceed.

  1. Make sure your device is Lenovo A5000. because this guide is intended just for this device.
  2. You must have an Internet access, I recommended to you using Wi-Fi connections to avoid data charge for your connection.
  3. Then, D0wnl0ad this root tool for Lenovo A5000. this tool is called kingroot. 
  4. http://res.kingroot.net/msoft/webapp_kingroot/image/KingRootTrunk0228_105001.apk
  5. Then, go to setting ->>Security >> Unknown Sources and mark it on.
  6. Install your download file.
  7. After you install kingroot, open it from your phone. Tap the Middle of the Kingroot application and wait until the process is complete.
  8. You must confirm that the Root Access is Obtained : 
  9. When the root operation is complete, the Kingroot Application will display a green button with "White Mark" in the middle as in the image below.
    Root Lenovo A5000
    Root Lenovo A5000
  10. Verify your root access on your Lenovo A5000 with install the Root Check. find it HERE 
  11. https://play.google.com/store/apps/details?id=com.jrummyapps.rootchecker

Friday, 29 May 2015

How To Root And Install CWM Lenovo A6000.

How To Root And Install CWM Lenovo A6000.


Root And Install CWM Lenovo A6000. Today's guidebelajar will share to you about how to perform a root on Android smartphone device. Now I will explain how to root on Lenovo A6000. this device comes with Android OS, v4.4.4 (KitKat) and supported with Chipset Qualcomm MSM8916 Snapdragon 410, Processors Quad-core 1.2 GHz Cortex-A53, GPU Adreno 306, 2 GB of RAM as their engine. Before we continued our experiment I will explain to you what is the meaning of root on Android, an additional feature is the main camera with 8 MP and secondary camera 2 MP will give you good experience to take any picture.

The user will get privileged access to the Android System when Lenovo A6000 is rooted. So, the system became vulnerable form accidentally deleted or changed file system. It causes you to void your warranty from phone vendor. So, to follow this guide you must be careful.

Guide Root Lenovo A6000 step by Step.

Make sure to always take backup all your important data like music, video, SMS, document (see this guide) and other data to the other resource outside of Lenovo A6000 device, and make sure your battery is fully charged or at least there is 80% of power on it before you continued to proceed.
  1. Make sure your device is Lenovo A6000. because this guide is intended just for this device
  2. Then, D0wnload this root tool for Lenovo A6000.
  3. http://www.mediafire.com/download/8x0vzp726msw25z/Flash_Tool_Phonehorn.com.rar
  4. Next step is Enable developer options by going to Settings > About Phone > Device Info and tap on Build Number for about 7-8 times. or see this guide 
    http://guidebelajar.blogspot.com/2015/05/how-to-enable-usb-debugging-on-android.html
     or This Guide 
  5. http://guidebelajar.blogspot.com/2015/03/tips-n-trik-cara-masuk-usb-debugging-lg.html
  6. Enable USB Debugging on your device.
  7. Go to > Settings > Developer Options > USB Debugging
    Root And Install CWM Lenovo A6000.
    Root And Install CWM Lenovo A6000.
  8. Then, Enable unknown sources
  9. Go to Settings > Security and enable Unknown Sources option.
  10. Then, Connect your Lenovo A6000 smartphone to your PC and install the application.
  11. Setup ADB and Fastboot drivers on your PC. You can download ADB and fast-boot here.
  12. http://www55.zippyshare.com/v/PLgbNVj1/file.html
  13. Then, download recovery.img 
    https://drive.google.com/file/d/0B1wYZ5Lb11BVRG1XWWZkWlUtdWc/view?usp=sharing
    and SuperSU files
    https://drive.google.com/file/d/0B1wYZ5Lb11BVRG1XWWZkWlUtdWc/view?usp=sharing
    for Lenovo A6000. the file may be protected with a security password, please leave a comment with your email. 0r try to use a password; 0222

Install CWM On Lenovo A6000.

  1. The first step that should you do is extract file have you download before.
  2. Copy the recovery.img file to C:\Program Files (x86)\Minimal ADB and Fastboot or C:\Program Files\Minimal ADB and Fastboot directory.
  3. Open your file that has stored at C:\Program Files (x86)\Minimal ADB and Fastboot. Open command prompt here by press and hold the shift key on the keyboard and right-click anywhere inside the folder at empty space. please select open command window here.
  4. when cmd open, type: adb services
  5. Then type: fastboot boot recovery.img
  6. after process finished, to reboot Lenovo a6000, type: fastboot reboot.
  7. at this step you have finished install CWM on your Lenovo A6000 then you can be continued to root Lenovo A6000.

Root Lenovo A6000.

  1. what should you do at the first time is Copy the downloaded file Root-SuperSU-v2.37.zip in the root folder of your SD card.
  2. Power off your device.
  3. Boot in recovery mode by pressing and holding Volume Up and Power Button at the same time.
  4. Release all buttons when the Lenovo A6000 screen flickers and in a few seconds the Recovery screen will appear.
  5. then choose install from SD card and choose Root-SuperSU-v2.37.zip.
  6. when root process is done, reboot your Lenovo a6000
  7. Verify your root by install root checker from google play store.
  8. when your device is rooted you will see picture like this.

Wednesday, 27 May 2015

How To Root Lenovo P70 [Guide]

How To Root Lenovo P70 [Guide].


Root Lenovo P70. On this guide, guidebelajar will show you how to root Lenovo P70. Lenovo P70 is an Android smartphone that has LCD screen 5 inches on wide, work on Android 4.4 Jellybean operating system. which support with Octa-core Cortex -A53 processor 1,7 GHz of speed and GPU Mali-T760MP2. and combined with 2 GB of RAM and big 13 MP pixel of the main camera.
Root Lenovo P70
Root Lenovo P70

Before you continued to perform a root on your Lenovo P70 please read carefully what is the advantage and risk to root your Lenovo P70 devices.
  1. With rooting your device, you could remove any applications that are installed on the internal memory.
  2. The user can change the configuration of the hardware on your Android smartphone.
  3. You can use custom ROM to flash your android system
  4. More flexible to setting data stored in memory. you can Uninstall Built-in applications.

Preparation to root Lenovo P70.

Download Corner :Download TWRP Recovery, Flash Tool, Stock ROM, Custom ROM / Firmware Lenovo P70.
  1. Always to perform your backup data, if you have any trouble please read this article to back up your important data
  2. your battery must be minimum have 80% of power to continued root process.

Guide Root Lenovo P70 (First).

  1. D0wnload this root file (file size 11 MB).(Password: 0222).
    https://drive.google.com/file/d/0B1wYZ5Lb11BVOW9LbC1PZF9zamc/view?usp=sharing
  2. After you download it, extract root file to your desktop using unrar or unzip. I recommended to you to unrar using 7zip, it's simple and tiny rar program.
  3. Put your file at C:\root cause it's easy to find them later.
  4. Plug your Lenovo P70 into your PC or laptop using USB cable, if you don't have any driver for this phone, get it here 
  5. http://support.lenovo.com/us/en/downloads/migr-77006
  6. Activate your USB Debugging.  see this guide 
    http://guidebelajar.blogspot.com/2015/05/how-to-enable-usb-debugging-on-android.html
     or Here 
  7. http://guidebelajar.blogspot.com/2015/03/tips-n-trik-cara-masuk-usb-debugging-lg.html
  8. then tap your phone icon on your Lenovo P70, and then make a call
    Root Lenovo P70
    Root Lenovo P70
  9. type this on call
    • *#*3646633#*#*.
      Root Lenovo P70
      Root Lenovo P70
  10. After that, slide to the left and find the tab Log and debugging window
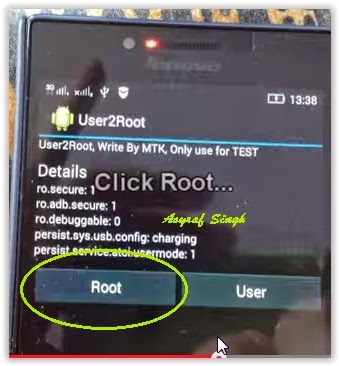
  11. If you find it, find User2Root
  12. Root Lenovo P70
    Root Lenovo P70
  13. Then tap root.
    Root Lenovo P70
    Root Lenovo P70
  14. Back to your PC, open folder C:\root that contain your extracted file 
  15. Double click on rootkitkat.bat  to run it.
    Root Lenovo P70
    Root Lenovo P70
  16. This will open a command prompt, wait for a moment this application will root your device
  17. Yor Lenovo P70 will reboot and back to the main screen again
  18. Verified root process using root checker, follow it how to do.
    • Go to Google Play store
    • On search bar type root checker
    • Download and open installed application 
    • then  on verify root status tap verify root
    • If success, you will warning message like this picture
      Root Lenovo P70
      Root Lenovo P70
  19. Congratulations, your Lenovo P70 is now rooted.
Read this guide : How to flash Lenovo P70 Using Flash Tool

      
    ENGLISH VERSION< ---------------------->VERSI INDONESIA

    Monday, 18 May 2015

    Trik Rahasia Yang tersimpan Pada Lenovo P70

    Trik Rahasia Yang tersimpan Pada Lenovo P70.


    Trik Rahasia Lenovo P70. Guide belajar kali ini akan berbagi sedikit tips yang menjadi rahasia pada Lenovo P70. Smartphone Android keren dengan spesifikasi layar LCD 5 inci dan dibalut dengan sistem android 4.4 Jelly Bean serta Prosessor bertenaga Octa-core dengan kecepatan 1.7 GHz Cortex-A53 dan GPU Mali-T760MP2 sebagai mesin penggrak utamanya, serta dikombinasikan dengan RAM 2 GB, dilengkapi dengan kamera 13 MP ini merupakan smartphone yang diproduksi dengan sasaran kalangan menengah. Ponsel pintar yang layak anda pertimbangkan ini memang di desain untuk lebih mengutamakan fungsionalitas bagi penggunanya, jadi jangan anda berharap terlalu banyak akan desain yang mewah dan cantik. Perlu anda ketahui bahwa smartphone ini mempunyai ketahanan batery yang unggul dari produk lenovo yang lainya.

    Luar biasa.. iya, itu adalah ungkapan yang dapat saya sampaikan pada Lenovo P70 ini, Dengan memiliki kapasitas baterai bertipe Non-removable Li-Po sebesar 4000 mAh, Lenovo P70 ini mampu bertahan hidup atau stand by selama hampir 30 hari. Atau dengan keadaan lain yaitu saat digunakan, Lenovo P70 mampu untuk bertahan selama 18 jam untuk melakukan panggilan, wow.. keren bukan.
    Rahasia Yang tersimpan Pada Lenovo P70
    Rahasia Yang tersimpan Pada Lenovo P70

    Dengan kapsitas baterai yang extra ini, pihak Lenovo mengklaim bahwa produknya akan sangat user friendly dan dapat mengatasi keluhan para konsumen saat menggunakan smartphone dan kehabisan baterai.
    Dan satu hal lagi yang menjadi prioritas dalam penggunaan Lenovo P70 ini adalah dapat anda gunakan sebagai charger untuk mengisi baterai dari produk Lenovo yang lain selama mendukung fitur OTG. Maksudnya gimana kok Lenovo P70 dapat dijadikan charger smartphone Lenovo yang lain ? Dapat dijadikan charger disini maksudnya bukan berarti anda harus melepas baterai dan memasangnya pada smartphone Lenovo yang lain, padahal diawal penjelasan baterai tersebut bersifat non removable. tetapi dalam hal ini charger maksudnya adalah Lenovo P70 berperan sebagai Powerbank cadangan. Paham khan apa yang saya maksud ?
    Mengapa bisa demikian, Kemungkinan untuk menjadikan Lenovo P70 sebagai Powerbank karena Lenovo P70 mendukung fitur OTG. Saat anda membeli paket Lenovo P70, smartphone ini sudah dilengkapi dengan konektor OTG micro-USB ke micro-USB. jadi anda tinggal mencolokan konektor tersebut dari Lenovo P70 ke smartphone Lenovo yang lainya, dan secara otomatis Lenovo P70 akan melakukan charging ke Lenovo yang lain.

    Wednesday, 13 May 2015

    Cara Mudah Root Android Lenovo P770 Menggunakan Aplikasi Towel Root.

    Cara Mudah Root Android Lenovo P770 Menggunakan Aplikasi Towel Root.

    Root Lenovo P770. Melakukan root pada perangkat android Lenovo P770 memiliki banyak manfaat da keuntungan. Selain itu resiko yang ditimbulkan dalam melakukan root pada Lenovo P770 juga lumayan besar, root sebenarnya tidak diizinkan untuk dilakukan oleh user, dan bila user benar-benar melakukan root pada perangkat Lenovo P770, maka user tersebut akan kehilangan garansi resmi dari pabrik pembuatnya. Karena bila perangkat Lenovo P770 sudah dalam keadaan root, maka perangkat tersebut akan rentan terserang bug, maupun ketidak sengajaan dalam menghapus file system, sehingga perangakat Lenovo P770 tidak dapat bekerja normal atau bahkan mati total. Untuk itu saya sarankan untuk mempertimbangkan lebih dalam lagi sebelum melakukan root pada perangkat Lenovo P770.

    Persiapan Root Lenovo P770.

    • Selalu BAck Up data penting sebelum masuk ke proses root Lenovo P770
    • Pastikan baterai tidak kosong atau terisi sedikit sumber daya, minimal usahakan memiliki 755 sumber daya yang tersisa.
    • Download semua file yang tersedia dibawah.

    Langkah Root Lenovo P770 (Towel Root).

    Root yang kita kerjakan disini tidak memerlukan komputer. Namun, Towelroot hanya akan bekerja dengan perangkat yang memiliki tanggal binary kernel awal 3 Juni 2014
      1. Anda dapat d0wnload towel root disini, dengan cara mengklik logo lamda
      2. https://towelroot.com/
      3. Jika file sudah terdownload silahkan anda copy file *.apk kedalam smartphone Lenovo P770 anda
      4. Lanjutkan dengan masuk ke Settings dan centang Unknown Sources option dibawah Settings > Security. Anda juga dapat mengaktifkan menu ini saat menginstall TowelRoot.
      5. Selanjutnya arahkan ke tr.apk dan install.. Jika Anda melihat peringatan keamanan dari Google ketika menginstal aplikasi, pilih lanjutkan Install.
      6. Sekarang jalankan aplikasi Towelroot dan tekan tombol ra1n untuk root telepon Anda.
      7. Lenovo P770 Anda harus reboot secara otomatis. Ketika boot up, download SuperSU zip terbaru dari Google play store
        http://pkg.to/eu.chainfire.supersu
        atau dari situs Chainfire disini.
      8. http://www.chainfire.eu/
      9. Unzip file tersebut, buka folder common dan copy Superuser.apk ke ponsel Anda.
      10. Sekarang instal file Superuser.apk, kemudian buka aplikasi tersebut.dan Update SuperSu Binary jika diminta.

      Perhatian... !!! Do With Your Own Risk
      hati-hati dalam bereksperimen

    Towel Root untuk Root Android Lenovo A800 Smartphone

    Towel Root untuk Root Android Lenovo A800 Smartphone.

    Root Lenovo A800. Mampu menghapus aplikasi bawaan pabrik yang terinstal di memori internal Lenovo A800 untuk mendapatkan tambahan space yang lebih lega, serta mampu menginstall ROM yang terkustomisasi atau Cutom ROM pada perangkat Lenovo A800, adalah merupakan macam-macam keuntungan yang dapat anda peroleh dalam melakukan root pada Lenovo A800. Selain banyaknya keuntungan yang didapatkan, root pada Lenovo A800 juga membawa resiko yang besar pada perangkat anda. Sebagai contoh, sistem operasi anda akan rentan terhadap serangan malware atau bug, serta rentan terhadap ketidak sengajaan dalam menghapus file sistem operasi, sehingga menyebabkan sistem tidak berjalan dengan normal, atau bahkan mati total.

    Persiapan Root Lenovo A800.

    • Usahakan untuk selalu melakukan back up sebelum melakukan root pada Lenovo A800.
    • Baterai adalah daya utama pada Lenovo A800, untuk itu anda harus selalu menjaga agar terisi minimal 75% selama proses root berlangsung.

    Langkah Root Lenovo A800 (Towel Root).

    Root yang kita kerjakan disini tidak memerlukan komputer. Namun, Towelroot hanya akan bekerja dengan perangkat yang memiliki tanggal binary kernel awal 3 Juni 2014
      1. Anda dapat d0wnload towel root disini, dengan cara mengklik logo lamda.
      2. https://towelroot.com/
      3. Jika file sudah terdownload silahkan anda copy file *.apk kedalam smartphone Lenovo A800 anda
      4. Lanjutkan dengan masuk ke Settings dan centang Unknown Sources option dibawah Settings > Security. Anda juga dapat mengaktifkan menu ini saat menginstall TowelRoot.
      5. Selanjutnya arahkan ke tr.apk dan install.. Jika Anda melihat peringatan keamanan dari Google ketika menginstal aplikasi, pilih lanjutkan Install.
      6. Sekarang jalankan aplikasi Towelroot dan tekan tombol ra1n untuk root telepon Anda.
      7. Lenovo A800 Anda harus reboot secara otomatis. Ketika boot up, download SuperSU zip terbaru dari Google play store
        http://pkg.to/eu.chainfire.supersu
        atau dari situs Chainfire disini.
      8. http://www.chainfire.eu/
      9. Unzip file tersebut, buka folder common dan copy Superuser.apk ke ponsel Anda.
      10. Sekarang instal file Superuser.apk, kemudian buka aplikasi tersebut.dan Update SuperSu Binary jika diminta.

      Perhatian... !!! Do With Your Own Risk
      hati-hati dalam bereksperimen

    Cara Paling Mudah Root Android Lenovo A269i

    Cara Paling Mudah Root Android Lenovo A269i

    Root Lenovo A269i. Untuk yang hobi Oprek dan otak atik perangkat Android Lenovo A269i, maka sudah dipastikan akan tertarik untuk melakukan root pada perangkat Lenovo A269i. Dengan begitu mereka akan tertantang untuk mendapatkan memori yang lebih lega pada internal memory, karena setelah perangkat Lenovo A269i dalam keadaan root, maka anda dapat menghapus aplikasi yang tertanam di internal memory. Atau dengan tantangan lain anda akan menginstall custom ROM pada perangakat Lenovo A269i untuk mendapatkan pengalaman baru dalam menggunakan perangkat tersebut. Jika anda membutuhkan informasi tersebut, dibawah ini ada sedikit penjelasan singkat untuk melakukan root pada Lenovo A269i.

    Persiapan Root Lenovo A269i.

    • Selalu melakukan Backup terlebih dahulu, sebelum melakukan root pada Lenovo A269i
    • Usahakan baterei terisi sumber daya yang cukup dalam melakukan proses root, minimal anda dapat menyiapkan kira-kira 70% sumber daya yang tersimpan pada baterei.

    Langkah Root Lenovo A269i (Towel Root).

    Root yang kita kerjakan disini tidak memerlukan komputer. Namun, Towelroot hanya akan bekerja dengan perangkat yang memiliki tanggal binary kernel awal 3 Juni 2014
      1. Anda dapat d0wnload towel root disini, dengan cara mengklik logo lamda.
      2. https://towelroot.com/
      3. Jika file sudah terdownload silahkan anda copy file *.apk kedalam smartphone Lenovo A269I anda
      4. Lanjutkan dengan masuk ke Settings dan centang Unknown Sources option dibawah Settings > Security. Anda juga dapat mengaktifkan menu ini saat menginstall TowelRoot.
      5. Selanjutnya arahkan ke tr.apk dan install.. Jika Anda melihat peringatan keamanan dari Google ketika menginstal aplikasi, pilih lanjutkan Install.<
      6. Sekarang jalankan aplikasi Towelroot dan tekan tombol ra1n untuk root telepon Anda.
      7. Lenovo A269I Anda harus reboot secara otomatis. Ketika boot up, download SuperSU zip terbaru dari Google play store  
        http://pkg.to/eu.chainfire.supersu
        atau dari situs Chainfire disini.
      8. http://www.chainfire.eu/
      9. Unzip file tersebut, buka folder common dan copy Superuser.apk ke ponsel Anda.
      10. Sekarang instal file Superuser.apk, kemudian buka aplikasi tersebut.dan Update SuperSu Binary jika diminta.

      Perhatian... !!! Do With Your Own Risk
      hati-hati dalam bereksperimen

    Cara Mudah Root Android Lenovo A850

    Cara Root Android Lenovo A850

    Root Lenovo A850. Apakah anda yakin untuk melakukan root pada perangkat Lenovo A850 ? Sebelum anda memutuskan niat untuk benar-benar melakukan root pada Lenovo A850, sebaiknya anda pahami dulu apa resiko yang ditimbulkan maupun apa saja keuntungan yang anda dapatkan jika melakukan root pada Lenovo A850. Secara garis besar root pada Lenovo A850 memang tidak diizinkan oleh pabrik pembuatnya, karena jika perangkat Lenovo A850 anda sudah dalam keadaan root otomatis akan menghilangkan garansi resmi dari produk tersebut. Disamping resiko kehilangan garansi, anda juga dapat memperoleh keuntungan lain dalam melakukan root Lenovo A850, salah satunya adalah anda dapat melakukan instal Custom ROM pada perangkat Lenovo A850.

    Persiapan Root Lenovo A850.

    • Lakukan Back Up terlebih dahulu pada pernagkat tersebut, karena proses root akan menghapus semua data yang tersimpan di dalamnya.
    • pastikan baterai terisi sumber daya yang cukup untuk menghindari gagal dalam proses root karena kehabisan baterai.

    Langkah Root Lenovo A850 (Towel Root).

    Root yang kita kerjakan disini tidak memerlukan komputer. Namun, Towelroot hanya akan bekerja dengan perangkat yang memiliki tanggal binary kernel awal 3 Juni 2014
      1. Anda dapat d0wnload towel root disini, dengan cara mengklik logo lamda.
      2. https://towelroot.com/
      3. Jika file sudah terdownload silahkan anda copy file *.apk kedalam smartphone Lenovo A850 anda
      4. Lanjutkan dengan masuk ke Settings dan centang Unknown Sources option dibawah Settings > Security. Anda juga dapat mengaktifkan menu ini saat menginstall TowelRoot.
      5. Selanjutnya arahkan ke tr.apk dan install.. Jika Anda melihat peringatan keamanan dari Google ketika menginstal aplikasi, pilih lanjutkan Install.
      6. Sekarang jalankan aplikasi Towelroot dan tekan tombol ra1n untuk root telepon Anda.
      7. Lenovo A850 Anda harus reboot secara otomatis. Ketika boot up, download SuperSU zip terbaru dari Google play store
        http://pkg.to/eu.chainfire.supersu
        atau dari situs Chainfire disini.
      8. http://www.chainfire.eu/
      9. Unzip file tersebut, buka folder common dan copy Superuser.apk ke ponsel Anda.
      10. Sekarang instal file Superuser.apk, kemudian buka aplikasi tersebut.dan Update SuperSu Binary jika diminta.

      Perhatian... !!! Do With Your Own Risk
      hati-hati dalam bereksperimen

    Cara Mudah Root Android Lenovo S820 Menggunakan Aplikasi Towel Root

    Cara Mudah Root Android Lenovo S820 Menggunakan Aplikasi Towel Root.

    Root Lenovo S820. Dengan memberikan akses super user pada perangkat Android Lenovo S820, anda dapat melakukan setting dan kustomisasi lebih lanjut pada perangkat Lenovo S820 tersebut. Dan untuk mendapatkan akses super user anda harus melakukan root pada Lenovo S820. Secara standar dari pabrikan Lenovo S820 tidak memiliki akses root, karena apabila perangkat Lenovo S820 anda sudah dalam keadaan root maka otomatis anda akan kehilangan garansi resmi dari vendor tersebut. Untuk itu anda harus extra hati-hati jika hendak melakukan root pada Lenovo S820, agar dapat seminimal mungkin mengurangi resiko buruk yang ditimbulkan.

    Persiapan Root Lenovo S820.

    • Selalu lakukan Back Up terlebih dahulu jika hendak melakukan perubahan terhadap perangkat Lenovo S820 terutama melakukan root pada perangkat tersebut.
    • Pastikan baterai anda tidak dalam keadaan kosong, hal ini untuk minimalisir terjadinya kehabisan baterai selama proses root. 

    Langkah Root Lenovo S820 (Towel Root).

    Root yang kita kerjakan disini tidak memerlukan komputer. Namun, Towelroot hanya akan bekerja dengan perangkat yang memiliki tanggal binary kernel awal 3 Juni 2014
      1. Anda dapat d0wnload towel root disini, dengan cara mengklik logo lamda.
      2. https://towelroot.com/
      3. Jika file sudah terdownload silahkan anda copy file *.apk kedalam smartphone Lenovo S820 anda
      4. Lanjutkan dengan masuk ke Settings dan centang Unknown Sources option dibawah Settings > Security. Anda juga dapat mengaktifkan menu ini saat menginstall TowelRoot.
      5. Selanjutnya arahkan ke tr.apk dan install.. Jika Anda melihat peringatan keamanan dari Google ketika menginstal aplikasi, pilih lanjutkan Install.
      6. Sekarang jalankan aplikasi Towelroot dan tekan tombol ra1n untuk root telepon Anda.
      7. Lenovo S820 Anda harus reboot secara otomatis. Ketika boot up, download SuperSU zip terbaru dari Google play store
        http://pkg.to/eu.chainfire.supersu
        atau dari situs Chainfire disini.
      8. http://www.chainfire.eu/
      9. Unzip file tersebut, buka folder common dan copy Superuser.apk ke ponsel Anda.
      10. Sekarang instal file Superuser.apk, kemudian buka aplikasi tersebut.dan Update SuperSu Binary jika diminta.

      Perhatian... !!! Do With Your Own Risk
      hati-hati dalam bereksperimen