smartdroid: root samsung
Showing posts with label root samsung. Show all posts

Monday, 14 May 2018

Guide to Root & Install TWRP Samsung Galaxy S9 and S9 Plus Exynos Chipset

Guide to Root & Install TWRP Samsung Galaxy S9 and S9 Plus Exynos Chipset

TWRP & Root Samsung S9 or S9 Plus. To day's we will show you step by step to root Samsung Galaxy S9 or S9 Plus. Many Android users ask, why do we have to root on the device?  Rooting your Samsung device or tablet gives you a full control over the system, and that power can be misused if you do not use it properly. Because you have a full access to the system directory, you can make changes to the way the Android OS operates. You need a tool called SuperSU, These tools are basically the gatekeeper of root access on your Samsung Android device. when you run the application and this application requests root access you must approve it using the root manager.

Simply, it can be interpreted as a device that already has root privileges can be installed in various kinds of custom ROM. This means you can install the latest Android operating system which may not have been released by the manufacturer. So your device will always get the update without waiting for update notice from the factory. And also you can enjoy the new experience using the latest software that is compatible with your S9 device.

In addition to having many advantages, root also poses a fatal risk on your device. Because the freedom to install any apps can cause you wrong in installing an app, or even making changes to system files which can cause the system to crash even bricked. So, if you are ready to follow the following guidelines make sure you are ready to accept all the risks posed.

Before this guide begins, first you should understand the Samsung Galaxy S9 specs. This phone released on 2018 March. Comes with 5.8 Inches Super AMOLED capacitive touchscreen, 16M colors, Powered by Exynos 9810 Octa chipset for EMEA, Octa-core (4x2.7 GHz Mongoose M3 & 4x1.8 GHz Cortex-A55) CPU, Mali-G72 MP18 GPU. This phone runs on Android 8.0 (Oreo). Supported by 4 GB of RAM and Non-removable Li-Ion 3000 mAh battery (11.55 Wh) of the battery.

Step By Step Root Samsung S9.

  1. Make sure to backup everything stored on the phone memory, everything will be deleted during the boot process. You can backup using Samsung smart switch, SD card or USB storage. If you're gonna use USB storage you can go ahead and use the OTG adapter that comes with your phone attached. You need to backup all important apps and app data.
  2. This guide work for the following phone model
    • Galaxy S9 – SM-G960F, SM-G960F/DS, Korean SM-G960N 
    • Galaxy S9 Plus – SM-G965F, SM-G965F/DS, Korean SM-G965N
      • So make sure your device is one of the supported models. How to check your phone model? From Settings - go to About phone and check your phone model number.
  3. Enable Developer Options, how to enable developer options Samsung S9 or S9 Plus?
    • Go to settings - About Phone - Software Information
    • Scroll down this screen and tap 7 times at build number until it says "you are a developer"
      developer option samsung S9
      developer option Samsung S9
  4. Then Enable OEM Unlock.
  5. Power off phone.
  6. Then, enter the phone into Download Mode and connect it to the computer via USB cable. How to bring your Samsung S9 or S9 Plus into download mode?
    • Press and hold Volume Down + Bixby Button + Power Button
  7. Hit the Volume Up button to put into “Download mode” then connect a USB cable from your phone to a Windows computer.
  8. File or tool needed for this actions.
    • Download ODIN v3.13.1 - here
    • Samsung USB driver - Here
    • RMM State Bypass zip - Here
    • Samsung Antiroot Removal Tool - Here
    • No Verify Encrypt zip - Here
    • TWRP.
      • TWRP Samsung Galaxy S9 - Here
      • TWRP Samsung Galaxy S9 Plus - Here
  9. Once all file successfully downloaded and save on the local computer, Now unzip the ODIN zip file FIRST then run the ODIN exe program.
  10. from the ODIN program windows, choose “AP button”, and choose the TWRP recovery file you downloaded from step no. 8.
    root samsung S9
    root Samsung S9
  11. Now click Start button to flash TWRP into your phone. 
  12. Once it has done, your phone will reboot and the screen goes blank. From this step immediately press and hold Volume Down + Bixby Button + Power Button for about 5 seconds.
  13. for the root process using TWRP, please watch the following video.
Video Guide.


Monday, 11 December 2017

Guide | How to Root Samsung Galaxy J5 2017 SM-J530F Run Android 7.0 Nougat.

Guide | How to root Samsung Galaxy J5 2017 SM-J530F Run Android 7.0 Nougat.

Root Samsung Galaxy J5 2017. The following guide will show you how to root and install TWRP recovery on Samsung Galaxy J5 2017 SM-J530F Using ODIN software. So, if you need this information, you can read this guide carefully in order to avoid your Samsung Galaxy J5 2017 brick or other risks. So, you must use your own risk and guidebelajar not responsible for bricking your phone. Rooting your Samsung J5 2017 with the following method will erase or wipe all data stored in the phone memory. We highly recommend to backup everything before perform it.

Now, we will root Samsung Galaxy J5 2017. This device released in June 2017. Comes with 5.2 inches, Super AMOLED capacitive touchscreen, 16M colors. Powered by Octa-core 1.6 GHz Cortex-A53 CPU, Exynos 7870 Octa chipset, Mali-T830 MP1 GPU, also supported by 3 GB of RAM. Samsung Galaxy J5 2017 has 13 MP on both second and primary camera. With Non-removable Li-Ion 3000 mAh battery. 

Prerequisite rooting and Installing TWRP Recovery on Samsung Galaxy J5 2017.

  1. Make sure your device is Samsung Galaxy J5 2017 to follow this guide.
  2. Then, you need to enable developer option your phone.
    • Settings -> About device
    • Then Tap 7 times on Build number to enable Developer options.
  3. Then, you need to Enable OEM to unlock and USB debugging options.
  4. Download the latest ODIN software. Here 
  5. Then, D0wnload and Install Samsung Mobile Phone Drivers: Here 
  6. Now you need to d0wnload  “twrp_3.1.1-1_j730gm_25817" Here
    • This is Unofficial release -TWRP recovery.
  7. D0wnload SuperSU HereThen copy to root of SD Card

Installation Guide.

How to Install TWRP recovery Samsung Galaxy J5 17.

  1. Or, you can continue with the following guide.
  2. Once all prerequisite above met, now boot your phone into Download Mode.

    • How to enter download mode Samsung Galaxy J5 2017?
      • Power Off phone
      • Press and hold the following button
        • Volume Down + Home Button + Power Button
  3. Once the warning screen comes up, press the Volume Up to continue. While connecting Samsung Galaxy J5 2017 to the computer.
  4. Now, go to the computer and run Odin software.

    • uncheck auto reboot on the options tab.
    • then click AP button to browse twrp_3.1.1-1_j730gm_25817
    • Once it loaded, you need to click the start button.

  5. Just wait for flashing twrp, until ODIN says PASS with the green button.

How to Enter TWRP recovery Samsung Galaxy J5 2017.

Once TWRP recovery successfully installed on your phone, now you can boot or enter your Samsung Galaxy J5 2017 into TWRP recovery with the following method.
  1. Power off Samsung Galaxy J5 2017.
  2. Then, power On again by press and hold the following button simultaneously.
    • Volume Down + Home Button + Power Button.
  3. Once Samsung Galaxy J5 2017 logo comes up, immediately press the Volume Up button.
  4. Now, release all button when your phone enters the TWRP main menu.

Root Samsung Galaxy J5 2017.

  1. Copy 'SuperSU.zip' to the external SD Card.
  2. Reboot Samsung J5 2017 into TWRP recovery.
  3. Flash SuperSu via TWRP recovery
    • Tap Install button from the TWRP main menu.
    • Then browse where you copy the SuperSU.zip file
    • Once it found, swap to confirm flash.
  4. Just wiat a minute beore everything ready.

Sunday, 7 June 2015

How To Root Samsung Galaxy A7 SM-A700FD, SM-A700H, SM-A7009, SM-A7000.

How To Root Samsung Galaxy A7 SM-A700FD, SM-A700H, SM-A7009, SM-A7000.


Root Samsung Galaxy A7. Today's guidebelajar will share about a guide on how to Root Samsung Galaxy A7 SM-A700F. Beware that root process on your android phone will void your warranty. And guidebelajar not responsible for bricked devices, boot loop, broken SD cards, because of your failed root process.
please bring your note if all file available in this guide How to Root Samsung Galaxy A7 SM-A700F is only applicable to the current type SM-A700F Kitkat, But, If you use Samsung Galaxy A7 SM-A700F for the other variant, You still can follow this guide. And you can find for a specific type of file according to your device. For other Samsung Galaxy A7 SM-A700F variant file, you can find the download link at the end of this guide.
Root Samsung Galaxy A7
Root Samsung Galaxy A7 

Warning : Before you following this guide How to Root Samsung Galaxy A7 SM-A700F, make sure you understand the benefits and risks of Root processes are going to do. We can not be responsible if there is damage in the your hardware or software caused to follow this guide How to Root Samsung Galaxy A7 SM-A700F.

Preparation Root Samsung Galaxy A7 SM-A700F.

  1. Make sure your Samsung Galaxy A7 SM-A700F battery is not in a state of the low battery, a minimum of 80%. If the battery runs out in the middle of the Root, it can lead to failure
  2. Always perform backup your important data before Root process, Although this process does not remove or delete the data in memory, Preferably in case if there is a failure and you have to Flash your phone.
  3. Make sure you have installed a Latest of Driver Samsung that support with your Smartphone, If you don't have, please download here or can also use the default application Samsung KIES.
  4. http://developer.samsung.com/technical-doc/view.do?v=T000000117
  5. Original USB cable driver for your Samsung Galaxy A7 SM-A700F.
  6. D0wnload and then Unzip root file (CF Auto ROOT) for :
    • Samsung Galaxy A7 SM-A7000 HERE.  
    • http://www.androidrootguide.com/list-android-custom-roms-official-roms-root-software-download-links

    • Samsung Galaxy A7 SM-A7009 HERE.
    • http://www.androidrootguide.com/list-android-custom-roms-official-roms-root-software-download-links
      •  
    • Samsung Galaxy A7 SM-A700FD HERE.  
    • http://www.androidrootguide.com/list-android-custom-roms-official-roms-root-software-download-links

    • Samsung Galaxy A7 SM-A700H HERE.  
    • http://www.androidrootguide.com/list-android-custom-roms-official-roms-root-software-download-links

    • To Unzip this file you can use the application like Winrar, Winzip or other applications that support the Zip format.
  7. D0wnload the latest ODIN, here 
    http://www.google.com/url?sa=t&rct=j&q=&esrc=s&source=web&cd=1&cad=rja&uact=8&ved=0CBwQFjAA&url=http%3A%2F%2Fforum.xda-developers.com%2Fattachment.php%3Fattachmentid%3D1168421&ei=E5YYVe6JB8aOuAT1j4DoAw&usg=AFQjCNEdxqAS5QWImOPDJboTA_V3D5S9eA&sig2=-4eKph1ntHlqhUFui5mPXg&bvm=bv.89381419,d.c2E
    or Here 
    http://www.mediafire.com/download/kewx7q183938j3d/SM-E500H-4.4.4.zip
    But, if you can download, Odin file are included in the extracted file.

Guide Root Samsung Galaxy A7 SM-A700F.

  1. Activate your USB Debugging on your Samsung Galaxy A7 SM-A700F.  see this guide (link 1 
    http://guidebelajar.blogspot.com/2015/05/how-to-enable-usb-debugging-on-android.html
     and link 2).
    http://guidebelajar.blogspot.com/2015/03/tips-n-trik-cara-masuk-usb-debugging-lg.html
  2. Turn Off your Samsung Galaxy A7 SM-A700F.
  3. Enter download mode by pressing and hold Volume Down Button + Home Button + Power Button. Hold and press all button until your phone vibrates and LCD show menu
    Root Samsung Galaxy A7
    Root Samsung Galaxy A7 

  4. And wait until you see a notification like this picture.
    Root Samsung Galaxy A7 SM-A700F.
    Root Samsung Galaxy A7 SM-A700F.
  5. Open your ODIN software that you download before.
    Root Samsung Galaxy A7 SM-A700F.
    Root Samsung Galaxy A7 SM-A700F.
  6. Connect your Samsung Galaxy A7 SM-A700F to your PC / laptop using a USB cable. 
  7. After your phone connected, you will see a message appear that show your device added and there is info on the ID: COM at top left corner. Keep in mind for this COM vary depending on the PC / Laptop. Just Ignore all
    Root Samsung Galaxy A7 SM-A700F.
    Root Samsung Galaxy A7 SM-A700F.
  8. At ODIN, click PDA then navigate to the location where you saved the Root extension file .md5 already you download before.
    Root Samsung Galaxy A7 SM-A700F.
    Root Samsung Galaxy A7 SM-A700F.
  9. Make sure the Re-Partition is not checked, then click Start. 
  10. Just wait for the process to run for about 2-5 minutes, and make sure there is no interference in this process. 
  11. When complete it will display a notification PASS and your smartphone Samsung Galaxy A7 SM-A700F will restart.
    Root Samsung Galaxy A7 SM-A700F.
    Root Samsung Galaxy A7 SM-A700F.
  12. After Restart check whether Icon SuperUser already exists. If the there, you have successfully followed this guide How to Root Samsung Galaxy A7 SM-A700F correctly.
    Root Samsung Galaxy A7 SM-A700F.
    Root Samsung Galaxy A7 SM-A700F.
    Congratulations you've been successful ROOT your Smartphone.

    How To Root Samsung Galaxy E7 SM-E700H + SM-E7000 dan SM-E700F.

    How To Root Samsung Galaxy E7 SM-E700H + SM-E7000 dan SM-E700F.


    Root Samsung Galaxy E7. In the previous guide, we have to write step by step how to root Samsung Galaxy E5 SM-E500H. Today's guidebelajar will share about a guide on how to Root Samsung Galaxy E7. Beware that root process on your android phone will void your warranty. And guidebelajar not responsible for bricked devices, boot loop, broken SD cards, because of your failed root process.

    This guide is how to Root Samsung Galaxy E5 that only applies to the current type Galaxy E7 SM-E700H + SM-E7000 dan SM-E700F run on KitKat Android, But, If you use Samsung Galaxy E5 for the other variant, You still can follow this guide. And you can find for a specific type of file according to your device. For other Samsung Galaxy E5 variant file, you can find a download link at the end of this guide.
    Root Samsung Galaxy E7.
    Root Samsung Galaxy E7.
    Warning : Before you following this guide How to Root Samsung Galaxy E7, make sure you understand the benefits and risks of Root processes are going to do. We can not be responsible if there is damage in the your hardware or software caused to follow this guide How to Root Samsung Galaxy E7.

    Preparation Root Samsung Galaxy E7.

    1. Make sure your Samsung Galaxy E7 battery is not in a state of the low battery, a minimum of 80%. If the battery runs out in the middle of the Root, it can lead to failure
    2. Always perform backup your important data before Root process, Although this process does not remove or delete the data in memory, Preferably in case if there is a failure and you have to Flash your phone.
    3. Make sure you have installed a Latest of Driver Samsung that support with your Smartphone, If you don't have, please download here or can also use the default application Samsung KIES.
    4. http://developer.samsung.com/technical-doc/view.do?v=T000000117
    5. Original USB cable driver for your Samsung Galaxy E7.
    6. D0wnload and then Unzip root file for Samsung Galaxy E7
      • SM - E700H 
      • http://download.chainfire.eu/723/CF-Root/CF-Auto-Root/CF-Auto-Root-e73g-e73gxx-sme700h.zip
    7. SM - E7000 
    8. http://download.chainfire.eu/720/CF-Root/CF-Auto-Root/CF-Auto-Root-e7ltehktw-e7ltezs-sme7000.zip


    9. SM - E700F.  
      http://download.chainfire.eu/722/CF-Root/CF-Auto-Root/CF-Auto-Root-e7lte-e7ltexx-sme700f.zip
       To Unzip all file you can use the application like Winrar, Winzip or other applications that support the Zip format.
    10. Download the latest ODIN, here. But, if you can download, ODIN file included in the extracted file.
      http://www.google.com/url?sa=t&rct=j&q=&esrc=s&source=web&cd=1&cad=rja&uact=8&ved=0CBwQFjAA&url=http%3A%2F%2Fforum.xda-developers.com%2Fattachment.php%3Fattachmentid%3D1168421&ei=E5YYVe6JB8aOuAT1j4DoAw&usg=AFQjCNEdxqAS5QWImOPDJboTA_V3D5S9eA&sig2=-4eKph1ntHlqhUFui5mPXg&bvm=bv.89381419,d.c2E

    11. Guide Root Samsung Galaxy E7.

      1. Activate your USB Debugging on your Samsung Galaxy E7.  see this guide (link 1 
        http://guidebelajar.blogspot.com/2015/05/how-to-enable-usb-debugging-on-android.html
         and link 2) 
        http://guidebelajar.blogspot.com/2015/03/tips-n-trik-cara-masuk-usb-debugging-lg.html
      2. Turn Off your Samsung Galaxy E7.
      3. Enter download mode by pressing and hold Volume Down Button + Home Button + Power Button. Hold and press all button until your phone vibrate and LCD show menu.
        Root Samsung Galaxy E7.
        Root Samsung Galaxy E7.

      4. And wait until you see a notification like this picture.
        Root Samsung Galaxy E7.
        Root Samsung Galaxy E7.
      5. Open your ODIN software that you download before.
        Root Samsung Galaxy E7.
        Root Samsung Galaxy E7.
      6. Connect your Samsung Galaxy E7 to your PC / laptop using a USB cable. 
      7. After your phone connected, you will see a message appear that show your device added and there is info on the ID: COM at top left corner. Keep in mind for this COM vary depending on the PC / Laptop. Just Ignore all
        Root Samsung Galaxy E7.
        Root Samsung Galaxy E7.
      8. At ODIN, click PDA then navigate to the location where you saved the Root extension file .md5 already you download before.
        Root Samsung Galaxy E7.
        Root Samsung Galaxy E7.
      9. Make sure the Re-Partition is not checked, then click Start. 
      10. Just wait for the process to run for about 2-5 minutes, and make sure there is no interference in this process. 
      11. When complete it will display a notification PASS and your smartphone Samsung Galaxy E7 will restart.
        Root Samsung Galaxy E7.
        Root Samsung Galaxy E7.
      12. After Restart check whether Icon SuperUser already exists. If the there, you have successfully follow this guide How to Root Samsung Galaxy E7 correctly.
        Root Samsung Galaxy E7.
        Root Samsung Galaxy E7.
        Congratulations you've been successful ROOT your Smartphone.

      How To Root Samsung Galaxy E5 SM-E500H.

      How To Root Samsung Galaxy E5 SM-E500H.


      Root Samsung Galaxy E5 SM-E500H. Today's guidebelajar will share about guide on how to Root Samsung Galaxy E5 SM-E500H. Beware that root process on your android phone will void your warranty. And guidebelajar not responsible for bricked devices, boot loop, broken SD cards, because of your failed root process.
      please bring your note if all file available in this guide How to Root Samsung Galaxy E5 is only applicable to the current type SM-E500H Kitkat, But, If you use Samsung Galaxy E5 for the other variant, You still can follow this guide. And you can find for a specific type of file according to your device. For other Samsung Galaxy E5 variant file, you can find the download link at the end of this guide.
      Root Samsung Galaxy E5 SM-E500H.
      Root Samsung Galaxy E5 SM-E500H.
      Warning : Before you following this guide How to Root Samsung Galaxy E5 SM-E500H, make sure you understand the benefits and risks of Root processes are going to do. We can not be responsible if there is damage in the your hardware or software caused to follow this guide How to Root Samsung Galaxy E5 SM-E500H.

      Preparation Root Samsung Galaxy E5 SM-E500H.

      1. Make sure your Samsung Galaxy E5 SM-E500H battery is not in a state of the low battery, a minimum of 80%. If the battery runs out in the middle of the Root, it can lead to failure
      2. Always perform backup your important data before Root process, Although this process does not remove or delete the data in memory, Preferably in case if there is a failure and you have to Flash your phone.
      3. Make sure you have installed a Latest of Driver Samsung that support with your Smartphone, If you don't have, please download here or can also use the default application Samsung KIES.
      4. Original USB cable driver for your Samsung Galaxy E5 SM-E500H
      5. D0wnload and then Unzip root file for Samsung Galaxy E5 SM-E500H HERETo Unzip this file you can use the application like Winrar, Winzip or other applications that support the Zip format.
      6. D0wnload the latest ODIN, here

      Guide Root Samsung Galaxy E5 SM-E500H.

      1. Activate your USB Debugging on your Samsung Galaxy E5 SM-E500H.  see this guide (link 1 and link 2)
      2. Turn Off your Samsung Galaxy E5 SM-E500H.
      3. Enter download mode by pressing and hold Volume Down Button + Home Button + Power Button. Hold and press all button until your phone vibrates and LCD show menu.
        Root Samsung Galaxy E5 SM-E500H.
        Root Samsung Galaxy E5 SM-E500H.

      4. And wait until you see a notification like this picture.
        Root Samsung Galaxy E5 SM-E500H.
        Root Samsung Galaxy E5 SM-E500H.
      5. Open your ODIN software that you download before.
        Root Samsung Galaxy E5 SM-E500H.
        Root Samsung Galaxy E5 SM-E500H.
      6. Connect your Samsung Galaxy E5 SM-E500H to your PC / laptop using a USB cable. 
      7. After your phone connected, you will see a message appear that show your device added and there is info on the ID: COM at top left corner. Keep in mind for this COM vary depending on the PC / Laptop. Just Ignore all
        Root Samsung Galaxy E5 SM-E500H.
        Root Samsung Galaxy E5 SM-E500H.
      8. At ODIN, click PDA then navigate to the location where you saved the Root extension file .md5 already you download before.
        Root Samsung Galaxy E5 SM-E500H.
        Root Samsung Galaxy E5 SM-E500H.
      9. Make sure the Re-Partition is not checked, then click Start. 
      10. Just wait for the process to run for about 2-5 minutes, and make sure there is no interference in this process. 
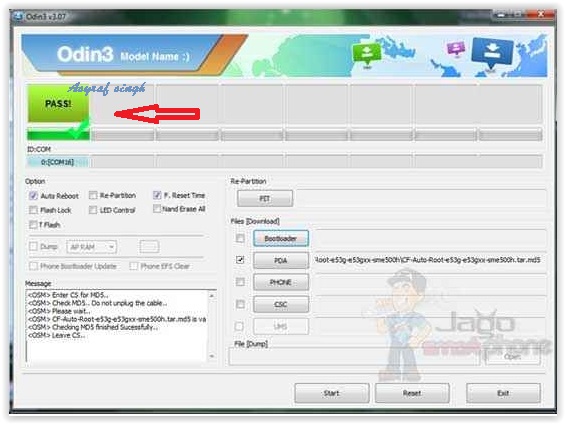
      11. When complete it will display a notification PASS and your smartphone Samsung Galaxy E5 SM-E500H will restart.
        Root Samsung Galaxy E5 SM-E500H.
        Root Samsung Galaxy E5 SM-E500H.
      12. After Restart check whether Icon SuperUser already exists. If the there, you have successfully followed this guide How to Root Samsung Galaxy E5 SM-E500H correctly. Congratulations you've been successful ROOT your Smartphone.
      If you want root Another version of galaxy E5, you can use this guide, the only difference of file that used is the CF-Auto-Root File only. If you have any other variants of Samsung Galaxy E5 please download below.
      1. Samsung Galaxy E5 SM-E500F. Download

      2. Samsung Galaxy E5 SM-E500H  Download

      3. Samsung Galaxy E5 SM-E500M Download