smartdroid

Sunday, 4 March 2018

How to Install TWRP Recovery And Root Xiaomi Redmi 5A 2018.

How to Install TWRP Recovery And Root Xiaomi Redmi 5A 2018.

Install TWRP & Root Redmi 5A 2018. If you want to modify your Android phone, you need a powerful recovery to do it. Actually, all Android devices have a standard recovery. This is a standard built-in recovery from the manufacturer which have limited features. So, if you need more features you must flash or install another recovery. And the most widely used recovery in the world is TWRP recovery. So, if you need guidance on how to install TWRP recovery in Redmi 5A 2018, you can follow the following guidelines.

Once TWRP recovery successfully installed on your Redmi 5A 2018, now you can flash other ZIP installation file. Such as SuprSU to root your phone.
TWRP and root Redmi 5A

Prerequisite.

  1. Please make a full backup before proceeding installation.
  2. Then, enable USB debugging on your Redmi 5A 2018.
    • How to enable USB debugging on Redmi 5A 2018?
      • From standby 
      • Connect your phone to the computer via USB cable
      • Tap Settings.
      • Tap About Phone.
      • Tap 7 times on MIUI Versions (until you see pop up message you are already a developer)
      • Back to Settings
      • Tap Additional Settings
      • Tap Developer Options - here you can enable OEM Unlock & Enable USB Debugging.
  3. Make sure the bootloader is unlocked. how to Unlock Bootloader Xiaomi Redmi 5A 2018? see the tutorial below (Unlock Mi Phone)
  4. Make sure MiFlash Unlock Tool is already installed on the computer. If not yet, you can download the MiFlash and then installed on the computer. If you got an error when running the program windows, please see more instruction how to get Mi Unlock tool.
  5. TWRP recovery Xiaomi Redmi 5A 2018 (recovery.img)
  6. Download ADB (adb-setup-1.4.3.exe)
  7. Download SuperSU for Redmi 5A 2018.- (SuperSU-v2.79-201612051815.zip) - For Root
  8. Download lazyflasher-no-verity-opt-encrypt.zip - For Root.

Enter Fastboot Mode Xiaomi Redmi 5A 2018.

  1. Power off your phone.
  2. Once your Xiaomi Redmi 5A 2018 completely Powers off, then enter your device into fastboot mode.
    • How to boot Xiaomi Redmi 5A into fastboot Mode?
      • Press and hold the Power button + Volume down button at the same time./li>
      • Release all button when your phone enters fastboot mode.
      • You will see the following picture on your phone.
      • root  Xiaomi Redmi Y1 (Note 5A)
        root  Xiaomi Redmi Y1 (Note 5A)
  3. Then, connect your phone to the computer using the USB cable.
  4. Now, the computer will automatically install the driver for Xiaomi Redmi 5A 2018.

How to Download Official Mi Unlock Tool.

  1. Go to the following website. https://unlock.update.miui.com
  2. Then click Unlock Now button.
  3. Then fill all available form on the site. This form contains the following data.
    • Input your name
    • Input your countries
    • Input your phone number
    • Then type the real reason for unlocking in English.
    • Type security text
    • Then tick I confirm that I have read and accepted the unlocking Disclaimer.
    • Now click Apply Now.
  4. You will get a message on your phone according to the phone number you have entered above.
  5. Now, click Next.
  6. You need to wait for the review. After your applications approved, you will get an SMS notification on your cell phone. (it will take 6 to 10 day )
  7. Once you get the notification, back to the website and download Mi Unlock tool.
  8. Once you get the SMS, you can directly go to the following URL to download Mi Unlock tool.
    • http://en.miui.com/unlock/download_en.html
  9. Now, install Mi Unlock tool on the computer.

How to Unlock Mi Phone Using Mi Unlock Tool.

  1. Check your Mi Unlock Status on your Redmi 5A 2018.
    • How to check Mi Unlock Status on Redmi 5A 2018?
      • Make sure developer Options is activated, see how to enable developer options above.
      • Goto Settings.
      • tap Additional Settings.
      • tap developer Options
      • Then tap Mi Unlock Status - if you see the message that says This device is locked the phone is secured then you need to unlock Mi device.
  2. How to unlock Mi device?
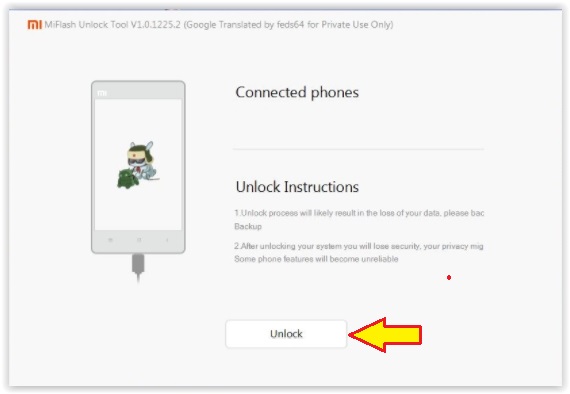
    • Now, launch the Miflash Unlock tool on the computer. You need to log in with a verified account when you unlock the bootloader.
    • Make sure your Xiaomi Redmi 5A also Log in with the same account.
    • Once you have successfully Login to Miflash Unlock tool, now click Unlock button.
    Root Xiaomi Redmi 5A 2018
    Root Xiaomi Redmi 5A 2018
    • Just wait for the process until done. and the Miflash Unlock say Unlocked Successfully.
    • Now, click reboot phone button.
    • Once your Redmi 5A 2018 boot up again, you can back to step 1 above to check Mi Unlock Status.
Install / Flash TWRP Recovery Redmi Note 4.

  1. Make sure your Redmi 5A in fastboot mode and connected to the computer via USB cable.
  2. Now, double-click adb-setup-1.4.3.exe to launch ADB installer.
  3. At the command prompt press Y then hit enter
  4. Then continue with the installation dialogue box.
  5. Once ADB and fastboot already installed, now go to C:\ADB
  6. Move or copy TWRP recovery (recovery.img) to the ADB folder
  7. From the platform tool folder, open CMD window How to do it?
    • Press and hold shift button, then right-click your mouse
    • Now, select Open command window here
  8. From the command prompt window, type the following command and press enter.
    • fastboot devices
  9. Once your device listed, now type the following command and hit enter.
    • fastboot flash recovery recovery.img
  10.  Then, type the following command again and hit enter. (this command is used to enter TWRP recovery via fastboot command)
    • fastboot boot recovery.img
  11. This command will force your device into the TWRP recovery menu.

How to Boot TWRP Recovery Using Button.

If your Redmi 5A is not in a fastboot mode, you can use the following button to enter the TWRP recovery without a command.
  1. Power Off your phone
  2. Once it completely powers off, now press and hold the following button at the same time.
    • Volume Up key + Power Key
  3. Release all button when you see Mi Logo.

How to Root Redmi 5A 2018.

  1. You need to copy two files already downloaded as prerequisite above. (SuperSU-v2.79-201612051815.zip and lazyflasher-no-verity-opt-encrypt.zip) to the Phone storage or SD Card. Use the USB cable to transfer it from the computer to your Redmi 5A 2018.
  2. Power off the phone.
  3. Then, enter your phone into TWRP recovery.
  4. From the TWRP main menu, tap Install.
  5. Then, browse the file which has been copied before.
  6. Tap the file (SuperSU-v2.79-201612051815.zipand then swipe to start to install the file.
  7. Once it finished. Tap back.
  8. Now, navigate to the Lazyflasher-no-verity-opt-encrypt.zip then tap and swipe to start to install the file.
  9. Once two files already installed/flashed you need to reboot your phone.

How to Verify Root Status

  1. Download and install Root checker pro from Google Play store.
  2. Then, open the root checker pro on your phone.
  3. If your Redmi 5A successfully rooted, you will see the following image on your phone screen.
  4. root redmi 5A
    root redmi 5A
  5. Finish.

How to Install TWRP Recovery Xiaomi Redmi Note 4, Root, and Enable Face Unlock Feature.

How to Install TWRP Recovery Xiaomi Redmi Note 4, Root, and Enable Face Unlock Feature.

Install TWRP Recovery Redmi Note 4. All Android operating systems have a recovery system, which works for Android system management. This is a standard recovery from manufacturers with limited features. So, if you want more flexibility in modifying the Android device. You can replace standard recovery with TWRP recovery. TWRP recovery offers several advantages than standard recovery. And now, guidebelajar will show you the easy steps to install TWRP recovery on Xiaomi Redmi Note 4.

TWRP recovery installation is the first step to do more. You can install zip-based files on your phone. For example, get root access by installing SuperSU Zip file or flash other Zip files to unlock more feature on your device.

Ok, let's we start this guide.
flash TWRP and Root Redmi Note 4

Prerequisite.

  1. You need to enable USB debugging on your phone.
    • How to enable USB debugging on Redmi Note 4?
      • From standby 
      • Connect your phone to the computer via USB cable
      • Tap Settings.
      • Tap About Phone.
      • Tap 7 times on MIUI Versions (until you see pop up message you are already a developer)
      • Back to Settings
      • Tap Additional Settings
      • Tap Developer Options - here you can enable OEM Unlock & Enable USB Debugging.
  2. Make sure the bootloader is unlocked. how to Unlock Bootloader Xiaomi Redmi Note 4? see the tutorial below (Unlock Mi Device)
  3. Make sure MiFlash Unlock Tool is already installed on the computer. If not yet, you can download the MiFlash and then installed on the computer. If you got an error when running the program windows, please see more instruction how to get Mi Unlock tool below.
  4. TWRP recovery Xiaomi Redmi Note 4 (recovery.img)
  5. Download Latest Platform Tool for Windows.
  6. Download SuperSU for Redmi Note 4.- (SuperSU-v2.79-201612051815.zip) - For Root
  7. Download lazyflasher-no-verity-opt-encrypt.zip - For Root.
  8. Download Face_ID Unlock from here. (FaceID-Santoni_9.2.5.zip)


Enter Fastboot Mode Xiaomi Redmi Note 4. 

  1. Turn off your phone.
  2. Once your Xiaomi Redmi Note 4 completely Power off, then enter your device into fastboot mode.
    • How to enter Xiaomi Redmi Note 4 into fastboot Mode?
      • Press and hold the Power button + Volume down button at the same time.
  3. Release all button when your phone enters fastboot mode.
  4. You will see the following picture on your phone.
    • root  Xiaomi Redmi Note 4
      root  Xiaomi Redmi Note 4
  5. Then, connect your phone to the computer using the USB cable.
  6. Now, the computer will automatically install the driver for Xiaomi Redmi Note 4.

    How to Download Mi Unlock Tool.

    1. Go to the following website. https://unlock.update.miui.com
    2. Then click Unlock Now button.
    3. Then fill all available form on the site. This form contains the following data.
      • Input your name
      • Input your countries
      • Input your phone number
      • Then type the real reason for unlocking in English.
      • Type security text
      • Then tick I confirm that I have read and accepted the unlocking Disclaimer.
      • Now click Apply Now.
    4. You will get a message on your phone according to the phone number you have entered above.
    5. Now, click Next.
    6. You need to wait for the review. After your applications approved, you will get an SMS notification on your cell phone. (it will take 6 to 10 day )
    7. Once you get the notification, back to the website and download Mi Unlock tool.
    8. Once you get the SMS, you can directly go to the following URL to download Mi Unlock tool.
      • http://en.miui.com/unlock/download_en.html
    9. Now, install Mi Unlock tool on the computer.

    How to Unlock Mi Phone.

    1. Check your Mi Unlock Status on your Redmi Note 4.
      • How to check Mi Unlock Status?
        • Make sure developer Options is activated, see how to enable developer options above.
        • Goto Settings.
        • tap Additional Settings.
        • tap developer Options
        • Then tap Mi Unlock Status - if you see the message that says This device is locked the phone is secured then you need to unlock Mi device.
    2. How to unlock Mi device?
      • Now, launch the Miflash Unlock tool on the computer. You need to log in with a verified account when you unlock the bootloader.
      • Make sure your Xiaomi Redmi Note 4 also Log in with the same account.
      • Once you have successfully Login to Miflash Unlock tool, now click Unlock button.
      root redmi note 4
      root redmi note 4
      • Just wait for the process until done. and the Miflash Unlock say Unlocked Successfully.
      • Now, click reboot phone button.
      • Once your Redmi Note 4 boot up again, you can back to step 1 above to check Mi Unlock Status.

    Install / Flash TWRP Recovery Redmi Note 4.

    1. Make sure your Redmi Note 4 in fastboot mode.
    2. Now, go to Platform Tools for windows folder
    3. Move or copy TWRP recovery (recovery.img) to the platform tool folder.
    4. From the platform tool folder, open CMD window How to do it?

      • Press and hold shift button, then right-click your mouse
      • Now, select Open command window here
    5. From the command prompt window, type the following command and press enter.

      • fastboot devices
    6. Once your device listed, now type the following command and hit enter.

      • fastboot flash recovery recovery.img
    7.  Then, type the following command again and hit enter. (this command is used to enter TWRP recovery via fastboot command)

      • fastboot boot recovery.img
    8. This command will force your device into the TWRP recovery menu.

    How to Enter TWRP Recovery Using Button.

    If your phone is not in a fastboot mode, you can use the following button to enter the TWRP recovery without a command.
    1. Power Off your phone
    2. Once it completely powers off, now press and hold the following button at the same time.
      • Volume Up key + Power Key
    3. Release all button when you see Mi Logo

    How to Root Redmi Note 4.

    1. You need to copy two files already downloaded as prerequisite above. (SuperSU-v2.79-201612051815.zip and lazyflasher-no-verity-opt-encrypt.zip) to the Phone storage or SD Card. Use the USB cable to transfer it from the computer to your phone.
    2. Power off the phone.
    3. Then, enter your phone into TWRP recovery.
    4. From the TWRP main menu, tap Install.
    5. Then, browse the file which has been copied before.
    6. Tap the file (SuperSU-v2.79-201612051815.zip) and then swipe to start to install the file.
    7. Once it finished. Tap back.
    8. Now, navigate to the Lazyflasher-no-verity-opt-encrypt.zip then tap and swipe to start to install the file.
    9. Once two files already installed/flashed you need to reboot your phone.

    How to Enable Face Unlock Redmi Note 4.

    1. This guide is tested on Redmi 4/4x running on MIUI 9 Global Stable (9.2.5.0) by the shubhandu as a junior member of XDA
    2. Copy FaceID-Santoni_9.2.5.zip to the SD card or phone internal memory root folder.
    3. From the TWRP main menu, tap Install.
    4. Then, browse the file which has been copied before.
    5. Tap the file and then swipe to start to install the file.
    6. Once the installations finished, reboot your phone.

    How to Install TWRP Recovery Xiaomi Redmi 4X, Root, and Enable Face Unlock.

    How to Install TWRP Recovery Xiaomi Redmi 4X, Root, and Enable Face Unlock.

    Flash TWRP Recovery Xiaomi Redmi 4X. We need an essential tool to modify the Android system. This tool is called custom recovery. TWRP is one of the most popular and widely used custom recoveries. by installing TWRP recovery on your Android device, it will be possible to flash custom ROM or another zip installation file. And now, we will show you an easy step how to install a custom recovery on Xiaomi 4X. custom recovery will replace original factory default recovery.

    Therefore, you have to be careful to install a custom recovery. In order to avoid errors that result in your Android device can't normally work. And now, let's start to install TWRP Recovery on Xiaomi Redmi 4X.
    TWRP 7 Root Redmi 4X
    TWRP 7 Root Redmi 4X

    Prerequisite.

    1. Make sure your device runs on V8.0.3.0.0 MIUI to follow this guide.
    2. Make sure the bootloader is unlocked. how to Unlock Bootloader Xiaomi Redmi 4X? see the tutorial below (Unlock Mi Device)
    3. Make sure MiFlash Unlock Tool is already installed on the computer. If not yet, you can download the MiFlash and then installed on the computer. 
    4. TWRP recovery cofface for Xiaomi Redmi 4X (cofface_recovery_redmi4X.img)
    5. Download ADB and Fastboot.
    6. Download SuperSU for Redmi 4X.- (UPDATE-SuperSU-v2.82-20170526223454.zip)
    7. Download Face_ID Unlock from here. (FaceID-Santoni_9.2.5.zip)


    Enter Fastboot Mode Xiaomi Redmi 4X.

    1. Enable developer option.
      • How to enable developer options on Xiaomi Redmi 4X?
        • Tap 7 times on MIUI Version under About phone menu.
        • Then back to Settings
        • Additional setting
        • Scroll down and tap developer options to enable OEM unlock and USB Debugging. 
    2. Turn off your phone.
    3. Once your Xiaomi Redmi 4X completely Power off, then enter your device into fastboot mode.
      • How to enter Xiaomi Redmi 4X into fastboot Mode?
        • Press and hold the Power button + Volume down button at the same time.
        • Release all button when your phone enters fastboot mode.
        • You will see the following picture on your phone.
        • root  Xiaomi Redmi 4X
          root  Xiaomi Redmi 4X
    4. Then, connect your phone to the computer using the USB cable.
    5. your computer will automatically install the driver for Xiaomi Redmi 4x

    Unlock Mi Device

    1. Check your Mi Unlock Status.
      • How to check Mi Unlock Status?
        • Make sure developer Options is activated, see how to enable developer options above.
        • Goto Settings.
        • tap Additional Settings.
        • tap developer Options
        • Then tap Mi Unlock Status - if you see the message that says This device is locked the phone is secured then you need to unlock Mi device.
    2. How to unlock Mi device?
      • Now, launch the Miflash Unlock tool on the computer. You need to log in with a verified account when you unlock the bootloader.
      • Make sure your Xiaomi Redmi 4X also Log in with the same account.
      • Once you have successfully Login to Miflash Unlock tool, now click Unlock button.
      root Xiaomi Redmi 4X
      root Xiaomi Redmi 4X
      • Just wait for the process until done. and the Miflash Unlock say Unlocked Successfully.
      • Now, close Miflash Unlock program windows.
      • You can back to step 1 above to check Mi Unlock Status.

    Install / Flash TWRP Recovery Redmi 4X.

    1. Open TWRP folder, then rename original TWRP recovery (cofface_recovery_redmi4X.img) to redmi4.img
    2. Move or copy TWRP recovery (redmi4.img) to the ADB folder.
    3. From the ADB folder, open CMD window How to do it?
      • Press and hold shift button, then right click your mouse
      • Now, select Open command window here
    4. From the command prompt window, type the following command and press enter.
      • fastboot devices
    5. Once your device recognized, now type the following command and hit enter.
      • fastboot flash recovery redmi4.img
    6.  Then, type the following command again and hit enter.
      • fastboot boot redmi4.img
    7. this command will force your device into the TWRP recovery menu.
    8. When the first time TWRP is open, the language used in China.
    9. root Xiaomi Redmi 4X
      root Xiaomi Redmi 4X
    10. How to change TWRP recovery Redmi 4X from China to English?
      • See the following picture. do the sequence according to the number
      • root Xiaomi Redmi 4X
        root Xiaomi Redmi 4X
      • root Xiaomi Redmi 4X
        root Xiaomi Redmi 4X
      • root Xiaomi Redmi 4X
        root Xiaomi Redmi 4X
      • Now your TWRP should in the English language.
      • root Xiaomi Redmi 4X
        root Xiaomi Redmi 4X
    11. Finish, you have successfully install TWRP recovery into your Xiaomi Redmi 4X.

    How to Root Xiami Redmi 4X.

    1. Copy UPDATE-SuperSU-v2.82-20170526223454.zip to the SD card root folder.
    2. From the TWRP main menu above, tap Install.
    3. Then, browse the file which has been copied before.
    4. Tap the file and then swipe to start to install the file.
    5. Once the installations finished, reboot your phone.

    How to Enable Face Unlock

    1. This guide is tested on Redmi 4/4x running on MIUI 9 Global Stable (9.2.5.0) by the shubhandu as a junior member of XDA
    2. Copy FaceID-Santoni_9.2.5.zip to the SD card root folder.
    3. From the TWRP main menu above, tap Install.
    4. Then, browse the file which has been copied before.
    5. Tap the file and then swipe to start to install the file.
    6. Once the installations finished, reboot your phone.

    Sunday, 11 February 2018

    Guide Hard Reset Samsung Galaxy A8/A8 Plus (2018) Android 7.1.1

    Guide Hard Reset Samsung Galaxy A8/A8 Plus (2018) Android 7.1.1

    Factory Reset Samsung Galaxy A8/A8+ (2018). There are several reasons why someone is performing a hard reset on their Android device. For example, the Android system is not responsively to process running applications. Or you have forgotten the PIN, password, and pattern lock screen. A quick step to fix the current problem is performing a hard reset or master reset. By resetting your Android devices, you will wipe or delete all user data stored at the phone internal memory. And, the following guide will show you how to perform hard reset or factory reset on Samsung Galaxy A8/A8+ (2018). 

    Actually, you can apply this method to the other Samsung Galaxy models. because most of the Samsung Galaxy devices have the same hard reset method. Before this guide starts, let's we show the Samsung Galaxy A8/A8 Plus (2018) specifications.

    Specifications
    Detail
    Product Released- 2017, December
    Display- 6.0 inches
    - Super AMOLED capacitive touchscreen, 16M colors
    CPU- Octa-core (2x2.2 GHz Cortex-A73 & 6x1.6 GHz Cortex-A53)
    GPU- Mali-G71
    Chipset- Exynos 7885 Octa
    Operating System
    - Android 7.1.1 (Nougat)
    Memory- 64 GB, 6 GB RAM or 32 GB, 4 GB RAM
    Camera- 16 MP (Main Camera)
    - 16 MP (Secondary Camera)
    Battery- Removable Li-Ion 3500 mAh battery
    Versions- A730F (Global Single-SIM)
    - A730F/DS (Global Dual-SIM)
    - Samsung Galaxy A8+ (2018) Duos with dual-SIM card slots

    Hard Reset Guide.

    1. This guide only applied for Samsung Galaxy A8/A8 Plus (2018), but you can also apply this guide to the other Samsung Galaxy phone.
    2. To avoid all data lost, we highly recommend to backup everything before proceeding the hard reset.
    3. Make sure your battery is fully charged, or at least has 78% of battery capacity.
    4. Now, turn off your Samsung Galaxy A8 or A8+
    5. If you can't turn off the phone due forgotten PIN or password, you can follow this step.
      • How to turn off the Samsung Galaxy A8 or A8+ if you forgot the PIN or password?
        • From standby screen.
        • Press and hold the Power button + Volume Down button at the same time.
        • Release all button when your phone screen goes black.
    6. Then turn it on again by pressing and holding the following 2 buttons at the same time.
      • Power Button + Volume Up 
      Reset Samsung Galaxy A8/A8 Plus (2018)
      Reset Samsung Galaxy A8/A8 Plus (2018)
    7. Now, release all button when Samsung Galaxy A8 Logo comes up on the screen.
      Samsung A8 Logo
      Samsung A8 Logo
    8. Then your phone will show the animated white Android logo.
    9. Now, your phone will show a yellow exclamation and no command text. 
      Reset Samsung Galaxy A8 Plus 2018
      Reset Samsung Galaxy A8 Plus 2018
    10. Just wait for a second, your phone will enter Android system recovery.
    11. Once your  Samsung Galaxy A8 / A8+ 2018 enter Android system recovery screen, you can use the volume up and volume down button to navigate the menu and use the power button to confirm.
    12. Now, highlight wipe data/ factory reset using volume button, and press the power button to confirm.
      Reset Samsung Galaxy A8 Plus 2018
      Reset Samsung Galaxy A8 Plus 2018
    13. On the next screen highlight yes, and press power button to confirm.
    14. The hard reset process will start, and you can see this progress at the bottom of the phone screen.
    15. Once the wipe data complete, you can highlight reboot system now, and press the power button to reboot your phone.
    16. Finish.

    Saturday, 10 February 2018

    Guide Hard Reset Samsung Galaxy J2 Pro 2018

    Guide Hard Reset Samsung Galaxy J2 Pro 2018.

    Factory Reset Samsung J2 Pro 2018. Almost all electronic devices have procedures to restore the user settings to factory settings. This can help the user to restore the initial settings in case of setting errors. Restore device settings to the factory settings called hard reset or master reset. This will delete all user data stored in phone memory. Therefore you need to backup all data before performing a hard reset. And now, this guide will show you how to perform Hard Reset Samsung Galaxy J2 Pro 2018. Please take a good look at how to do it.

    Before this guide starts, let's we show the Samsung Galaxy J2 Pro (2018) specifications. This phone is also known as Samsung Galaxy J2 (2018) or Samsung Galaxy Grand Prime Pro

    Specifications
    Detail
    Product Released- 2018, January
    Display- 5.0 inches
    - Super AMOLED capacitive touchscreen, 16M colors
    CPU- Quad-core 1.4 GHz Cortex-A53
    GPU- Adreno 308
    Chipset- Qualcomm MSM8917 Snapdragon 425
    Operating System
    - Android 7.1 (Nougat)
    Memory- 16 GB, 1.5 GB RAM
    Camera- 8 MP (Main Camera)
    - 5 MP (Secondary Camera)
    Battery- Removable Li-Ion 2600 mAh battery
    Versions- Samsung Galaxy J2 (2018),
    - Samsung Galaxy Grand Prime Pro

    Hard Reset Guide.

    1. This guide only applied for Samsung Galaxy J2 Pro 2018, but it is possible to apply on most any Samsung Galaxy type.
    2. Hard reset will wipe everything on your phone, we highly recommend to backup it as soon as possible.
    3. Make sure your battery is fully charged, or at least has 78% of battery capacity.
    4. Now, power off your device.
    5. Once it completely powers off, turn on it again by press and hold simultaneously the following button located on the phone side body.
      • Power Button + Volume Up  + Home Button
      Reset Samsung Galaxy J2 Pro 2018
      Reset Samsung Galaxy J2 Pro 2018
    6. Now, release all button when Samsung Galaxy J2 Pro Logo comes up on the screen.
      Samsung Galaxy J2 Pro 2018 Logo
      Samsung Galaxy J2 Pro 2018 Logo
    7. Then your phone will show the animated white Android logo.
    8. Now, your phone will show a yellow exclamation and no command text. 
      Reset Samsung Galaxy J2 Pro 2018
      Reset Samsung Galaxy J2 Pro 2018
    9. Just wait for a second, your phone will enter Android system recovery.
    10. Once your  Samsung Galaxy J2 Pro 2018 enter Android system recovery screen, you can use the volume up and volume down button to navigate the menu and use the power button to confirm.
    11. Now, highlight wipe data/ factory reset using volume button, and press the power button to confirm.
      Reset Samsung Galaxy J2 Pro 2018
      Reset Samsung Galaxy J2 Pro 2018
    12. On the next screen highlight yes, and press power button to confirm.
    13. The hard reset process will start, and you can see this progress at the bottom of the phone screen.
    14. Once the wipe data complete, you can highlight reboot system now, and press the power button to reboot your phone.
    15. Finish.

    Friday, 9 February 2018

    Guide to Reset Garmin Forerunner 230 / 235 to The Default Factory Setting.

    Guide to Reset Garmin Forerunner 230 / 235 to The Default Factory Setting.

    Reset Garmin Forerunner 230 / 235. Reset on an electronic device will return all settings to the factory default settings. So, if your device is having problems due to incorrect settings, or the device becomes unresponsive, you can try to reset the device. By resetting or master reset, all settings will be deleted and restored to the original factory settings. And now, we will show you how to perform reset on Garmin Forerunner 230 / 235.

    Reset the device will clear all user data. Now, let's start how to reset Garmin Forerunner 230 / 235.

    Reset Garmin Forerunner 230 / 235.

    1. Turn off your device first. How to turn off Garmin Forerunner 230 / 235 device?
      • Simply press and hold the power button.
      • If you see the power off menu comes on the screen, then select Yes.
        Reset Garmin Forerunner 230 / 235
        Reset Garmin Forerunner 230 / 235
      • Now, the device will turn off.
    2. Once the device completely Powers off, now turn it on again by press and hold the following button.
      • Power Button + Lap Button
        Reset Garmin Forerunner 230 / 235
        Reset Garmin Forerunner 230 / 235
    3. Keep holding until your device shows the Clear User Data menu.
      Reset Garmin Forerunner 230 / 235
      Reset Garmin Forerunner 230 / 235
    4. From this screen, you need to select Yes. Use the scroll button on the left side of your device to highlight the menu.
    5. Now, your Garmin Forerunner 230 / 235 will reboot.

    Guide to Reset or Restore Garmin Nuvi GPS to Factory Settings (With Picture)

    Guide to Reset or Restore Garmin Nuvi GPS to Factory Settings (With Picture).

    Reset Garmin Nuvi GPS to Factory Settings. The following guide will show you how to perform reset a Garmin GPS to the default factory settings. Once the reset process is done all user settings will be reset or wipe. Factory reset or hard reset is also known as master reset. this applies to any electronic device. There are two ways or methods you can use to perform reset on your Garmin Nuvi GPS device.

    Ok, now let's start to reset the Garmin Nuvi GPS device.

    Reset Garmin Nuvi GPS (First Method)

    1. Shut the devices off or get it out of standby. 
      • How to shut off Garmin Nuvi GPS?
        • Hold the Power Button.
        • Then you will see Turn off the device prompt at your Garmin Nuvi GPS.
          Turn Off Garmin Nuvi GPS
          Turn Off Garmin Nuvi GPS
        • Now, select Off
        • And wait for a while
        • Now, the Garmin Nuvi GPS completely Power Off.
    2. Once the Garmin Nuvi GPS power off, now hold down the bottom right-hand corner of the screen.
    3. Then hold the Power button On.
    4. Reset Garmin Nuvi GPS
      Reset Garmin Nuvi GPS
    5. Wait for a moment and be patient here because it will take a little bit. Then the system will prompt it's happening there.
    6. Don't release all button until you see a dialog box that asks you to erase all user data.
      Reset Garmin Nuvi GPS
      Reset Garmin Nuvi GPS
    7. From the current screen, select Yes
    8. Now, wait for the hard reset process runs.
    9. Once the Hard reset process is done. Your Garmin Nuvi GPS will be back to the default factory settings.

    Reset Garmin Nuvi GPS (Second Method)

    1. Turn on the Garmin Nuvi GPS device.
    2. Now, select View Map
      Reset Garmin Nuvi GPS
      Reset Garmin Nuvi GPS
    3. Then, select speed or speedometer icon.
      Reset Garmin Nuvi GPS
      Reset Garmin Nuvi GPS
    4. Then press and hold the speedometer button with your finger.
      Reset Garmin Nuvi GPS
      Reset Garmin Nuvi GPS
    5. Now, you will get the actual menu on the screen.
      Reset Garmin Nuvi GPS
      Reset Garmin Nuvi GPS
    6. From this screen, select Clear All User Data.
    7. If you see that your Garmin Nuvi GPS screen show the confirmation box as show the picture below, you need to select Yes.
    8. Reset Garmin Nuvi GPS
      Reset Garmin Nuvi GPS
      Now, your device will reboot.