smartdroid: May 2015

Sunday 31 May 2015

Download Official Firmware / Stock ROM Asus Zenfone 2

Download Official Firmware / Stock ROM Asus Zenfone 2.


Stock ROM Asus Zenfone 2. If you need to flash your Asus Zenfone 2, you have needed this tool. Yes, this is Stock ROM or Original ROM that can be used to flash or install Asus Zenfone 2 to back state condition of this phone.
Stock ROM Asus Zenfone 2

Here is link Download Original ROM / Stock ROM Asus Zenfone 2.

Link Download

  1. Asus Zenfone 2 (500CL)
  2. http://dlcdnet.asus.com/pub/ASUS/ZenFone/ZE500CL/UL-ASUS_Z00D-WW-12.16.4.3-user.zip
  3. Asus Zenfone 2 (550ML).
  4. http://dlcdnet.asus.com/pub/ASUS/ZenFone/ZE550ML/UL-Z008-WW-2.12.40.9-user.zip
  5. Asus Zenfone 2 (551CL)
  6. http://dlcdnet.asus.com/pub/ASUS/ZenFone/ZE551ML/UL-Z00A-WW-2.12.40.9-user.zip
  7. Asus Zenfone 2 USB Driver
  8. http://dlcdnet.asus.com/pub/ASUS/ZenFone/ZE500CL/ASUS_Android_USB_drivers_for_Windows_20150212.zip

Guide To Enter Recovery Mode, Wipe Data, Wipe Cache on Asus Zenfone 2

Guide To Enter Recovery Mode, Wipe Data, Wipe Cache on Asus Zenfone 2.


Enter Recovery Mode, Wipe Data, Wipe Cache on Asus Zenfone 2. If you don't know what is the meaning of recovery, today's guidebelajar will explain to you about recovery mode. Recovery in the Android device is referred to the bootable partition, and over there recovery console was installed. When you in recovery mode, there is a tool available to help fix repair your installation like install Official Operating System updates. You can enter this recovery mode on Asus Zenfone 2 by using a combination of key presses or instructions from a command line sometimes. We know that Android system is open source, which the recovery code is available so we can build a new customized ROM on the Android system easily. 

So, how to enter it? now guidebelajar will teach you how to do this.

How to Enter Recovery Mode.

  1. The first time that you need is turn off your Asus zenfone 2
  2. Then, Turn On it by hold and pressing Power button + Volume UP.
  3. Enter Recovery Mode, Wipe Data, Wipe Cache on Asus Zenfone 2
    Enter Recovery Mode, Wipe Data, Wipe Cache on Asus Zenfone 2
  4. Release all hold button when your Asus Zenfone 2 feel vibrate and show Asus Logo.
    Enter Recovery Mode, Wipe Data, Wipe Cache on Asus Zenfone 2
    Enter Recovery Mode, Wipe Data, Wipe Cache on Asus Zenfone 2
  5. Then you will look screen like this.
    Enter Recovery Mode, Wipe Data, Wipe Cache on Asus Zenfone 2
    Enter Recovery Mode, Wipe Data, Wipe Cache on Asus Zenfone 2
  6. On this screen you can select Normal boot, Power Off, Restart Bootloader or Recovery Mode, select it using volume UP/Down Button at behind your phone.
  7. To enter recovery mode, you should select recovery mode. execute this option use the power button.
    Enter Recovery Mode, Wipe Data, Wipe Cache on Asus Zenfone 2
    Enter Recovery Mode, Wipe Data, Wipe Cache on Asus Zenfone 2
  8. After Asus Zenfone 2 reboot, you will see logo android sleep like this.
    Enter Recovery Mode, Wipe Data, Wipe Cache on Asus Zenfone 2
    Enter Recovery Mode, Wipe Data, Wipe Cache on Asus Zenfone 2
  9. Continue to press and hold  Power Button + Volume Up and release them when you see a picture like this.
    Enter Recovery Mode, Wipe Data, Wipe Cache on Asus Zenfone 2
    Enter Recovery Mode, Wipe Data, Wipe Cache on Asus Zenfone 2
  10. On this screen you can do :
    • Wipe Data
    • Wipe Cache
    • Reboot System
  11. Select item that you like to do by pressing Volume Up/Down Button, then execute using Power Button

How To Root Acer Liquid Z220.

How To Root Acer Liquid Z220.


Root Acer Liquid Z220. Today's guidebelajar will share about a guide on how to Root Acer Liquid Z220. Beware that root process on your android phone will void your warranty. And guidebelajar not responsible for bricked devices, boot loop, broken SD cards, because of your failed root process.
Root Acer Liquid Z220.

Guide Root Acer Liquid Z220.

  1. Before you starting root process, it's better you backup your important data first.
  2. Your battery must be 80% charged
  3. D0wnload and install USB driver for Acer Liquid Z220. Here 
  4. http://goo.gl/JFBDZM
  5. Activate your USB Debugging on your Acer Liquid Z220.  see this guide (link 1 
    http://guidebelajar.blogspot.com/2015/05/how-to-enable-usb-debugging-on-android.html
     and link 2 
  6. http://guidebelajar.blogspot.com/2015/03/tips-n-trik-cara-masuk-usb-debugging-lg.html
  7. Download root tool OneClickRoot tool for Acer Liquid Z220
    http://www.oneclickroot.com/device/acer-liquid-Z220-2/
  8. Then, Unzip the package and save it on your computer
  9. Start the OneClickRoot
  10. Plug your device (with USB debug activated).
  11. Follow the instructions show on screen
  12. In the end, please install SuperSU find it on Google Play Store.
  13. http://click.xda-developers.com/api/click?format=go&jsonp=vglnk_143280067819615&key=f0a7f91912ae2b52e0700f73990eb321&libId=ia7vt5pw01000n4o000DA4ksbcwld&loc=http%3A%2F%2Fforum.xda-developers.com%2Fshowthread.php%3Ft%3D2628793&v=1&out=https%3A%2F%2Fplay.google.com%2Fstore%2Fapps%2Fdetails%3Fid%3Deu.chainfire.supersu%26hl%3Dfr&ref=https%3A%2F%2Fwww.google.co.id%2F&title=%5BROOT%5D%20Acer%20Liquid%20Z220%20%2F%20S520%20via%20Superboot%20M%E2%80%A6%20%7C%20Android%20Development%20and%20Hacking%20%7C%20XDA%20Forums&txt=SuperSU%20from%20Play%20Store
  14. Reboot your device, root is done

How Hard Reset Acer liquid Z220.

How Hard Reset Acer Liquid Z220.


Hard Reset Acer Liquid Z220. Today's guidebelajar will explain to you how to perform a hard reset on Acer Liquid Z220 smartphone. Some People say that Hard reset process is called with master reset or factory reset. Many people asking why should we perform a hard reset to our phone. The logical answer that can I say for this asking is :
  • Because we will sell our Acer liquid Z220 Android phones
  • We will give our Acer liquid Z220 away to some one else, and we don't want that one know everything about our secret data, so we have to erase all data before back up it.
  • our Acer liquid Z220 has been lagging and stuck on android logo, this call with boot loop
  • There are many bugs on Acer Liquid Z220.
  • We want to remove all personal data and setting that was stored in Acer liquid Z220.device.
  • We have forgotten on PIN or Pattern Lock at Acer Liquid Z220.
  • and many other reasons.

1st Method. Hard Reset ACER LIQUID Z220 Using Menu :

  1. Turn on ACER LIQUID Z220, by long press on the power button
  2. Make sure your battery is fully charged, we recommended that your battery has 80% power
  3. Always BackUp your important data that store in Acer Liquid Z220.
  4. Go to menu: Setting > Privacy > Factory Data Reset > Reset
  5. Choose Erase everything to confirm that you have ready to do a master format or hard reset on Acer Liquid Z220.
  6. Acer Liquid Z220. will be continued to hard reset till it back for factory default.
Unlock Forgotten Password, PIN, Pattern Lock Screen Without Losing data.

2nd Methode. Hard Reset ACER LIQUID Z5 DUO (Z150) using Hardware Key.

  1. Turn Off your Acer liquid Z220 Handheld first
  2. Make sure your battery is fully charged, we recommended that your battery has 80% power
  3. Always BackUp your important data that store in Acer Liquid Z220
  4. Press and hold Power Button + Volume UP together, release it when phone vibrate.  
  5. Then, You should release held keys when new Menu appears on the screen
  6. Choose Recovery Mode menu. Press Volume UP to scroll to Recovery option and confirm your choice by pressing Volume Down.
    recovery menu acer liquid Z220
  7. Choose Wipe data/factory reset menu. Press Volume Down to scroll to Recovery option and confirm your choice by pressing Power Button.
    Hard Reset Acer liquid Z220.
    Hard Reset Acer Liquid Z220.
  8. Now, choose "yes--- delete all user data" Press Volume Down to scroll to Recovery option.

  9. Hard Reset Acer liquid Z220.
    Hard Reset Acer Liquid Z220.

  10. And confirm your choice by pressing Menu Button
    Hard Reset Acer liquid Z220.
    Hard Reset Acer Liquid Z220.
  11. Then press Power Button, to confirm menu and then choose  reboot system now
  12. Follow the screen instruction to continued hard reset your Acer Liquid Z220


  13. That's all, you have done to Hard Reset Acer liquid Z220,

    ATTENTION... !!!
    Hard Reset/Master reset/Factory Reset may erase all data stored on internal memory and all account setting, guidebelajar  is not responsible for the risks afterward. 
    Do it with your own risk

Saturday 30 May 2015

How To Root Acer Liquid Z520.

How To Root Acer Liquid Z520.


Root Acer Liquid Z520. Today's guidebelajar will share about a guide on how to Root Acer Liquid Z520. Beware that root process on your android phone will void your warranty. And guidebelajar not responsible for bricked devices, boot loop, broken SD cards, because of your failed root process.
Root Acer Liquid Z520.

Guide Root Acer Liquid Z520.

  1. Before you starting root process, it's better you backup your important data first.
  2. Your battery must be 80% charged
  3. D0wnload and install USB driver for Acer Liquid Z520. Here  
  4. http://goo.gl/JFBDZM
  5. Activate your USB Debugging on your Acer Liquid Z520.  see this guide (link 1 
    http://guidebelajar.blogspot.com/2015/05/how-to-enable-usb-debugging-on-android.html
     and link 2) 
  6. http://guidebelajar.blogspot.com/2015/03/tips-n-trik-cara-masuk-usb-debugging-lg.html
  7. Download root tool OneClickRoot tool for Acer Liquid Z520. Here
    http://www.oneclickroot.com/device/acer-liquid-z520-2/
  8. Then, Unzip the package and save it on your computer
  9. Start the OneClickRoot.
  10. Plug your device (with USB debug activated)
  11. Follow the instructions show on screen
  12. At the end, please install SuperSU find it on Google Play Store
  13. http://click.xda-developers.com/api/click?format=go&jsonp=vglnk_143280067819615&key=f0a7f91912ae2b52e0700f73990eb321&libId=ia7vt5pw01000n4o000DA4ksbcwld&loc=http%3A%2F%2Fforum.xda-developers.com%2Fshowthread.php%3Ft%3D2628793&v=1&out=https%3A%2F%2Fplay.google.com%2Fstore%2Fapps%2Fdetails%3Fid%3Deu.chainfire.supersu%26hl%3Dfr&ref=https%3A%2F%2Fwww.google.co.id%2F&title=%5BROOT%5D%20Acer%20Liquid%20Z520%20%2F%20S520%20via%20Superboot%20M%E2%80%A6%20%7C%20Android%20Development%20and%20Hacking%20%7C%20XDA%20Forums&txt=SuperSU%20from%20Play%20Store
  14. Reboot your device, root is done

How Hard Reset Acer liquid Z520.

How Hard Reset Acer Liquid Z520.


Hard Reset Acer Liquid Z520. Today's guidebelajar will explain to you how to perform a hard reset on Acer Liquid Z520 smartphone. Some People say that Hard reset process is called with master reset or factory reset. Many people asking why should we perform a hard reset to our phone. The logical answer that can I say for this asking is :
  • Because we will sell our Acer liquid Z520 Android phones
  • We will give our Acer liquid Z520 away to someone else, and we don't want that one know everything about our secret data, so we have to erase all data before back up it.
  • our Acer liquid Z520 has been lagging and stuck on android logo, this call with boot loop
  • There are many bugs on Acer Liquid Z520.
  • We want to remove all personal data and setting that was stored in Acer liquid Z520.device.
  • We have forgotten on PIN or Pattern Lock at Acer Liquid Z520.
  • and many other reasons.

1st Method. Hard Reset ACER LIQUID Z520 Using Menu :

  1. Turn on ACER LIQUID Z520, by long press on the power button
  2. Make sure your battery is fully charged, we recommended that your battery has 80% power
  3. Always BackUp your important data that store in Acer Liquid Z520.
  4. Go to menu: Setting > Privacy > Factory Data Reset > Reset
  5. Choose Erase everything to confirm that you have ready to do a master format or hard reset on Acer Liquid Z520.
  6. Acer Liquid Z520. will be continued to hard reset till it back for factory default.
Unlock Forgotten Password, PIN, Pattern Lock Screen Without Losing data.

2nd Method. Hard Reset ACER LIQUID Z520 using Hardware Key.

  1. Turn Off your Acer liquid Z520 Handheld first
  2. Make sure your battery is fully charged, we recommended that your battery has 80% power
  3. Always BackUp your important data that store in Acer Liquid Z520
  4. Press and hold Volume Down + Power Button together, release it when phone vibrate.
  5. Then, You should release held keys when new Menu appears on the screen
  6. Choose Recovery Mode menu. Press Volume Down to scroll to Recovery option and confirm your choice by pressing Volume UP.
    recovery menu Acer Liquid Z520
  7. Wait a minute you will see Acer Logo on your screen.
    Hard Reset Acer liquid Z520.
    Hard Reset Acer Liquid Z520.
  8. Choose Wipe data/factory reset menu. Press Volume Down to scroll android system recovery utility option and confirm your choice by pressing Power Button.
    Hard Reset Acer liquid Z520.
    Hard Reset Acer Liquid Z520.
  9. Now, choose "yes--- delete all user data" Press Volume Down to scroll confirm wipe of all user data option. 
    Hard Reset Acer liquid Z520.
    Hard Reset Acer Liquid Z520.
  10. And confirm your choice by pressing Power Button.
  11. Wait a minute, the system will wipe your data on phone.
  12. Then press Power Button, to confirm menu and then choose  reboot system now
  13. Follow the screen instruction to continued hard reset your Acer Liquid Z520.

That's all, you have done to Hard Reset Acer liquid Z520,

ATTENTION... !!!
Hard Reset/Master reset/Factory Reset may erase all data stored on internal memory and all account setting, guidebelajar  is not responsible for the risks afterward. 
Do it with your own risk

Friday 29 May 2015

How To Root And Install CWM Lenovo A6000.

How To Root And Install CWM Lenovo A6000.


Root And Install CWM Lenovo A6000. Today's guidebelajar will share to you about how to perform a root on Android smartphone device. Now I will explain how to root on Lenovo A6000. this device comes with Android OS, v4.4.4 (KitKat) and supported with Chipset Qualcomm MSM8916 Snapdragon 410, Processors Quad-core 1.2 GHz Cortex-A53, GPU Adreno 306, 2 GB of RAM as their engine. Before we continued our experiment I will explain to you what is the meaning of root on Android, an additional feature is the main camera with 8 MP and secondary camera 2 MP will give you good experience to take any picture.

The user will get privileged access to the Android System when Lenovo A6000 is rooted. So, the system became vulnerable form accidentally deleted or changed file system. It causes you to void your warranty from phone vendor. So, to follow this guide you must be careful.

Guide Root Lenovo A6000 step by Step.

Make sure to always take backup all your important data like music, video, SMS, document (see this guide) and other data to the other resource outside of Lenovo A6000 device, and make sure your battery is fully charged or at least there is 80% of power on it before you continued to proceed.
  1. Make sure your device is Lenovo A6000. because this guide is intended just for this device
  2. Then, D0wnload this root tool for Lenovo A6000.
  3. http://www.mediafire.com/download/8x0vzp726msw25z/Flash_Tool_Phonehorn.com.rar
  4. Next step is Enable developer options by going to Settings > About Phone > Device Info and tap on Build Number for about 7-8 times. or see this guide 
    http://guidebelajar.blogspot.com/2015/05/how-to-enable-usb-debugging-on-android.html
     or This Guide 
  5. http://guidebelajar.blogspot.com/2015/03/tips-n-trik-cara-masuk-usb-debugging-lg.html
  6. Enable USB Debugging on your device.
  7. Go to > Settings > Developer Options > USB Debugging
    Root And Install CWM Lenovo A6000.
    Root And Install CWM Lenovo A6000.
  8. Then, Enable unknown sources
  9. Go to Settings > Security and enable Unknown Sources option.
  10. Then, Connect your Lenovo A6000 smartphone to your PC and install the application.
  11. Setup ADB and Fastboot drivers on your PC. You can download ADB and fast-boot here.
  12. http://www55.zippyshare.com/v/PLgbNVj1/file.html
  13. Then, download recovery.img 
    https://drive.google.com/file/d/0B1wYZ5Lb11BVRG1XWWZkWlUtdWc/view?usp=sharing
    and SuperSU files
    https://drive.google.com/file/d/0B1wYZ5Lb11BVRG1XWWZkWlUtdWc/view?usp=sharing
    for Lenovo A6000. the file may be protected with a security password, please leave a comment with your email. 0r try to use a password; 0222

Install CWM On Lenovo A6000.

  1. The first step that should you do is extract file have you download before.
  2. Copy the recovery.img file to C:\Program Files (x86)\Minimal ADB and Fastboot or C:\Program Files\Minimal ADB and Fastboot directory.
  3. Open your file that has stored at C:\Program Files (x86)\Minimal ADB and Fastboot. Open command prompt here by press and hold the shift key on the keyboard and right-click anywhere inside the folder at empty space. please select open command window here.
  4. when cmd open, type: adb services
  5. Then type: fastboot boot recovery.img
  6. after process finished, to reboot Lenovo a6000, type: fastboot reboot.
  7. at this step you have finished install CWM on your Lenovo A6000 then you can be continued to root Lenovo A6000.

Root Lenovo A6000.

  1. what should you do at the first time is Copy the downloaded file Root-SuperSU-v2.37.zip in the root folder of your SD card.
  2. Power off your device.
  3. Boot in recovery mode by pressing and holding Volume Up and Power Button at the same time.
  4. Release all buttons when the Lenovo A6000 screen flickers and in a few seconds the Recovery screen will appear.
  5. then choose install from SD card and choose Root-SuperSU-v2.37.zip.
  6. when root process is done, reboot your Lenovo a6000
  7. Verify your root by install root checker from google play store.
  8. when your device is rooted you will see picture like this.

How Hard Reset Sony Xperia M2 and M2 Dual

How Hard Reset Sony Xperia M2 Dual.


Hard Reset Sony Xperia M2 Dual. Today's guidebelajar will explain to you how to perform a hard reset on Sony Xperia M2 Dual smartphone. Some People say that Hard reset process is called with master reset or factory reset. Many people asking why should we perform a hard reset to our phone. The logical answer that can I say for this asking is :
  • Our Sony Xperia M2 Dual has been lagging and stuck on android logo, this call with boot loop
  • There are many bugs on Sony Xperia M2 Dual.
  • Because we will sell our Sony Xperia M2 Dual Android phones.
  • We want to remove all personal data and setting that was stored in Sony Xperia M2 Dual.device.
  • We have forgotten on PIN or Pattern Lock at Sony Xperia M2 Dual.
  • and many other reasons.

Hard Reset SONY XPERIA M2 DUAL use Hardware Key.

  1. Turn Off your Sony Xperia M2 Dual Handheld first
  2. Open back cover of your Sony Xperia M2 Dual, then remove the battery from this device, wait for 1 minutes to install again on a device.
  3. Make sure your battery is fully charged, we recommend that your battery has 80% power
  4. Always BackUp your important data that store in Sony Xperia M2 Dual
  5. Press and hold Volume UP + Power  Button together.
  6. Hard Reset Sony Xperia M2 and M2 Dual
    Hard Reset Sony Xperia M2 and M2 Dual
  7. Then, You should release held keys when you see sony logo on the screen.
  8. At the moment Recovery Menu appears on the screen.

    Hard Reset Sony Xperia M2 and M2 Dual
    Hard Reset Sony Xperia M2 and M2 Dual
  9. In the Recovery Mode menu. Press Volume Down/UP to scroll to Recovery option and confirm your choice by pressing Power Button.
  10. From the menu items, you should select wipe data/ factory reset press power button to confirm.
  11. On the next steps, the android recovery option will appear to confirm wipe of all user data? If you select “Yes -- delete all user data” then all data will delete from your mobile.  
    Hard Reset Sony Xperia M2 and M2 Dual
    Hard Reset Sony Xperia M2 and M2 Dual
  12. Follow the screen instruction to continued hard reset your Sony Xperia M2 Dual. Wait until complete RESET YOUR PHONE, Then press Power Button, to confirm menu and then choose reboot system now.
    Hard Reset Sony Xperia M2 and M2 Dual
    Hard Reset Sony Xperia M2 and M2 Dual

That's all, you have done to Hard Reset Sony Xperia M2 Dual,

ATTENTION... !!!
Hard Reset/Master reset/Factory Reset may erase all data stored on internal memory and all account setting, guidebelajar  is not responsible for the risks afterward. 
Do it with your own risk

How Hard Reset Lenovo A7000.

How Hard Reset Lenovo A7000.


Hard Reset Lenovo A7000. Today's guidebelajar will explain to you how to perform a hard reset on Lenovo A7000 smartphone. Some People say that Hard reset process is called with master reset or factory reset. Many people asking why should we perform a hard reset on our phone. The logical answer that can I say for this asking is :
  • Because we will sell our Lenovo A7000 Android phones
  • We will give our Lenovo A7000 away to someone else, and we don't want that one know everything about our secret data, so we have to erase all data before back up it.
  • our Lenovo A7000 has been lagging and stuck on android logo, this call with boot loop
  • There are many bugs on Lenovo A7000.
  • We want to remove all personal data and setting that was stored in Lenovo A7000.device.
  • We have forgotten on PIN or Pattern Lock at Lenovo A7000.
  • and much other reason.

Hard Reset LENOVO A7000 use Hardware Key.

  1. Turn Off your Lenovo A7000 Handheld first
  2. Open back cover of your Lenovo A7000, then remove the battery from this device, wait for 1 minutes to install again on the device.
  3. Make sure your battery is fully charged, we recommended that your battery has 80% power
  4. Always BackUp your important data that store in Lenovo A7000
  5. Press and hold Volume UP + Volume Down  Button together.
  6. Keep pressing both Volume Up and Volume Down button, and then press and hold Power Button.
    Hard Reset Lenovo A7000.
    Hard Reset Lenovo A7000.
  7. Then, You should release held keys when recovery Menu appears on the screen
    Hard Reset Lenovo A7000.
    Hard Reset Lenovo A7000.
  8. In the Recovery Mode menu. Press Volume Down/UP to scroll to Recovery option and confirm your choice by pressing Power Button.
  9. From the menu items, you should select wipe data/ factory reset.
  10. On the next steps, the android recovery option want form you confirm you want to factory reset your android device? If you select “Yes” then all data will delete from your mobile.
  11. Hard Reset Lenovo A7000
    Hard Reset Lenovo A7000
  12. Then press Power Button, to confirm menu and then choose reboot system now.
    Hard Reset Lenovo A7000.
    Hard Reset Lenovo A7000.
  13. Follow the screen instruction to continued hard reset your Lenovo A7000


That's all, you have done to Hard Reset Lenovo A7000,

ATTENTION... !!!
Hard Reset/Master reset/Factory Reset may erase all data stored on internal memory and all account setting, guidebelajar  is not responsible for the risks afterward. 
Do it with your own risk

How To Flash/Install Firmware Acer Liquid Z200.

How To Flash/Install Firmware Acer Liquid Z200.

Flash Acer Liquid Z200. Guidebelajar will explain to you how to flash Acer Liquid Z200. Flashing in android is the same way like a fresh install on the windows PC, So by performing a flash on Android, you will give a new performance like a new phone. One reason that you should perform a flash your android is because your Android gets a boot loop or when you failed to install Stock ROM Mod. For this reason, guidebelajar will share a guide on how to perform flash on Acer Liquid Z200 with the simple and easy way.
Install Firmware Acer Liquid Z200.

Maybe you ask what is bootloop, Ok. now I will explain to you what is boot loop. Some people say that bootloop is a problem that occurred on an android system which the android system could not start up going to the home screen menu. And it's happened is automatically return to the initial state on the first time when you turn on the Acer Liquid Z200And the device will stop to display on the smartphone logo.

Now follow the instructions list below, do it at your own risk. Flashing your Acer Liquid Z200 will improve your system because developer fixes the existing deficiencies in the current system. we are going to flash with a new firmware.

Prepare Flash Acer Liquid Z200.

  1. Make sure your Acer Liquid Z200 has been detected on PC or Laptop when it switches off.
  2. It's better you hard reset/master reset/factory reset your Acer Liquid Z200. see this guide 
  3. Do it at your own risk.

Guide Flash Acer Liquid Z200.

  1. Download custom ROM for Acer Liquid Z200. link available at the end of this post.
  2. Open SP Flash tool
  3. In the Scatter-Loading field go to the folder where you extracted the Flash Tool and select your scatter.
  4. Uncheck on preloader
  5. Then, click the download button on top right and connect your Acer Liquid Z200 with the USB cable in phone switch off position.
    Root Lenovo A7000
    Root Lenovo A7000
  6. The process will run automatic, and you can see the red stripe showing download percentage at bellow
  7. When your process complete, you can see a green circle with a tick mark.  
    Root Lenovo A7000
    Root Lenovo A7000
  8. flash Acer Liquid Z200 is done!
Attention ... !! this firmware is not rooted yet, so you have to do it if you want your Acer Liquid Z200 rooted after flashing process.

Thursday 28 May 2015

How To Install CWM / TWRP and Root Lenovo A7000

How To Root Lenovo A7000.

Root Lenovo A7000. Today's guidebelajar will share to you about how to perform a root on an android smartphone device. Now I will explain how to root on Lenovo A7000. this device comes with Android OS, v5.0 (Lollipop) and supported with Chipset Mediatek MT6752m, Processors Octa-core 1.5 GHz Cortex-A53, GPU Mali-T760MP2, 2 GB of RAM as their engine. Before we continued our experiment I will explain to you what is the meaning of root on Android, an additional feature is the main camera with 8 MP and secondary camera 5 MP will give you good experience to take any picture.

By root your Lenovo A7000, you will allow the user to attain privileged control on this device. for example, they can uninstall default applications in internal memory, or they can install Custom ROM on Lenovo A7000. Besides some advantages, also there is some risk. For example, they will lose their warranty for this device.

Guide Flash Lenovo A7000 using SP Flash Tool.


Make sure to always take backup all your important data like music, video, SMS, document (see this guide) and other data to the other resource outside of Lenovo A7000 device, and make sure your battery is fully charged or at least there is 80% of power on it before you continue to proceed.
  1. Make sure your device is Lenovo A7000. because this guide is intended just for this device
  2. Then, D0wnload this root tool for Lenovo A7000Here
  3. http://www.mediafire.com/download/8x0vzp726msw25z/Flash_Tool_Phonehorn.com.rar
  4. D0wnload this Recovery image.
    • CWM Recovery Here 
    • http://click.xda-developers.com/api/click?format=go&jsonp=vglnk_145091981470918&key=f0a7f91912ae2b52e0700f73990eb321&libId=iijhawq201000n4o000DAbf0p9yhj&loc=http%3A%2F%2Fforum.xda-developers.com%2Fchef-central%2Fandroid%2Frequest-cwm-twrp-recovery-lenovo-a7000a-t3102588&v=1&out=https%3A%2F%2Fdrive.google.com%2Ffile%2Fd%2F0BwpEpNLSDmlFcENFYm5Cai1ITGs%2Fview%3Fusp%3Dsharing&ref=https%3A%2F%2Fwww.google.com%2F&title=LENOVO%20A7000-a%20DEVELOPMENT&txt=%3Cfont%20size%3D%224%22%3EDownload%20here%3C%2Ffont%3E
    • TWRP recovery Here 
    • http://click.xda-developers.com/api/click?format=go&jsonp=vglnk_145091983091019&key=f0a7f91912ae2b52e0700f73990eb321&libId=iijhawq201000n4o000DAbf0p9yhj&loc=http%3A%2F%2Fforum.xda-developers.com%2Fchef-central%2Fandroid%2Frequest-cwm-twrp-recovery-lenovo-a7000a-t3102588&v=1&out=https%3A%2F%2Fz5h64q92x9.net%2Fproxy_u%2Fru-en.en%2Fhttps%2Fyadi.sk%2Fd%2FI4xvv57Cgue4c&ref=https%3A%2F%2Fwww.google.com%2F&title=LENOVO%20A7000-a%20DEVELOPMENT&txt=%3Cfont%20size%3D%224%22%3EDownload%20here%3C%2Ffont%3E
  5. Next step is Enable developer options by going to Settings > About Phone > Device Info and tap on Build Number for about 7-8 times. or see this guide   
    http://guidebelajar.blogspot.com/2015/05/how-to-enable-usb-debugging-on-android.html
    or This Guide 
  6. http://guidebelajar.blogspot.com/2015/03/tips-n-trik-cara-masuk-usb-debugging-lg.html
  7. Enable USB Debugging on your device.
  8. Goto > Settings > Developer Options > USB Debugging
  9. Enable unknown sources
  10. Go to Settings > Security and enable Unknown Sources option
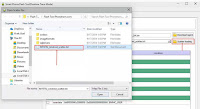
  11. Now extract the Flash Tool archive d0wnloaded before and click on flash_tool.exe.
    Root Lenovo A7000
    Root Lenovo A7000
  12. In the Scatter-Loading field go to the folder where you extracted the Flash Tool and select MT6752_Android_scatter.txt. 
    https://drive.google.com/file/d/0B2I5z1mFfUpcZkNwSkN0TzVXd0E/view?usp=sharing
     
    Root Lenovo A7000
    Root Lenovo A7000
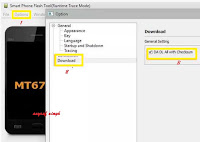
  13. Then you click options ->Download -> then check DA DL all with checksum.
    Root Lenovo A7000
    Root Lenovo A7000
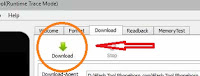
  14. Next, close option box.
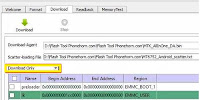
  15. On download tab, ensure you have selected download only option from drop-down menu, see below picture.
    Root Lenovo A7000
    Root Lenovo A7000
  16. Then click on checkbox recovery and browse to the extracted files and locate recovery.img
    Root Lenovo A7000
    Root Lenovo A7000
  17. Then, Turn off your Lenovo A7000 android phone. 
  18. Pull your battery from Lenovo A7000
  19. Then, click the download button on top right and connect your Lenovo A7000 with a USB cable in phone switch off position.
    Root Lenovo A7000
    Root Lenovo A7000
  20. The process will run automatic, and you can see the red stripe showing download percentage at bellow
  21. When your process complete, you can see a green circle with a tick mark. 
    Root Lenovo A7000
    Root Lenovo A7000
  22. Now disconnect your Lenovo A7000
  23. Install your battery again. 
  24. Then, start your Lenovo A7000

Root Lenovo Lenovo A7000.

To perform the root on Lenovo Lenovo A7000, you must have CWM recovery installed on the Android system. then you must download UPDATE-SuperSU-v2.46.zip (here).
https://userscloud.com/o8m7u398nmv5
When it's done, now follow this guide to root your device.
  1. First, copy the UPDATE-SuperSU-v2.46.zip file in your SD card root folder
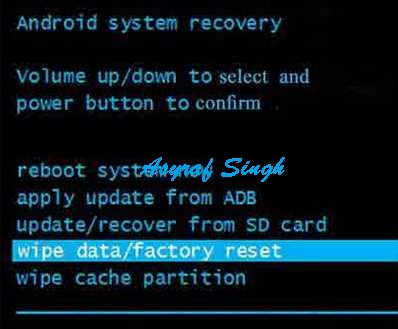
  2. Then, Enter/Reboot to recovery mode on your Lenovo A7000 device. How to do this :
    • Switch off your phone
    • Then, Press and hold the Volume Down Button  + Volume Up Button + Power Button.
    • When you see the Boot Screen, Release the Power Button only.
    • keep the Volume Buttons pressed until you see the Recovery Screen.
  3. Then, Select the UPDATE-SuperSU-v2.46.zip file and click update to root Lenovo A7000.
  4. Wait for the process until finish.
  5. Now, You can confirm your device is rooted or not by downloading the Root Checker app from Google Play store.
    https://play.google.com/store/apps/details?id=com.jrummyapps.rootchecker
  6. Finish.

Wednesday 27 May 2015

How Hard Reset Acer liquid C1.

How Hard Reset Acer liquid C1.


Hard Reset Acer liquid C1. Today's guidebelajar will explain to you how to perform a hard reset on Acer Liquid C1 smartphone. Some People say that Hard reset process is called with master reset or factory reset. Many people asking why should we perform a hard reset to our phone. The logical answer that can I say for this asking is :
  • Because we will sell our Acer liquid C1 Android phones.
  • Our Acer liquid C1 has been lagging and stuck on android logo, this call with boot loop
  • There are many bugs on Acer liquid C1.
  • We want to remove all personal data and setting that was stored in Acer liquid C1.device.
  • We have forgotten on PIN or Pattern Lock at Acer liquid C1.
  • and many other reasons.

1st Methode. Hard Reset ACER LIQUID C1 Using Menu :

  1. Turn on ACER LIQUID C1, by long press on the power button
  2. Make sure your battery is fully charged, we recommended that your battery has 80% power
  3. Always BackUp your important data that store in Acer liquid C1.
  4. Go to menu: Setting > Privacy > Factory Data Reset > Reset
  5. Choose Erase everything to confirm that you have ready to do a master format or hard reset on Acer liquid C1.
  6. Acer Liquid C1. will continue to hard reset till it back for factory default.
Unlock Forgotten Password, PIN, Pattern Lock Screen Without Losing data.

2nd Methode. Hard Reset ACER LIQUID C1 using Hardware Key.

  1. Turn Off your Acer liquid C1 Handheld first
  2. Make sure your battery is fully charged, we recommend that your battery has 80% power
  3. Always BackUp your important data that store in Acer liquid C1
  4. Press and hold Power Button + Volume Down together, release it when phone vibrate.
  5. Then, You should release held keys when new Menu appears on the screen
  6. Choose Recovery Mode menu. Press Volume Down to scroll to Recovery option and confirm your choice by pressing Volume UP.
    recovery menu acer liquid C1
    recovery meAcercer liquid C1
  7. Then, you will see Acer Logo appear on screen
    acer logo acer liquid C1
    acer logo Acer liquid C1

  8. Choose Wipe data/factory reset menu. Press Volume Down and Volume UP to scroll to Recovery option and confirm your choice by pressing Power Button.
    Hard Reset Acer liquid C1
    Hard Reset Acer liquid C1
  9. Now, choose "yes" Press Volume Down to scroll to Recovery option and confirm your choice by pressing Power Button.
    Hard Reset Acer liquid C1
    Hard Reset Acer liquid C1
  10. Then press Power Button, to confirm menu and then choose reboot system now.
    reboot Acer liquid C1
  11. Follow the screen instruction to continued hard reset your Acer liquid C1


That's all, you have done to Hard Reset Acer liquid C1,

ATTENTION... !!!
Hard Reset/Master reset/Factory Reset may erase all data stored on internal memory and all account setting, guidebelajar  is not responsible for the risks afterward. 
Do it with your own risk

How Hard Reset Acer liquid Z200.

How Hard Reset Acer Liquid Z200.


Hard Reset Acer Liquid Z200. Today's guidebelajar will explain to you how to perform a hard reset on Acer Liquid Z200 smartphone. Some People say that Hard reset process is called with master reset or factory reset. Many people asking why should we perform a hard reset to our phone. The logical answer that can I say for this asking is :
  • Because we will sell our Acer liquid Z200 Android phones
  • We will give our Acer liquid Z200 away to someone else, and we don't want that one know everything about our secret data, so we have to erase all data before back up it.
  • our Acer liquid Z200 has been lagging and stuck on android logo, this call with boot loop
  • There are many bugs on Acer Liquid Z200.
  • We want to remove all personal data and setting that was stored in Acer liquid Z200.device.
  • We have forgotten on PIN or Pattern Lock at Acer Liquid Z200.
  • and many other reasons.

1st Method. Hard Reset ACER LIQUID Z200 Using Menu :

  1. Turn on ACER LIQUID Z200, by long press on the power button
  2. Make sure your battery is fully charged, we recommend that your battery has 80% power
  3. Always BackUp your important data that store in Acer Liquid Z200.
  4. Go to menu: Setting > Privacy > Factory Data Reset > Reset
  5. Choose Erase everything to confirm that you have ready to do a master format or hard reset on Acer Liquid Z200.
  6. Acer Liquid Z200. will continue to hard reset till it back for factory default.
Unlock Forgotten Password, PIN, Pattern Lock Screen Without Losing data.

2nd Method. Hard Reset ACER LIQUID Z200 using Hardware Key.

  1. Turn Off your Acer liquid Z200 Handheld first
  2. Make sure your battery is fully charged, we recommend that your battery has 80% power
  3. Always BackUp your important data that store in Acer Liquid Z200
  4. Press and hold these buttons at the same times.
    • Volume Down button + Power Button
  5. Release all buttons when you see boot menu selections appear on your screen.
  6. Choose Recovery Mode menu. Press Volume Down to scroll to Recovery option and confirm your choice by pressing Volume UP.
    recovery menu acer liquid z200
    recovery menu Acer liquid z200
  7. Then, you will see Acer Logo appear on screen
    acer logo acer liquid z200
    acer logo acer liquid z200

  8. Choose Wipe data/factory reset menu. Press Volume Down and Volume UP to scroll to Recovery option and confirm your choice by pressing Power Button.
    Hard Reset Acer liquid Z200
    Hard Reset Acer liquid Z200
  9. Now, choose "yes" Press Volume Down to scroll to Recovery option and confirm your choice by pressing Power Button.
    Hard Reset Acer liquid Z200
    Hard Reset Acer Liquid Z200
  10. Then press Power Button, to confirm menu and then choose reboot system now.
    reboot Acer liquid z200
  11. Follow the screen instruction to continued hard reset your Acer Liquid Z200
That's all, you have done to Hard Reset Acer liquid Z200,

ATTENTION... !!!
Hard Reset/Master reset/Factory Reset may erase all data stored on internal memory and all account setting, guidebelajar  is not responsible for the risks afterward. 
Do it with your own risk