smartdroid: TWRP Huawei
Showing posts with label TWRP Huawei. Show all posts

Saturday, 25 November 2017

Guide | Install TWRP Recovery Huawei GR5 2017 - Honor 6X EMUI 5.0 Android 7.0 Nougat.

Guide | Install TWRP Recovery Huawei GR5 2017 - Honor 6X EMUI 5.0 Android 7.0 Nougat.

TWRP Recovery Huawei GR5 2017.  Hi guys, the following guide will show you how to Install TWRP Recovery Huawei GR5 2017. This device also is known as with Huawei Honor 6X. So, if you looking for about this guide you can follow it. By installing a TWRP recovery on your Huawei GR5 2017, you can backup and restore the system, flash any custom ROM, or root this device. This guide is taken from the following video so we can be sure this guide has been successfully tested on the Huawei Honor 6X device. please follow the following guidelines slowly for the expected results.

So, let's get started this guide.

Requirement.

  1. Make sure your Huawei Honor 6X run Android Nougat 7.0 and EMUI 5.0.
  2. Enable USB debugging and OEM Unlock
  3. Unlock Bootloader your Huawei GR5 | Honor 6X. You can read this guide to unlock bootloader Huawei phone.
  4. Downl0ad and install Hisuite or Huawei Driver. Here
  5. Downl0ad ADB-fastboot-tool-2016.zip - Here 
  6. D0wnload TWRP For Huawei GR5 2017 EMUI 5.0 - Here 

Installation Guide.

  1. Before flash a custom TWRP, you need to backup everything 
  2. Connect your Huawei Mate 9 to the computer via USB cable.
  3. Install Hisuite or Huawei driver.
  4. Extract ADB fastboot tool 2016, the ZIP file contains the following files and folder;
    • adb
    • driver
    • xp
    • install.bat
      ADB fastboot mate 9
      ADB fastboot mate 9
  5. Then, copy twrp-GR5-2017.img to the adb folder.
  6. Now rename to recovery.img
    TWRP Huawei Mate 9
    TWRP Huawei Mate 9
  7. Then, from the ADB fastboot folder right click and hold the shift button, and click open command window here or Open with Powershell
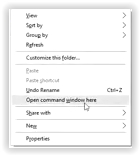
    open command in adb fastboot
    open command in adb fastboot
  8. Now, you need to verify your Huawei GR5 connected to the computer or not by type the following command.
    • adb device.
  9. Once your Huawei GR5 2017 successfully connected, you will see that your device ID is listed in the prompt
    • list of devices attached ...
    • device ID
  10. Then you need to reboot your Huawei GR5 2017 into bootloader using this command and press enter
      • adb reboot bootloader

  11. Just wait a minute, your device will reboot into fastboot and rescue mode.
  12. Once your device in the fastboot and rescue mode, it's time to flash TWRP recovery to your device. Therefore you need to type this command at prompt and then press the enter button

    • fastboot flash recovery recovery.img

  13. wait for 2 or 3 seconds for the complete flashing process.
  14. Done, now you have successfully installed/flashed TWRP-GR5-2017 on Huawei Mate 9 with EMUI 5.0.
  15. Enjoy it.

Friday, 24 November 2017

Guide | Flash TWRP 3.0.3-1 Huawei Mate 9 on EMUI 5.0

Guide | Flash TWRP 3.0.3-1 Huawei Mate 9 on EMUI 5.0.

Flash TWRP Huawei Mate 9. Actually, all Android devices have a built-in recovery. But this recovery but has limited features and designs. If you are interested to flash another custom recovery, you can try this guide. The following guide will explain to you how to flash a custom recovery into Huawei Mate 9. the type of recovery we use in this guide is TWRP recovery. by installing TWRP recovery, we can backup and restore firmware/stock ROM in case of boot failure (boot loop). And also you can install custom ROM, Kernel, Root, and ZIp files to your Huawei Mate 9. This guide proudly presented for you from this video.

For the information, Huawei Mate 9 is released in 2016, December. This device comes with 5,9 inches IPS LCD capacitive touchscreen, 16M colors. powered by Octa-core CPU, Hisilicon Kirin 960 chipset, and Mali-G71 MP8 GPU.

Ok, let's start this guide.
Flash TWRP 3.0.3-1 Huawei Mate 9

Prerequisite.

  1. Unlock Bootloader your Huawei Mate 9. You can read this guide to unlock bootloader Huawei phone.
  2. Enable USB debugging and OEM Unlock
  3. Downl0ad and install Hisuite or Huawei Driver. Here 
  4. Downl0ad ADB-fastboot-tool-2016.zip - Here 
  5. D0wnload TWRP custom recovery for Huawei Mate 9 - Here

Installation Guide.

  1. Make sure to backup everything stored in phone internal memory (contact, phone apps, files, message, etc) it will be deleted during wiping data.
  2. Connect your Huawei Mate 9 to the computer via USB cable.
  3. Install Hisuite or Huawei driver.
  4. Extract ADB fastboot tool 2016, the ZIP file contains the following files and folder;
    • adb
    • driver
    • XP
    • install.bat
      ADB fastboot mate 9
      ADB fastboot mate 9
  5. Then, copy twrp-3.0.3-1-hi3660.img to the adb folder.
  6. Now rename to recovery.img
    TWRP Huawei Mate 9
    TWRP Huawei Mate 9
  7. Then, from the ADB fastboot folder right click and hold the shift button, and click open command window here.
    open command in adb fastboot
    open command in adb fastboot
  8. Once command prompt windows come up on the screen, now you need to ensure your Huawei Mate 9 successfully connected or not using the following command and press enter.
    • adb device.
  9. If your device is successfully connected to the computer, then the result will show your phone ID number.
    • list of devices attached ...
    • device ID
  10. Once your Huawei Mate 9 successfully connected to the computer. Now, reboot your device into bootloader using this command and press enter
      • adb reboot bootloader


  11. Just wait a minute, your device will reboot into fastboot and rescue mode.
  12. Once your device in the fastboot and rescue mode, it's time to flash TWRP recovery to your device. Therefore you need to type this command at prompt and then press the enter button

    • fastboot flash recovery recovery.img


  13. Just wait for 2 or 3 seconds for the complete flashing process.
  14. Done, now you have successfully installed/flashed TWRP 3.0.3-1 on Huawei Mate 9 with EMUI 5.0.
  15. Enjoy it.

Thursday, 23 November 2017

Guide | Install TWRP 3.1.1-0 Huawei P8Lite By OpenKirin

Guide | Install TWRP 3.1.1-0 Huawei P8Lite By OpenKirin.

TWRP Huawei P8Lite. If you want to install TWRP recovery on your Huawei P8Lite, try to read the following guide. This is unofficial TWRP for stock EMUI 4.x device. This guide from the XDA thread surdu_petru, By installing TWRP on your device, you can install the custom ROM. TWRP is one of the widest recovery used by Android phone user, because it is easy to use and an easy-to-understand interface.

Why you should install this TWRP version compared the official version? Because, if you want to restore EMUI firmware you don't need to wipe: /data/cust. and there are many more advantages that you can get by installing TWRP OpenKirin.

Prerequisite.

  1. Downl0ad TWRP OpenKirin (md5 : 29e1c65cf48803892946e858ebe950cf). Here
  2. Make sure the Huawei P8Lite Bootloader is unlocked. see this guide to unlock Huawei bootloader.
  3. Enable USB debugging on your phone.
  4. D0wnl0ad ADB and fastboot from Here
  5. Enable OEM unlock

Installation Guide.

  1. Make sure your device is Huawei P8Lite in order to follow this guide.
  2. Make sure your Huawei P8Lite running EMUI 4.x
  3. Extract TWRP OpenKirin, now then put recovery.img into a platform-tools folder inside ADB folder.
  4. Now, connect your Huawei Honor P8Lite to the computer via USB cable.
  5. Run command prompt from the ADB fastboot folder, How to do it?
    • From the empty space, right-click the mouse and Hold down shift button.
    • Now, select open command here
  6. Then, from the command prompt window type the following command.
    • adb device
  7. The command prompt should return your device ID serial number. If so, you have successfully connected your phone to the computer.
  8. Once your Huawei P8Lite successfully connected, now type the following command.
    • adb reboot bootloader
  9. Just wait for a second, your Huawei P8Lite will reboot into fastboot and rescue mode.
  10. Once your device in the fastboot and rescue mode, it's time to flash TWRP 3.1.1-0 OpenKirin to your phone. Therefore you need to type this command at prompt and then press the enter button
    • fastboot flash recovery recovery.img
  11. Just wait for 2 or 3 seconds for the complete flashing process.

How to Boot Huawei P8Lite into Recovery.

  1. Make sure your device is still connected to the computer while check the TWRP is working or not.
  2. From the command prompt type the following command and press enter
    • adb reboot recovery
  3. Then, back to your phone and now it will enter the recovery mode as shown in the image below.
    enter TWRP recovery mode
    enter TWRP recovery mode
  4. And now your device will boot into TWRP recovery.
  5. Finish

Tuesday, 21 November 2017

How to Install TWRP 3.1.1-1 and Root Huawei Honor 8 Pro Success 100% Tested.

How to Install TWRP 3.1.1-1 and Root Huawei Honor 8 Pro Success 100% Tested.

Root Huawei Honor 8 Pro. If you need any information about how to root Huawei Honor 8 Pro, now you are at the right place. This guide will show you how to root the Honor 8 Android phone. Also, this guide is fully tested on this video. You can directly watch it or continue reading this guide. We will present this guide very simple, and easy to understand. Even if you are a beginner on Android trick. Everyone has different reasons to root their Android device, so does the Honor 8 Pro owner.

By rooting your Huawei Honor 8 Pro, you will get some advantages, for example, you can increase your phone speed and battery life, Block Ads in Apps that contains Ads, even you can remove pre-installed crapware. as we have seen, that crapware cannot be uninstalled without root access. And much more advantages.

Now, lets this guide begin.

Prerequisite.

  1. As the main requirement to root your Huawei Honor 8, you need to unlock the bootloader. If you don't know how to do it, you can read the following guide - How to unlock the bootloader on any Huawei phone.
  2. Enable USB debugging on your phone.
  3. D0wnl0ad ADB and fastboot from Here
  4. Downl0ad PHH Superuser from Here 
  5. Downl04d TWRP recovery root from this link.
    • Once TWRP successfully downloaded, now put this TWRP into a platform-tools folder.
    • Rename it to twrp.img

Install TWRP 3.1.1-1 Honor 8 Pro | Guide.

  1. Extract platform-tools-latest-windows.zip file.
  2. Go to the extracted folder
  3. Then, Open platform-tools folder.
  4. Now, connect your Huawei Honor 8 Pro to the computer via USB cable.
  5. Then, from the ADB fastboot folder right click and hold the shift button, and click open command window here.
    open command in adb fastboot
    open command in ADB fastboot
  6. Once command prompt windows come up, now you need to check your Huawei Honor 8 Pro successfully connected or not using the following command and press enter.
    • adb device.
  7. If your device is successfully connected to the computer, then the result will return like this.
    • list of devices attached ...
  8. Once your Huawei Honor 8 Pro successfully connected to the computer. Now, reboot your device into bootloader using this command and press enter
      • adb reboot bootloader


  9. Just wait a minute, your device will reboot into fastboot and rescue mode.
  10. Once your device in the fastboot and rescue mode, it's time to flash TWRP recovery to your device. Therefore you need to type this command at prompt and then press the enter button

    • fastboot flash recovery twrp.img


  11. Just wait for 2 or 3 seconds for the complete flashing process.

Boot Honor 8 Pro into Recovery.

  1. Power off your Honor 8 Pro.
  2. Now, press and hold three buttons simultaneously located at the side phone body
    • Volume UP + Volume Down + Power Button
  3. Release all button if you see an Honor logo comes up on your screen.
  4. Now, you will see that honor 8 Pro has been unlocked status on screen.
    Honor 8 pro recovery mode
    Honor 8 pro recovery mode
  5. And now your device will boot into TWRP recovery.
  6. Tap Wipe - Format Data - type Yes - Ok
  7. Tap Back - Reboot - Recovery - Don't install
  8. Now your device will reboot into TWRP recovery.again. To root your Honor 8 Pro read the next step below.

Root Honor 8 Pro.

  1. You need to copy Superuser-r310-beta (download link available at prerequisite) to the internal storage of Huawei Honor 8 Pro
  2. Continued from step no. 8 above. or, make sure your device in TWRP recovery mode.
  3. From TWRP main menu, tap Install.
  4. Then, tap Superuser-r310-beta.zip from internal storage.
  5. Now, Swap to confirm flash.
  6. Once Zip file successfully flashed, you just need to click on reboot.system.
  7. Now, your Huawei Honor 8 Pro will reboot into the system.

How to Install TWRP 3.1.1 Recovery on Huawei Honor 9 EMUI 5.1

How to Install TWRP 3.1.1 Recovery on Huawei Honor 9 EMUI 5.1

TWRP 3.1.1 Huawei Honor 9. In this guide, guidebelajar will show you how to flash TWRP recovery on Huawei Honor 9 EU and Chinese version. By installing TWRP recovery on your Huawei Honor 9 allow you to install third-party firmware or custom ROM and back up the current system, and then revert to at any time. Also, you can install the third party app, kernel, and add-on (e.g. SuperSU, Google Apps, Themes), and other mods. Once TWRP recovery successfully installed on your Huawei Honor 9, you can make backing up, restoring, Wiping, and mounting various device partitions. For example boot, system, cache, user data and internal storage for the Huawei Honor 9. This guide is sourced from the following video.
Ok, now lets the tutorial begins. Do at your own risk.. :)

Prerequisite.

  1. First, you need to download these files (TWRP Recovery for Honor 9).
  2. Downl0ad Huawei Honor 9 driver.
  3. ADB Fastboot tool
  4. Make sure you have Unlock Bootloader on your device. See this guide to unlock bootloader Huawei Honor 9.
  5. Enable USB debugging on Huawei Honor 9. How to do it? or see this guide
    • Go to Settings - Scroll down - About Phone - tap 7 times at Build number.
    • Now you get Developer Option.
    • Then Enable USB debugging

Guide to Install The TWRP.

  1. First, you need to install the Hsuite as a Huawei Honor 9 USB driver.
  2. Extract ADB fastboot tool using any zip program. e.g 7zip.
  3. Now, move the TWRP.3.1.1-0.img to the extracted ADB folder.
  4. Now open ADB folder.
  5. Then just click adb.exe to run it.
  6. Rename TWRP.3.1.1-0.img to twrp (there is no other extension)
  7. Now, connect your Huawei Honor 9 to the computer via USB cable.
  8. Then, from the ADB fastboot folder right click and hold the shift button, and click open command window here.
    open command in adb fastboot
    open command in adb fastboot
  9. Once command prompt windows come up, now you need to check your Huawei Honor 9 successfully connected or not using the following command and press enter.
    • adb device.
  10. If your device is successfully connected to the computer, then the result will return like this.
    • list of devices attached ...
  11. Once your Huawei Honor 9 successfully connected to the computer. Now, reboot your device into bootloader using this command and press enter
    • adb reboot bootloader
  12. Just wait a minute, your device will reboot into fastboot and rescue mode.
    reboot into bootloader
    reboot into bootloader
  13. Once your device in the fastboot and rescue mode, it's time to flash TWRP recovery to your device. Therefore you need to type this command at prompt and then press the enter button
    • fastboot flash recovery twrp.img
  14. Just wait for 2 or 3 seconds for the complete flashing process.
  15. Make sure the twrp.img at the command prompt is the same name as the twrp name in the adb fastboot folder. (refers to step no. 6 above).
  16. At the end of the flashing process, you need to send a command to your device by typing this at the command prompt.
    • fastboot reboot.
  17. And now, your Huawei Honor 9 will automatically reboot.
  18. Finish.

Check the TWRP is work or not?

First method (using adb fastboot command)

  1. Make sure your device is still connected to the computer while check the TWRP is working or not.
  2. From the command prompt type the following command and press enter
    • adb reboot recovery
  3. Then, back to your phone and now it will enter the recovery mode as shown in the image below.
    enter TWRP recovery mode
    enter TWRP recovery mode
  4. finish.

Second method (using physical button)

  1. This is the alternative method you can use to enter TWRP recovery mode without connected your phone to the computer.
  2. At the second method is using a physical button located on the outside phone body.
  3. Make sure your phone is completely powered off.
  4. Then, power on again by the press and hold the following button for a 10 to 15 seconds
    • The Power Button + Volume Up
  5. Now, release all button when your phone successfully enters recovery mode.
  6. enter recovery honor 9
    how to enter recovery mode huawei honor 9
    enter recovery honor 9
  7. Finish

Guide How to Enter and Quit Recovery Mode Huawei Honor 9.

Guide How to Enter and Quit Recovery Mode Huawei Honor 9.

Recovery Mode Huawei Honor 9. The following guide will show you how to Enter and Quit your Huawei Honor 9 into recovery mode. We know that recovery mode is a bootable partition on Android device with the recovery console installed. By entering recovery mode on Huawei Honor 9 you can repair or recover the Android installation. Besides that, you can also perform the hard reset or factory reset on Huawei Honor 9.

Every android device has a different way to enter recovery mode. generally, to access the recovery mode you must use the combination button. And now you will learn how to access the recovery mode by reading this guide.

Ok, now let start this guide.

Enter Recovery Mode.

  1. Make sure your device is Huawei Honor 9 in order to follow this guide.
  2. If you ready to follow this guide, you must power off your Huawei Honor 9 now.
  3. Prepare the original micro USB cable for Huawei Honor 9.
  4. Then power On your phone press and hold the following button at the same time.
    • Power Button + Volume Up.
      Enter Recovery Mode Huawei Honor 9
      Enter Recovery Mode Huawei Honor 9
  5. At the same time as well connect the micro USB cable to the computer USB port.
  6. Just wait a few seconds and remember to keep holding the Volume Up button.
  7. Now release all button when the Honor logo comes up on your phone screen.
    Huawei Honor Logo
    Huawei Honor Logo
  8. Just wait a few seconds again.
  9. If you see the image as shown below, your Huawei Honor 9 successfully enter recovery mode.
    recovery mode Huawei Honor 9
    recovery mode Huawei Honor 9
  10. To quit from recovery mode by simply tap reboot or shutdown menu.
  11. Finish.