smartdroid: flash xperia
Showing posts with label flash xperia. Show all posts

Friday, 13 October 2017

Guide | Flash Any Recovery at Sony Xperia Phone Via ADB And Fastboot.

Guide | Flash Any Recovery at Sony Xperia Phone Via ADB And Fastboot.

Flash Sony Xperia Recovery Via ADB. This is a simple guide that explains to you how to install or flash any recover at Sony Xperia device via ADB and fastboot.

What you need?

  1. Android SDK
  2. Driver for your Sony Xperia device. The driver will automatically installed on your computer when your phone connected.
  3. Setup ADB and fastboot on your Windows computer. See This Guide.
  4. Download recovery.img for your phone. you can use a google to search it

Instruction Guide.

  1. Make sure your phone is fully charged, at least you have 78% of battery capacity in order to avoid the system down caused the battery capacity.
  2. Backup everything stored in the phone internal memory to avoid losing the important data.
  3. The following guide is for Windows PC only. But, if you running windows 8 then you need to disable driver signature verification. How to disable driver signature verification on windows? see this guide.
  4. Enable USB debugging on your Sony Xperia phone. How to enter download mode Sony Xperia phone?
    • Tap Settings.
    • Tap About Phone.
    • Tap Build Number 7 or 8 times, until your Sony Xperia phone say you are in developer now.
    • Back to the settings screen.
    •  Find Developer Option and then Tap it.
    • Now, tap USB debugging.
    • If you see a pop-up screen, just tap OK.
  5. Now, connect the phone to the PC
  6. Go to the drive C:\SDK\Platform-tools. -- this drive is where your ADB and fastboot installed.
  7. Now, paste your recovery image here and rename it to recovery.img
  8. Press and hold Shift key + Right click mouse at this folder, then click open command here. 
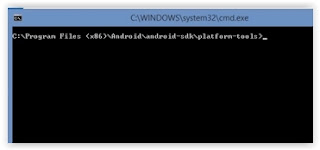
    sdk command prompt
    sdk command prompt
  9. Now, ADB is ready to be used.
  10. Type this command to start using ADB
    • adb devices
  11. It should return to the list of devices attached.
  12. Go to back your phone, it should see a pop-up screen that says Allow USB debugging? - Tap OK
  13. Now type this command.
    • adb reboot bootloader
  14. Your phone must reboot.
  15. Then, type this command.
    • fastboot devices
  16. Now, type this command to proceed to flash a recovery image.
    • fastboot flash recovery recovery.img
  17. Wait for the flashing process done, and you will see the command prompt look like this.
    adb and fastboot command
    adb and fastboot command
  18. Once the flashing process was done, now type this command.
    • fastboot reboot.
  19. Now you can safely disconnect your phone from PC
  20. Finish.

Guide | How to Upgrade Sony Xperia X to Android 8.0 Oreo - Unofficial AOSP

Guide | How to Upgrade Sony Xperia X to Android 8.0 Oreo - Unofficial AOSP.

Upgrade Sony Xperia X to Android Oreo. There is a good news for the people who are now using Sony Xperia X. By default, this device run on Android 6.0.1 (Marshmallow), 7.1.1 (Nougat) and planned upgrade to Android 8.0 (Oreo) soon. But the official release of Android oreo for this device has not been released yet. Therefore, the senior user o XDA forum (lubik1) has released an unofficial test build of AOSP Android 8.0 Oreo for your Sony Xperia X device. So, if you wanna feel a new experience of Android Oreo feature, you can follow this guide to apply. Because this android version is unofficially released, you will find some features that don't work. For example, the call speaker and the 20MP and 8MP cameras. And the developer says, there may be more features doesn't work properly and that if you will face a boot loop. But, simply you can fix it by re-flashing without Gapps. 

Before the upgrade process starting, let we know Sony Xperia X specs. This device released in 2016, May. Powered by Hexa-core (4x1.4 GHz Cortex-A53 & 2x1.8 GHz Cortex-A72) CPU, Qualcomm MSM8956 Snapdragon 650 chipset, and Adreno 510 GPU. Sony Xperia X runs on Android 6.0.1 (Marshmallow), 7.1.1 (Nougat), planned upgrade to Android 8.0 (Oreo). Supported by 3 GB of RAM, featured with 23 MP of primary camera, and 13 MP of secondary camera, also powered by Non-removable Li-Ion 2620 mAh battery.

Prerequisite.


  • D0wnload AOSP Android 8.0 Oreo for Sony Xperia X. Here 

    1. https://drive.google.com/drive/folders/0B1CJidSWx71kX244ZUhDaWNTUWM

    Instruction.

    1. Once the AOSP Android 8.0 Oreo for Sony Xperia X successfully downloaded on your computer, you must copy to the SD card at the root directory.
    2. Now, Power off Sony Xperia X and flash with ADB or shell.
    3. How to flash recovery at Sony Xperia via ADB and Fastboot ? See Here.
    4. Type this to start flash on ADB
      • fastboot flash oem SW_binaries_for_Xperia_AOSP_O_MR0_4.4_v02_loire.img
    5. You must put the SW_binaries_for_Xperia_AOSP_O_MR0_4.4_v02_loire.img at the same directory with running shell or ADB.
    6. Then, Flash GAPPS.
    7. Then flash SuperSU.
    8. Once it completed, you must reboot your Sony Xperia X phone.
    9. Finish.

    Wednesday, 10 June 2015

    Download Official Firmware / Stock ROM Sony Xperia M2 Single & Dual.

    Download Official Firmware / Stock ROM Sony Xperia M2 Single & Dual.


    Stock ROM Sony Xperia M2 Single & Dual. If you need to flash your Sony Xperia M2 Single & Dual, you have needed this tool. Yes, this is Stock ROM or Original ROM that can be used to flash or install Sony Xperia M2 Single & Dual to back state condition of this phone. This Stock ROM is official firmware from Sony, So this ROM is not Custom ROM.

    Download Official Firmware / Stock ROM Sony Xperia M2 Single & Dual.
    Download Official Firmware / Stock ROM Sony Xperia M2 Single & Dual.

    Here is link Download Original ROM / Stock ROM Sony Xperia M2 Single & Dual.

    Link Download Sony Xperia M2 Single (D2303/D2305/D2306) :

    1. Jelly Bean 4.3 – D2303 18.0.C.1.13 Central Europe (Bloatware Removed) Here or Here
    2. Jelly Bean 4.3 – D2305 18.0.A.1.30 Indonesia. Here
    3. Jelly Bean 4.3 – D2305 18.0.A.1.30 Global. Here
    4. KitKat 4.4 – D2303 18.3.C.0.37 Central Europe. Here
    5. KitKat 4.4 – D2305 18.3.A.0.31 Indonesia. Here / Here / Here
      1. or
      2. KitKat 4.4 – D2302 18.3.B.0.31 Indonesia. Here

    How to Unlock Bootloader On Sony Xperia.

    How to Unlock Bootloader On Sony Xperia.

    Unlock Bootloader On Sony Xperia. Some people call Unlock Bootloader with UBL,  We know that Sony Xperia Phones devices always came with a locked bootloader. why someone need to unlock bootloader ? This is the reason why should anyone unlock the bootloader. Someone try to unlock bootloader because they want to activate developer option or want to install custom or modified ROMs, flash custom recovery and other tweaks on their phones. So.. they have to unlock bootloader.

    Once Sony Xperia bootloader successfully unlocked, the user will get more hidden features on Sony Xperia device, So, you can also install other tweaks. Below you can read more guide to Unlock Bootloader On Android Sony Xperia smartphones


    Attention :  Unlocking your device may void all or parts of your warranty by Sony. and you will never get OTA updates by sony. And one thing should you know that in this guide we can not get back our bootloader. it's mean you can Relock Bootloader. So, Beware what will you do. 

    What is your prepair ?

    1. You can apply this guide on any type of Sony Smartphone.
    2. Download latest flash tool for sony Xperia. Here.

    Check Bootloader Unlock Support for your Sony Experia Phone.

    1. first, switch On your Sony Experia.
    2. Then dial this number :  *#*#7378423#*#*
      Check Bootloader Unlock Support
      Check Bootloader Unlock Support
    3. Select Service info -> 
    4. then tap Configuration. 
    5. Make sure you see Bootloader Unlocked Allowed: Yes on Rooting status  (if there isn't it's mean you can not Unlock Bootloader your sony experia)
      Check Bootloader Unlock Support
      Check Bootloader Unlock Support

    Get Unlock Bootloader Key.

    1. Open Sony Website Here.
    2. Scroll down the page,
    3. Then, select your Sony Xperia type
    4. Click Continue.
    5. Then, type your Valid Email address. 
    6. Give on Terms and conditions checklist below 
    7. then click submit.
    8. Log in to your email account you registered and then check the email inbox from Sony> Click on the link provided Sony.
    9. Check your IMEI by dial *#06#. If you have dual SIM on your Sony Xperia, you will get 2 number IMEI, just input number one
    10. After you found your IMEI input it on sony website. Input all number but left one number at the end of your IMEI number. Example. your IMEI is 1234567891234, You just input all number except number 4 at the end of your IMEI.
    11. Then your key will appear on screen, Save your key

    Get Started to Unlock Bootloader.

    I will explain to you step by step how to unlock bootloader on Sony Xperia smartphone. You must read all activity carefully before you apply to perform it to your Sony Xperia M2 Single And Duals.
    1. Open flash tool that you have downloaded and installed.
    2. If you see Device Selector as shown below, Just click Cancel.
      device selctor flash tool
      device selctor flash tool
    3. Then, select BLU
      BLU flash tool
      BLU flash tool
    4. You will see popup message wait for flashmode> Switch Off your Sony Xperia > Press and Hold volume down, then connect Sony Xperia to the computer via USB cable.
      wait for flash mode - flash too
      wait for flash mode - flash tool
    5. Then you will see popup again. wait for fastboot> unplug the USB cable> while hold and pressing volume up (+), connect your Sony Xperia to the computer via USB cable.
      wait for fastboot - flash tool
      wait for fastboot - flash tool
    6. Fill the form with Unlock Code that you get from Sony website, then click Unlock.
      unlock code - flash tool
      unlock code - flash tool
    7. When you see warning like picture shown below (OKAY and FINISHED) you can disconnect your USB Cable.
      okay finished - flash tool
      okay finished - a flash tool
    8. Finish, Now you can switch On your Sony Xperia
    9. To check your success UBL please dial :  *#*#7378423#*#* > Service Info > Configuration
      • If everything you did above got success you will see : Bootloader Unlocked: Yes
      • But if failed, you will see : Bootloader Unlocked Allowed : Yes
    Now you can install custom ROMs, flash a custom recovery and perform other system tweaks on your HTC phone because your Sony Xperia M2 Single And Dual has Unlock Bootloader. congratulation.

    I'm as Guidebelajar admin doesn't to be held responsible if you damage or brick your device.