smartdroid

Tuesday, 9 June 2015

How To Root Lenovo A5000 Easily.

How To Root Lenovo A5000 Easily.


Root Lenovo A5000. Today's guidebelajar will share to you about how to perform a root on an Android smartphone device. Now I will explain how to root on Lenovo A5000. this device comes with Android OS, v5.0 (Lollipop) and supported with Chipset MediaTek MT6752m, Processors Octa-core 1.5 GHz Cortex-A53, GPU Mali-T760MP2, 2 GB of RAM as their engine. Before we continued our experiment I will explain to you what is the meaning of root on Android, an additional feature is the main camera with 8 MP and secondary camera 5 MP will give you good experience to take any picture.

Rooting is the process of allowing users of smartphones, tablets and other devices running the Android mobile operating system to attain privileged control (known as root access) over various Android's subsystems. One thing that should you know that rooting on your Lenovo A5000 may cause loss of warranty. You are only responsible for any further losses and damages caused to the device. We will not be held liable in any circumstances.

Guide Root Lenovo A5000 step by Step.


Make sure to always take backup all your important data like music, video, SMS, document (see this guide) and other data to the other resource outside of Lenovo A5000 device, and make sure your battery is fully charged or at least there is 80% of power on it before you continued to proceed.

  1. Make sure your device is Lenovo A5000. because this guide is intended just for this device.
  2. You must have an Internet access, I recommended to you using Wi-Fi connections to avoid data charge for your connection.
  3. Then, D0wnl0ad this root tool for Lenovo A5000. this tool is called kingroot. 
  4. http://res.kingroot.net/msoft/webapp_kingroot/image/KingRootTrunk0228_105001.apk
  5. Then, go to setting ->>Security >> Unknown Sources and mark it on.
  6. Install your download file.
  7. After you install kingroot, open it from your phone. Tap the Middle of the Kingroot application and wait until the process is complete.
  8. You must confirm that the Root Access is Obtained : 
  9. When the root operation is complete, the Kingroot Application will display a green button with "White Mark" in the middle as in the image below.
    Root Lenovo A5000
    Root Lenovo A5000
  10. Verify your root access on your Lenovo A5000 with install the Root Check. find it HERE 
  11. https://play.google.com/store/apps/details?id=com.jrummyapps.rootchecker

How To Root LG Leon H324 (99% work).

How To Root LG Leon H324 (99% work).


Root LG Leon H324. Today's guidebelajar will share to you about how to perform a root on Android smartphone device. Now I will explain how to root on LG Leon H324. this device comes with Android OS, v5.0.1 (Lollipop) and supported CPU Qualcomm MSM8916 Snapdragon 410, Quad-core 1.2 GHz Cortex-A53, GPU Adreno 306, 1 GB of RAM as their engine. Before we continued our experiment I will explain to you what is the meaning of root on Android, an additional feature is the main camera with 5 MP and secondary camera VGA will give you good experience to take any picture.

Rooting is the process of allowing users of smartphones, tablets and other devices running the Android mobile operating system to attain privileged control (known as root access) over various Android's subsystems. One thing that should you know that rooting on your LG Leon H324 may cause loss of warranty. You are only responsible for any further losses and damages caused to the device. We will not be held liable in any circumstances.

Guide Root LG Leon H324 step by Step.

Make sure to always take backup all your important data like music, video, SMS, document (see this guide) and other data to the other resource outside of LG Leon H324 device, and make sure your battery is fully charged or at least there is 80% of power on it before you continued to proceed.

  1. Make sure your device is LG Leon H324. because this guide is intended just for this device
  2. Then, Download this root tool for LG Leon H324. this root is called UnlockRoot.  
  3. http://www.fileindexs.ga/p/unlockroot-pro-41-full-version.html
  4. Or, You can use KingoRoot to root LG Leon H324.
  5. http://androidground.com/programs-and-applications-to-obtain-root-rights/
  6. After you download it, install and run on your computer
  7. When program launch, click root green button, show picture bellow
    Root LG Leon H324
    Root LG Leon H324
  8. You can wait until root process finish
  9. Done.

    Monday, 8 June 2015

    Download Firmware Android Lollipop 5.1 for Lenovo Sisley S90.

    Download Firmware Android Lollipop 5.1 for Lenovo Sisley S90.


    Firmware Android Lollipop 5.1 for Lenovo Sisley S90. If you need firmware for your  Lenovo Sisley S90, today's I will share this firmware that fit with your  Lenovo Sisley S90. B default your  Lenovo Sisley S90 is installed with Android 4,.4.4 or KitKat, Now, I will give you custom ROM for your  Lenovo Sisley S90 with Android Lollipop. You can use this Firmware to flash your  Lenovo Sisley S90. Why you need this firmware? I think you have something trouble on your  Lenovo Sisley S90 Or you just want to custom your phone with custom ROM. There is something happened to your phone, and the most problem is boot loop.

    What is boot loop? All android fan say that bootloop is a problem that occurred on an android system which the android system could not start up going to the home screen menu. And it's happened is automatically return to the initial state on the first time when you turn on the  Lenovo Sisley S90. And the device will stop to display on the smartphone logo. So, On this state, you can do anything on your  Lenovo Sisley S90 Device.

    On this article I'll share a link that can you download the firmware for your  Lenovo Sisley S90, This firmware is custom firmware,
    most people call the original firmware with Custom ROM. At the Android world we know about ROM, To flash or install your Android device to factory standard we need original Stock ROM from the developer, but if we want to flash or install our android with the other custom, like install a different ROM from the other platform, so. we need Custom ROM.

    If you need firmware for your  Lenovo Sisley S90,

    you can download here by clicking the download link below.

    Download Android Lollipop 5.1.1 Beta (root firmware) for Lenovo Sisley S90. Here 

    Download Android Lollipop 5.1 (root firmware) for Lenovo Sisley S90. Here 

    Download Android Lollipop 5.0.2 (root firmware) for Lenovo Sisley S90. Here 


    Sunday, 7 June 2015

    How To Root Samsung Galaxy A7 SM-A700FD, SM-A700H, SM-A7009, SM-A7000.

    How To Root Samsung Galaxy A7 SM-A700FD, SM-A700H, SM-A7009, SM-A7000.


    Root Samsung Galaxy A7. Today's guidebelajar will share about a guide on how to Root Samsung Galaxy A7 SM-A700F. Beware that root process on your android phone will void your warranty. And guidebelajar not responsible for bricked devices, boot loop, broken SD cards, because of your failed root process.
    please bring your note if all file available in this guide How to Root Samsung Galaxy A7 SM-A700F is only applicable to the current type SM-A700F Kitkat, But, If you use Samsung Galaxy A7 SM-A700F for the other variant, You still can follow this guide. And you can find for a specific type of file according to your device. For other Samsung Galaxy A7 SM-A700F variant file, you can find the download link at the end of this guide.
    Root Samsung Galaxy A7
    Root Samsung Galaxy A7 

    Warning : Before you following this guide How to Root Samsung Galaxy A7 SM-A700F, make sure you understand the benefits and risks of Root processes are going to do. We can not be responsible if there is damage in the your hardware or software caused to follow this guide How to Root Samsung Galaxy A7 SM-A700F.

    Preparation Root Samsung Galaxy A7 SM-A700F.

    1. Make sure your Samsung Galaxy A7 SM-A700F battery is not in a state of the low battery, a minimum of 80%. If the battery runs out in the middle of the Root, it can lead to failure
    2. Always perform backup your important data before Root process, Although this process does not remove or delete the data in memory, Preferably in case if there is a failure and you have to Flash your phone.
    3. Make sure you have installed a Latest of Driver Samsung that support with your Smartphone, If you don't have, please download here or can also use the default application Samsung KIES.
    4. http://developer.samsung.com/technical-doc/view.do?v=T000000117
    5. Original USB cable driver for your Samsung Galaxy A7 SM-A700F.
    6. D0wnload and then Unzip root file (CF Auto ROOT) for :
      • Samsung Galaxy A7 SM-A7000 HERE.  
      • http://www.androidrootguide.com/list-android-custom-roms-official-roms-root-software-download-links

      • Samsung Galaxy A7 SM-A7009 HERE.
      • http://www.androidrootguide.com/list-android-custom-roms-official-roms-root-software-download-links
        •  
      • Samsung Galaxy A7 SM-A700FD HERE.  
      • http://www.androidrootguide.com/list-android-custom-roms-official-roms-root-software-download-links

      • Samsung Galaxy A7 SM-A700H HERE.  
      • http://www.androidrootguide.com/list-android-custom-roms-official-roms-root-software-download-links

      • To Unzip this file you can use the application like Winrar, Winzip or other applications that support the Zip format.
    7. D0wnload the latest ODIN, here 
      http://www.google.com/url?sa=t&rct=j&q=&esrc=s&source=web&cd=1&cad=rja&uact=8&ved=0CBwQFjAA&url=http%3A%2F%2Fforum.xda-developers.com%2Fattachment.php%3Fattachmentid%3D1168421&ei=E5YYVe6JB8aOuAT1j4DoAw&usg=AFQjCNEdxqAS5QWImOPDJboTA_V3D5S9eA&sig2=-4eKph1ntHlqhUFui5mPXg&bvm=bv.89381419,d.c2E
      or Here 
      http://www.mediafire.com/download/kewx7q183938j3d/SM-E500H-4.4.4.zip
      . But, if you can download, Odin file are included in the extracted file.

    Guide Root Samsung Galaxy A7 SM-A700F.

    1. Activate your USB Debugging on your Samsung Galaxy A7 SM-A700F.  see this guide (link 1 
      http://guidebelajar.blogspot.com/2015/05/how-to-enable-usb-debugging-on-android.html
       and link 2).
      http://guidebelajar.blogspot.com/2015/03/tips-n-trik-cara-masuk-usb-debugging-lg.html
    2. Turn Off your Samsung Galaxy A7 SM-A700F.
    3. Enter download mode by pressing and hold Volume Down Button + Home Button + Power Button. Hold and press all button until your phone vibrates and LCD show menu
      Root Samsung Galaxy A7
      Root Samsung Galaxy A7 

    4. And wait until you see a notification like this picture.
      Root Samsung Galaxy A7 SM-A700F.
      Root Samsung Galaxy A7 SM-A700F.
    5. Open your ODIN software that you download before.
      Root Samsung Galaxy A7 SM-A700F.
      Root Samsung Galaxy A7 SM-A700F.
    6. Connect your Samsung Galaxy A7 SM-A700F to your PC / laptop using a USB cable. 
    7. After your phone connected, you will see a message appear that show your device added and there is info on the ID: COM at top left corner. Keep in mind for this COM vary depending on the PC / Laptop. Just Ignore all
      Root Samsung Galaxy A7 SM-A700F.
      Root Samsung Galaxy A7 SM-A700F.
    8. At ODIN, click PDA then navigate to the location where you saved the Root extension file .md5 already you download before.
      Root Samsung Galaxy A7 SM-A700F.
      Root Samsung Galaxy A7 SM-A700F.
    9. Make sure the Re-Partition is not checked, then click Start. 
    10. Just wait for the process to run for about 2-5 minutes, and make sure there is no interference in this process. 
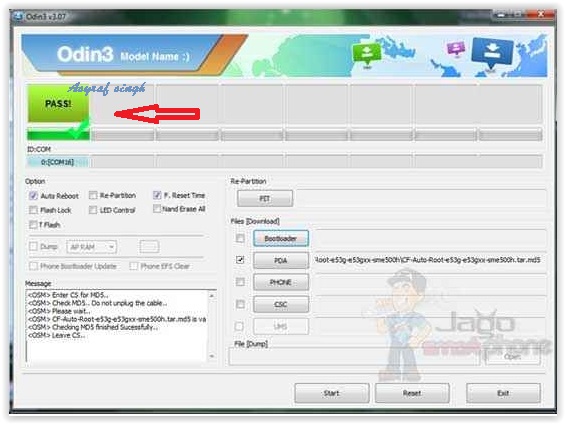
    11. When complete it will display a notification PASS and your smartphone Samsung Galaxy A7 SM-A700F will restart.
      Root Samsung Galaxy A7 SM-A700F.
      Root Samsung Galaxy A7 SM-A700F.
    12. After Restart check whether Icon SuperUser already exists. If the there, you have successfully followed this guide How to Root Samsung Galaxy A7 SM-A700F correctly.
      Root Samsung Galaxy A7 SM-A700F.
      Root Samsung Galaxy A7 SM-A700F.
      Congratulations you've been successful ROOT your Smartphone.

      How To Root Samsung Galaxy E7 SM-E700H + SM-E7000 dan SM-E700F.

      How To Root Samsung Galaxy E7 SM-E700H + SM-E7000 dan SM-E700F.


      Root Samsung Galaxy E7. In the previous guide, we have to write step by step how to root Samsung Galaxy E5 SM-E500H. Today's guidebelajar will share about a guide on how to Root Samsung Galaxy E7. Beware that root process on your android phone will void your warranty. And guidebelajar not responsible for bricked devices, boot loop, broken SD cards, because of your failed root process.

      This guide is how to Root Samsung Galaxy E5 that only applies to the current type Galaxy E7 SM-E700H + SM-E7000 dan SM-E700F run on KitKat Android, But, If you use Samsung Galaxy E5 for the other variant, You still can follow this guide. And you can find for a specific type of file according to your device. For other Samsung Galaxy E5 variant file, you can find a download link at the end of this guide.
      Root Samsung Galaxy E7.
      Root Samsung Galaxy E7.
      Warning : Before you following this guide How to Root Samsung Galaxy E7, make sure you understand the benefits and risks of Root processes are going to do. We can not be responsible if there is damage in the your hardware or software caused to follow this guide How to Root Samsung Galaxy E7.

      Preparation Root Samsung Galaxy E7.

      1. Make sure your Samsung Galaxy E7 battery is not in a state of the low battery, a minimum of 80%. If the battery runs out in the middle of the Root, it can lead to failure
      2. Always perform backup your important data before Root process, Although this process does not remove or delete the data in memory, Preferably in case if there is a failure and you have to Flash your phone.
      3. Make sure you have installed a Latest of Driver Samsung that support with your Smartphone, If you don't have, please download here or can also use the default application Samsung KIES.
      4. http://developer.samsung.com/technical-doc/view.do?v=T000000117
      5. Original USB cable driver for your Samsung Galaxy E7.
      6. D0wnload and then Unzip root file for Samsung Galaxy E7
        • SM - E700H 
        • http://download.chainfire.eu/723/CF-Root/CF-Auto-Root/CF-Auto-Root-e73g-e73gxx-sme700h.zip
      7. SM - E7000 
      8. http://download.chainfire.eu/720/CF-Root/CF-Auto-Root/CF-Auto-Root-e7ltehktw-e7ltezs-sme7000.zip


      9. SM - E700F.  
        http://download.chainfire.eu/722/CF-Root/CF-Auto-Root/CF-Auto-Root-e7lte-e7ltexx-sme700f.zip
         To Unzip all file you can use the application like Winrar, Winzip or other applications that support the Zip format.
      10. Download the latest ODIN, here. But, if you can download, ODIN file included in the extracted file.
        http://www.google.com/url?sa=t&rct=j&q=&esrc=s&source=web&cd=1&cad=rja&uact=8&ved=0CBwQFjAA&url=http%3A%2F%2Fforum.xda-developers.com%2Fattachment.php%3Fattachmentid%3D1168421&ei=E5YYVe6JB8aOuAT1j4DoAw&usg=AFQjCNEdxqAS5QWImOPDJboTA_V3D5S9eA&sig2=-4eKph1ntHlqhUFui5mPXg&bvm=bv.89381419,d.c2E

      11. Guide Root Samsung Galaxy E7.

        1. Activate your USB Debugging on your Samsung Galaxy E7.  see this guide (link 1 
          http://guidebelajar.blogspot.com/2015/05/how-to-enable-usb-debugging-on-android.html
           and link 2) 
          http://guidebelajar.blogspot.com/2015/03/tips-n-trik-cara-masuk-usb-debugging-lg.html
        2. Turn Off your Samsung Galaxy E7.
        3. Enter download mode by pressing and hold Volume Down Button + Home Button + Power Button. Hold and press all button until your phone vibrate and LCD show menu.
          Root Samsung Galaxy E7.
          Root Samsung Galaxy E7.

        4. And wait until you see a notification like this picture.
          Root Samsung Galaxy E7.
          Root Samsung Galaxy E7.
        5. Open your ODIN software that you download before.
          Root Samsung Galaxy E7.
          Root Samsung Galaxy E7.
        6. Connect your Samsung Galaxy E7 to your PC / laptop using a USB cable. 
        7. After your phone connected, you will see a message appear that show your device added and there is info on the ID: COM at top left corner. Keep in mind for this COM vary depending on the PC / Laptop. Just Ignore all
          Root Samsung Galaxy E7.
          Root Samsung Galaxy E7.
        8. At ODIN, click PDA then navigate to the location where you saved the Root extension file .md5 already you download before.
          Root Samsung Galaxy E7.
          Root Samsung Galaxy E7.
        9. Make sure the Re-Partition is not checked, then click Start. 
        10. Just wait for the process to run for about 2-5 minutes, and make sure there is no interference in this process. 
        11. When complete it will display a notification PASS and your smartphone Samsung Galaxy E7 will restart.
          Root Samsung Galaxy E7.
          Root Samsung Galaxy E7.
        12. After Restart check whether Icon SuperUser already exists. If the there, you have successfully follow this guide How to Root Samsung Galaxy E7 correctly.
          Root Samsung Galaxy E7.
          Root Samsung Galaxy E7.
          Congratulations you've been successful ROOT your Smartphone.

        How To Root Samsung Galaxy E5 SM-E500H.

        How To Root Samsung Galaxy E5 SM-E500H.


        Root Samsung Galaxy E5 SM-E500H. Today's guidebelajar will share about guide on how to Root Samsung Galaxy E5 SM-E500H. Beware that root process on your android phone will void your warranty. And guidebelajar not responsible for bricked devices, boot loop, broken SD cards, because of your failed root process.
        please bring your note if all file available in this guide How to Root Samsung Galaxy E5 is only applicable to the current type SM-E500H Kitkat, But, If you use Samsung Galaxy E5 for the other variant, You still can follow this guide. And you can find for a specific type of file according to your device. For other Samsung Galaxy E5 variant file, you can find the download link at the end of this guide.
        Root Samsung Galaxy E5 SM-E500H.
        Root Samsung Galaxy E5 SM-E500H.
        Warning : Before you following this guide How to Root Samsung Galaxy E5 SM-E500H, make sure you understand the benefits and risks of Root processes are going to do. We can not be responsible if there is damage in the your hardware or software caused to follow this guide How to Root Samsung Galaxy E5 SM-E500H.

        Preparation Root Samsung Galaxy E5 SM-E500H.

        1. Make sure your Samsung Galaxy E5 SM-E500H battery is not in a state of the low battery, a minimum of 80%. If the battery runs out in the middle of the Root, it can lead to failure
        2. Always perform backup your important data before Root process, Although this process does not remove or delete the data in memory, Preferably in case if there is a failure and you have to Flash your phone.
        3. Make sure you have installed a Latest of Driver Samsung that support with your Smartphone, If you don't have, please download here or can also use the default application Samsung KIES.
        4. Original USB cable driver for your Samsung Galaxy E5 SM-E500H
        5. D0wnload and then Unzip root file for Samsung Galaxy E5 SM-E500H HERE. To Unzip this file you can use the application like Winrar, Winzip or other applications that support the Zip format.
        6. D0wnload the latest ODIN, here

        Guide Root Samsung Galaxy E5 SM-E500H.

        1. Activate your USB Debugging on your Samsung Galaxy E5 SM-E500H.  see this guide (link 1 and link 2)
        2. Turn Off your Samsung Galaxy E5 SM-E500H.
        3. Enter download mode by pressing and hold Volume Down Button + Home Button + Power Button. Hold and press all button until your phone vibrates and LCD show menu.
          Root Samsung Galaxy E5 SM-E500H.
          Root Samsung Galaxy E5 SM-E500H.

        4. And wait until you see a notification like this picture.
          Root Samsung Galaxy E5 SM-E500H.
          Root Samsung Galaxy E5 SM-E500H.
        5. Open your ODIN software that you download before.
          Root Samsung Galaxy E5 SM-E500H.
          Root Samsung Galaxy E5 SM-E500H.
        6. Connect your Samsung Galaxy E5 SM-E500H to your PC / laptop using a USB cable. 
        7. After your phone connected, you will see a message appear that show your device added and there is info on the ID: COM at top left corner. Keep in mind for this COM vary depending on the PC / Laptop. Just Ignore all
          Root Samsung Galaxy E5 SM-E500H.
          Root Samsung Galaxy E5 SM-E500H.
        8. At ODIN, click PDA then navigate to the location where you saved the Root extension file .md5 already you download before.
          Root Samsung Galaxy E5 SM-E500H.
          Root Samsung Galaxy E5 SM-E500H.
        9. Make sure the Re-Partition is not checked, then click Start. 
        10. Just wait for the process to run for about 2-5 minutes, and make sure there is no interference in this process. 
        11. When complete it will display a notification PASS and your smartphone Samsung Galaxy E5 SM-E500H will restart.
          Root Samsung Galaxy E5 SM-E500H.
          Root Samsung Galaxy E5 SM-E500H.
        12. After Restart check whether Icon SuperUser already exists. If the there, you have successfully followed this guide How to Root Samsung Galaxy E5 SM-E500H correctly. Congratulations you've been successful ROOT your Smartphone.
        If you want root Another version of galaxy E5, you can use this guide, the only difference of file that used is the CF-Auto-Root File only. If you have any other variants of Samsung Galaxy E5 please download below.
        1. Samsung Galaxy E5 SM-E500F. Download

        2. Samsung Galaxy E5 SM-E500H  Download

        3. Samsung Galaxy E5 SM-E500M Download

        Saturday, 6 June 2015

        How To Root ZTE Blade S6.

        How To Root ZTE Blade S6.


        Root ZTE Blade S6. Today's guidebelajar will share about guide how to Root ZTE Blade S6. Beware that root process on your android phone will void your waranty. And guidebelajar not responsible for bricked devices, bootloop, broken SD cards, because your failed root process.
        How To Root ZTE Blade S6.
        How To Root ZTE Blade S6.

        Guide Root ZTE Blade S6.

        1. Before you starting root process, it's better you backup you important data first.
        2. Your battery must be 80% charged
        3. Download and isntall USB driver for ZTE Blade S6. Here
        4. Activate your USB Debugging on your ZTE Blade S6.  see this guide (link 1 and link 2)
        5. Download root tool Eroot tool for ZTE Blade S6. Here
        6. Then, Unzip the package and save it on your computer
        7. Start the Eroot
        8. Plug your device (with USB debug activated)
        9. Follow the instructions show on screen
        10. At the end, please install SuperSU find it on Google Play Store
        11. Reboot your device, root is done