smartdroid

Monday, 13 November 2017

How to Disable CTRL+ALT+DEL Requirement for Windows Server 2012 Logon Screen.

How to Disable CTRL+ALT+DEL Requirement for Windows Server 2012 Logon Screen.

Disable CTRL+ALT+DEL. The following guide will show you how to bypass or disable CTRL+ALT+DEL requirement at Windows Server 2012. Generally, we must press CTRL+ALT+DEL simultaneously if we want to Login to the computer desktop. But for certain conditions, we can also disable this screen by doing this task. To disable this screen you must access the policy. By default, this policy is disabled on Windows Server 2012 workstation and servers that are joined to a domain.

Now, you can follow this guide to disable CTRL+ALT+DEL screen on Windows Server 2012.
Disable CTRL+ALT+DEL

Instructions.
  1. From the Windows Server 2012 Desktop, click start button located at the left bottom of the screen.
  2. Now, click magnifier icon (search icon) located at the right top of the screen.
  3. Then, at the search form type the following text.
    • local security policy
      Disable CTRL+ALT+DEL
      Disable CTRL+ALT+DEL
  4. Also, you can access local security policy using Run command. How to access local security policies using run?
    • Press Windows  +  R
    • Then type secpol.msc
  5. Then, it will open Local security policy windows.
    Local security policy windows
    Local security policy windows
  6. From Local security policy windows, you can navigate to;
    • Security Settings - Local Policies - Security Options.
  7. Now, go to the right panel windows and double-click the following menu.
    • Interactive logon: Do not require CTRL+ALT+DEL
  8. Now, it will open Interactive logon: Do not require CTRL+ALT+DEL windows.
    Interactive logon: Do not require CTRL+ALT+DEL
    Interactive logon: Do not require CTRL+ALT+DEL
  9. From this window, you can select enable or disable. Then click Apply - Ok.
  10. Now, reboot your Windows Server 2012 machine.
  11. Once the machine boot up, CTL+ALT+DEL screen no longer available on your machine.

How to Remove Log On Password on Windows Server 2012.

How to Remove Log On Password on Windows Server 2012.

Remove Log On Password Windows Server 2012. Generally, all Operating System has a Logon or Login sections. Logon is the procedure used to get access to the Windows or other operating systems. Logon also protects your operating system from unauthorized user to use your computer. But, you can also remove or disable the Logon password on your Windows computer. And now, guidebelajar will explain to you how to Remove Log On Password on Windows Server 2012. Just follow this guide how to do it.

Remove Logo Password Windows Server 2012.

  1. From the Desktop, click start button located at the left bottom of the screen.
  2. Now, click magnifier icon (search icon) located at the right top of the screen.
  3. Then, at the search form type the following command.
    • netplwiz
      automatically login Windows Server 2012
      automatically login Windows Server 2012
  4. This command will open the User Accounts program windows.
    automatically login Windows Server 2012
    automatically login Windows Server 2012
  5. From this window, you must select the account you wish to use to log in automatically. E.g: Administrator.
  6. Then, Click off the check-box above the user account that says "Users must enter a username and password to use this computer." Click OK.
  7. Now, Enter your password once and then a second time to confirm it. 
  8. Then click OK.
  9. Now, you can restart your Windows Server 2012 to apply changes.
  10. Once it boots up, Windows Server 2012 will bypass the lock screen and the log-in screen to automatically take you to the Desktop or Start screen.

Sunday, 12 November 2017

How to Access StartUp Folder on Your Windows All Versions.

How to Access StartUp Folder on Your Windows All Versions.

Open StartUp Folder. Windows has many system folders to help operate the OS run properly. For example is the Startup folder. You can put any shortcut program Windows in the Startup folder. This program will automatically launch when the Windows OS running. On the old Windows version Startup folder located in the program folder. You can found it by clicking on the Start button and going into the Programs folder. But, how to access the StartUp Folder on the latest Windows version?

Therefore, just follow this guide on how to access the Startup folder on every Windows OS.

#1. Access Startup Folder Via Run Command.

  1. This method is universal in all version of Windows, you can use this method for the fastest step.
  2. To launch Run command you must press simultaneously the following keyboard button.
    • Windows + R button.
      windows + R
      windows + R
  3. Now, the Run window is displayed immediately on your screen.
    run program windows
    run program windows
  4. Then, type this command in the open form and press enter or click the Ok button.
    • shell:startup
  5. It will immediately open the Startup folder.

#2. Access Startup Folder Windows 7.

  1. You can use the first method above to access the Startup folder on Windows 7.
  2. Or, you can go to Start - All Programs - Startup - right click startup - explore.

#3. Access Startup Folder Windows 8.1.

  1. The first method is a universal method, you can use it to access the Startup folder.
  2. Or, from the desktop point your mouse to the upper right corner of the screen to show the charm bar.
    charm bar windows 8
    charm bar windows 8
  3. Then, click magnifier to search any program.
  4. Now, type run.
  5. Once the Run program found you can click it.
  6. From the Run windows type this command; shell:startup

#4. Access Startup Folder Windows 10.

  1. You can use the first method above to access the Startup folder on Windows 10.
  2. Or, use this method.
  3. You can press the Start button to open the Start Menu.
  4. Then, click or tap “All Apps -> Windows System -> Run”.
  5. From the Run windows type this command; shell:startup

#5. Access Startup Folder Windows Server 2012.

  1. The first method is a universal method, you can use it to access the Startup folder on Windows Server 2012.
  2. Or use this method.
  3. From the desktop point your mouse to the upper right corner of the screen to show the charm bar Windows Server 2012.
    charm bar windows server 2012
    charm bar windows server 2012
  4. Then, click magnifier to search any program.
  5. Now, type run.
  6. Once the Run program found you can click it.
  7. From the Run windows type this command; shell:startup

Saturday, 11 November 2017

How to Hard Reset | Factory Reset Xiaomi Redmi 4 (4X) to Remove Forgotten Pattern Lock Screen.

How to Hard Reset | Factory Reset Xiaomi Redmi 4 (4X) to Remove Forgotten Pattern Lock Screen.

Reset Xiaomi Redmi 4 (4X). Hard reset on Android device is also known as with factory reset, it will delete everything stored in phone internal memory. Hard reset will restore your device to the default factory setting. So, if you have any problem with your Android phone e.g Xiaomi Redmi 4 (4X). You can try to fix it by performing a hard reset. For example, you have forgotten the pattern lock previously set on your Xiaomi Redmi 4 (4X), or your device becomes slowly when running any Android apps.

Before performing a hard reset on Xiaomi Redmi 4 (4X), make sure any important data backed up at the external storage from your phone. This will avoid you lose everything, also your Google Authenticator credentials. And now, this guide will explain to you how to perform a hard reset on Xiaomi Redmi 4 (4X).

Hard Reset Guide.

  1. If your Android device runs on Android 5.1 or higher, you must remember your Google login and password information. you might be asked to input the Google account login and password after a hard reset process done.
  2. Make sure your device run on enough battery power, at least has 75% of battery capacity.
  3. This guide also applies to many other Xiaomi models, and this method will remove the pattern lock screen, PIN, and fingerprint.
  4. Lets we start this guide. first, you need to power off the Xiaomi Redmi 4 (4X) via Power button.
  5. Once the Xiaomi Redmi 4 (4X) completely power off, then power On the phone again by press and hold the following button simultaneously.
    • Volume UP + Power Button.
    Reset Xiaomi Redmi 4 (4X)
    Reset Xiaomi Redmi 4 (4X)
  6. Then, release all button on your finger if you see MI Logo comes up on the screen. and wait for a few seconds.
    Reset Xiaomi Redmi 4 (4X) - Mi logo
    Reset Xiaomi Redmi 4 (4X) - Mi logo
  7. And now your phone will enter the service menu. Generally, it will show you in the Chinese language.
    Reset Xiaomi Redmi 4 (4X) - chinese menu
    Reset Xiaomi Redmi 4 (4X) - chinese menu
  8. To change the language into English just tap this menu.
  9. Reset Xiaomi Redmi 4 (4X) - English menu
    Reset Xiaomi Redmi 4 (4X) - English menu
  10. From the English language, tap the recovery menu to enter recovery mode.
  11. Then, you will have a warning that says "Do you really want to enter recovery mode?
    recovery mode  Xiaomi Redmi 4 (4X)
    recovery mode  Xiaomi Redmi 4 (4X) 
  12. Now, tap OK.
  13. Just wait for a second, now your Xiaomi Redmi 4 (4X) will enter recovery mode
    recovery mode xiaomi redmi 4 (4X)
    recovery mode xiaomi redmi 4 (4X)
  14. From the recovery mode, select Wipe data. (use a volume down button to navigate between menu, and the power button to confirm)
  15. Then tap Wipe All Data. 
  16. Now, you will see a confirm wipe all data on your screen, to continue hard reset your Xiaomi Redmi 4 (4X), tap Confirm.
    Reset Xiaomi Redmi 4 (4X)
    Reset Xiaomi Redmi 4 (4X)
  17. Now, wait a few seconds again. The system will start processing wipe all data on Xiaomi Redmi 4 (4X).
  18. Once the hard reset process is done, you will see a notification that says, Data Wiped Successfully.
  19. Now, select Back to Main Menu.
  20. Then, select Reboot to reboot your device.
  21. Finish.

Friday, 3 November 2017

Guide | Hard Reset Samsung Galaxy Note 8 Via Hardware Key.

Guide | Hard Reset Samsung Galaxy Note 8 Via Hardware Key.

Hard reset Samsung Galaxy Note 8. The following guide, guidebelajar will show you a simple guide how to perform a hard reset or factory reset on Samsung Galaxy Note 8. Most of Android user call the hard reset with the master reset. It will delete and erase everything stored in the phone internal memory, such as data, file, and personal account. Hard reset can be used to solve the following problems on your Samsung galaxy note 8. For example, the device becomes unstable or run too slow, there are many bugs, or forgotten the password, PIN, or pattern lock.

There is some method you can use to perform the hard reset on your Samsung Galaxy Note 8. First, you can perform a hard reset using the internal setting menu. Second, use hardware button located on the phone side body. And the following guide will show you perform hard reset Samsung Galaxy Note 8 using hardware button.

Hard Reset Guide.

  1. Make sure your device is Samsung Galaxy Note 8.
  2. Hard reset will wipe everything on your phone, we highly recommend to backup it as soon as possible.
  3. Make sure your battery is fully charged, or at least has 75% of battery capacity.
  4. Now, power off the phone.
  5. Once it completely powers off, turn on it again by press and hold simultaneously the following button located on the phone side body.
    • Volume Up + Bixby Button + Power Button.
      Reset Samsung Galaxy Note 8
      Reset Samsung Galaxy Note 8
  6. Now, release all button when your phone shows white Android logo with a blue background.
    Reset Samsung Galaxy Note 8
    Reset Samsung Galaxy Note 8
  7. Just wait the initializing system update for a second.
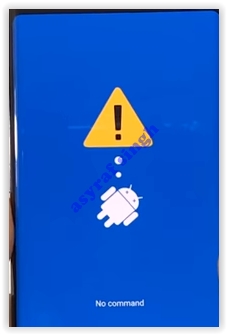
  8. Now, your phone will show a yellow exclamation and no command text. 
    Reset Samsung Galaxy Note 8
    Reset Samsung Galaxy Note 8
  9. At this screen, press and hold the power button to enter Android system recovery.
  10. Once your  Samsung Galaxy Note 8 enter Android system recovery screen, you can use the volume up and volume down button to navigate the menu and use the power button to confirm.
  11. Now, highlight wipe data/ factory reset using volume button, and press the power button to confirm.
    Reset Samsung Galaxy Note 8
    Reset Samsung Galaxy Note 8
  12. On the next screen highlight yes, and press power button to confirm.
    Reset Samsung Galaxy Note 8
    Reset Samsung Galaxy Note 8
  13. The hard reset process will start, and you can see this progress at the bottom of the phone screen.
  14. Once the wipe data complete, you can highlight reboot system now, and press the power button to reboot your phone.
  15. Finish.

Thursday, 2 November 2017

Guide | Bypass Factory Reset Protection Samsung Galaxy Note 8.

Guide | Bypass Factory Reset Protection Samsung Galaxy Note 8.

Bypass FRP Samsung Galaxy Note 8. To protect your Android device after a hard reset, nowadays Android device has a factory reset protection. This is a built-in feature on the latest Android device run at least Android lollipop. Also, FRP works on Samsung Galaxy Note 8. Once the owner performs the factory reset on this device. They must enter the correct Google account previously synced to this device. The answer is, what will they do if forgot the Google account? The following guide will show you how to bypass Factory reset protection on Samsung Galaxy Note 8.

 So, if you still need this information. Read the following step by step guide to Bypass FRP on your Samsung Galaxy Note 8. 

Prerequisite.

  1. Samsung driver. Here
  2. ADB-FRP.zip file Here
  3. A Bluetooth Headset.

Step-by-step Bypass FRP.

  1. Make sure your Samsung Galaxy Note 8. is connected to the Internet via Wi-Fi
  2. Power on your device.
  3. From the Welcome screen, tap emergency call
  4. remove FRP Samsung Galaxy Note 8
    remove FRP Samsung Galaxy Note 8
  5. Now, from the dial pad number, dial 911 to make a call.
  6. When the call options come up, tap the Bluetooth icon.
  7. remove FRP Samsung Galaxy Note 8
    remove FRP Samsung Galaxy Note 8
  8. It will automatically turn ON the Bluetooth.
  9. Then, select the available Bluetooth device around your Samsung Galaxy Note 8. Make sure the connecting device is visible to other devices.
  10. Now, turn On your Bluetooth headset to pair it.
  11. Once it successfully pairing, your Bluetooth device will appear on the Samsung Galaxy Note 8 screen.
  12. remove FRP Samsung Galaxy Note 8
    remove FRP Samsung Galaxy Note 8
  13. Now, tap the available device to start pairing.
  14. Then, tap call end, your phone will back to dial pad again.
  15. Now, go to your Bluetooth headset. Just press and hold the call button for 3 seconds.
  16. Your Samsung Galaxy Note 8 will launch the Google App. and waiting for listening to your voice command.
  17. Just talk anything, for example: OK Google.
  18. Now, type app at the Google search bar. and then tap Galaxy Apps as the search result.
  19. remove FRP Samsung Galaxy Note 8
    remove FRP Samsung Galaxy Note 8
  20. Click Start to use the Galaxy Apps
  21. Now, tap calculator on the search bar. and tap calculator on the search result.
  22. Then, download calculator apps.
  23. remove FRP Samsung Galaxy Note 8
    remove FRP Samsung Galaxy Note 8
  24. Once the calculator successfully installed, now open this app.
  25. From the calculator apps, type the following number;
    • (+30012012732+
  26. It will open DRParser Mode.
  27. Now, type this number;
    • *#0808#
  28. This command will open USB settings. From this screen, you can tap DM+ACM+ADB and then tap Reboot.
  29. remove FRP Samsung Galaxy Note 8
    remove FRP Samsung Galaxy Note 8
  30. Your Samsung Galaxy Note 8 will reboot now, just wait for your device to boot up again.
  31. Once it ready at the welcome screen, connect your Samsung Galaxy Note 8 to the computer via USB cable.
  32. Install USB driver if you have not already installed it.
  33. Checking Port Number used by Samsung Galaxy Note 8 device.
    • Open windows explorer
    • Right click computer - click manage
    • Then, click device manager.
    • Make sure your phone is detected, and the port number is shown on the device list.
    • remove FRP Samsung Galaxy Note 8
      remove FRP Samsung Galaxy Note 8
    • From the picture above, we know that port number used by your device is COM14
  34. Now, extract the ADB-FRP.zip file.
  35. Then double click FRP_addROM file to launch it.
  36. If you see the command prompt as the image below, you can press any key to continue...
  37. remove FRP Samsung Galaxy Note 8
    remove FRP Samsung Galaxy Note 8
  38. Now, disconnect your Samsung Galaxy Note 8 from the computer.
  39. Finish. 

Wednesday, 1 November 2017

Guide | How to Flash TWRP Recovery Xiaomi Mi Max 2

Guide | How to Flash TWRP Recovery Xiaomi Mi Max 2.

Flash TWRP Mi Max 2. The following guide guidebelajar will explain to you how to flash a TWRP Recovery on Xiaomi Mi Max 2. TWRP or Team Win Recovery Project is one of the most popular recovery used by the Android phone user. TWRP is flashed over the stock recovery. Once TWRP successfully the user will get more options on their Android phones, such as flashing custom ROM's, kernel and script, and take a full system backup and restore it, make a root, etc.

There two types of TWRP recovery offered to flash on Android Xiaomi Mi Max 2. Both of its available download from a forum-XDA-developers website.

First, TWRP recovery by xuefer, this TWRP you can download from the following link.
  • Descriptions.
    • Built and tweaked for Mi Max 2 (oxygen) 
    • Decryption support added for /data 
    • Built using LineageOS 14.1 source.
    • Faster transfer using adb push
    • Extra fonts added
Second, TWRP recovery by iscle, this TWRP you can download from the following link.
  • Descriptions.
    • Based on Stock TWRP 3.1.1-0 with no modifications.
    • Ported from Redmi Note 4 (mido) 
    • English language as default 
    • You must flash dm-verity zip immediately after flashing this TWRP, else your Android phone will not boot.

How to Flashing TWRP Recovery.

  1. You must unlock bootloader your Xiaomi Mi Max 2 first before proceeding installing TWRP recovery.
  2. Then, install Minimal ADB + Fastboot drivers. See this guide on how to install it.
  3. Download TWRP recovery from the available link above and copy this recovery to the folder where the ADB and fastboot installed.
    • for example C:\Program Files (x86)\Minimal ADB and Fastboot folder
  4. Then, download dm-verity disabler and copy the file to your Xiaomi Mi Max 2 phone.
  5. Power off your Xiaomi Mi Max 2, 
  6. Then, Power on again into fatsboot mode. How to boot Xiaomi Mi Max 2 to fastboot mode?
    • Press and Hold the Power + Volume Down at the same time.
  7. Once your phone enters fastboot mode, connect it to the computer.
  8. Back to your computer, and go to the folder where TWRP file is present. (Refers to step 3 above)
  9. Now, open a command prompt. (right click + hold the ctrl on the keyboard)
  10. Now, type this command at the command prompt.
    • fastboot devices
  11. The result will return with your phone serial number.
  12. Then type;
    • fastboot flash recovery <recovery_name.img>
    • example ;
      • fastboot flash recovery twrp_3.1.1-0.img
  13. This command will execute TWRP to flashed on your Xiaomi Mi Max 2
  14. Once it completed, now type this command at the command prompt to boot your Xiaomi Mi Max 2 into TWRP
    • fastboot boot <recovery_name.img>
    • example;
      • fastboot boot  twrp_3.1.1-0.img.
  15. Now, disconnect your Xiaomi Mi Max 2 from the computer.

Setup The TWRP Recovery.

  1. Once your Xiaomi Mi Max 2 enter TWRP recovery, on the screen, swipe to allow modifications and select your language. then, uncheck "Keep system read-only"
  2. Then, Select Install and then choose the dm-verity disabler zip and swipe start to flash this zip file.
  3. Then, select Backup and check all partitions. 
  4. Swipe to backup. The backup file will be stored in "TWRP" folder.
  5. Now, select reboot to reboot your device.
  6. You will be asked if you want to disable the stock recovery. Swipe to disable.
  7. Now, your Xiaomi Mi Max 2 will boot into MIUI with TWRP installed.