smartdroid: bypass FRP
Showing posts with label bypass FRP. Show all posts

Sunday, 13 May 2018

Samsung Galaxy J7 Pro Bypass FRP Remove Google Account.

Samsung Galaxy J7 Pro Bypass FRP Remove Google Account.

Remove Factory Reset Protection. FRP is a new built-in feature in the Android operating system. this will help protect the data and information stored on your mobile after you perform a hard reset, Including encrypted data and screen lock. The FRP or Factory Reset Protection is a security feature for your Android phone. This feature is already equipped on the phone that runs the Android operating system Lollipop 5.1 or higher. This guide will show you how to remove Google account previously synced on the Samsung J7 Pro.

So, FRP will automatically work when you are synchronizing your mobile device with a Gmail account, So you do not need to activate manually. When FRP is enabled on your J7 Pro device, it prevents the use of a device after a factory data reset, until you log in using Google username and password previously set up on the device. So you need to make sure to keep your Google account in a safe place before doing a hard reset. in other words, you should not forget the Google account ever registered on your smartphone. Otherwise, your smartphone will be locked.

Then what can you do if you currently forget your Gmail account and you have done the factory reset on Samsung J7 Pro? this is not a difficult thing. The following guidelines will explain in detail. I hope you are the official owner of the mobile phone that will bypass its FRP. So your actions are legal, and not harmful to others.

Here are some suggestions you can make before perform the hard reset process on the Samsung Galaxy J7 Pro, to avoid having your device locked by FRP.

  1. Make sure you backup all data before the hard reset process is done.
  2. Make sure you correctly remember or write down your Google account. This account we need to login after a hard reset.
  3. If you know your Google account username, but can't remember the password related the current Gmail, you can reset your password on the device. it can take up to 24 hours for a new password to sync with all registered phone or devices. After 24 hours, you can try logging in to your smartphone with the new password.

Guide to Remove FRP Samsung Galaxy J7 Pro.


Tuesday, 24 April 2018

Bypass FRP Google Account And Hard Reset Samsung A-Series A8/8 Plus (SM-A530F/SM-A730F)

Bypass FRP Google Account And Hard Reset Samsung A-Series A8/8 Plus (SM-A530F/SM-A730F).

Bypass FRP Samsung Galaxy A-Series A8/8 Plus. For Samsung phones that already use at least Android 5.0 operating system, the factory reset protection or FRP will automatically enable when you sync the device with your Google account. as well as Samsung Galaxy A8 / A8 Series, this device also has the FRP feature. This feature will help the user from unwanted people who want to access phone after they performed the hard reset on the current device. issues that appear on the phone screen after a hard reset process are as follows "this device was reset, to continue, sign in with a Google account that was previously synced on this device"

This occurs because you forget the Google account information previously synced with the device after a hard reset process. For people who need information on how to perform a hard reset on the Samsung Galaxy A8, you can follow this guide.

Warning: Hard reset will delete everything stored on the phone memory, it removes all data including.
  • Google™ account 
  • System and app 
  • data App settings 
  • Downloaded apps and etc

How to Hard Reset Samsung A8 | A8 Plus.

  1. This method is using the hardware button located on the phone body to perform a hard reset on Samsung Galaxy A8. Use this method to unlock forgotten PIN, password, or pattern lock.
  2. Power off phone. to force the phone off press and hold Power Button + Volume Button
  3. Once the phone completely power off, now press and hold the following button to turn on into Android system recovery.
    • Power button + Volume UP
  4. Release all button when the Samsung Galaxy A8 logo comes up.
  5. Just wait until your phone enters Android Recovery screen.
  6. Here, you can navigate the menu using Volume Up or Volume down button and use the Power button to confirm.
  7. Now, highlight Wipe data/factory reset. and press Power button to confirm.
  8. Then, on the next screen highlight Yes and press power button to confirm
  9. Now, the hard reset process will start to erase everything on your Samsung Galaxy A8 / A8 Plus and then restore all setting to default factory setting.
  10. Once the hard reset process completed, now choose reboot system now.
Here is step by step how to Bypass Factory Reset Protection on Samsung Galaxy A8 / A8 Plus.

bypass FRP Samsung A8

Prerequisite.

  1. ODIN Flash tool Here
  2. ROM or firmware (1 = Security level 1 Samsung Update If the device is in a high-level security update, the ROM must be at the same level of security.).
    • Samsung Galaxy A8 - SM-A530F Version
      • COMBINATION_OXM_FA71_A530FXXU1ARA1
      • http://123link.pw/wWPNk
      • Stock Rom  5File SM-A530FXXU1AQLC
      • http://123link.pw/VW6AoE
    • Samsung Galaxy A8 - SM-A730F Version
      • COMBINATION_OXM_FA71_A730FXXU1ARA1
      • http://123link.pw/5mDMVJc
      • Rom Stock 5File SM-A730FXXU1AQLE
      • http://123link.pw/XApE

Instruction - Video Guide.

(how to bypass Google account protection Samsung Galaxy A8 / A8 plus)

Sunday, 15 April 2018

How to Hard Reset And Remove FRP Bypass Google Account Samsung Galaxy S9.

How to Hard Reset And Remove FRP Bypass Google Account Samsung Galaxy S9.

Hard Reset Samsung Galaxy S9. The following guide will show you how to perform hard reset or master reset Samsung Galaxy S9 or S9 Plus. Hard reset is also called factory reset. After performing a hard reset, all data stored in memory will be erased. Including installed applications will also be deleted. Your phone will be restored to the default factory settings after reboot. Therefore, we strongly recommend doing any backups stored on the phone before performing a hard reset. This means, that the important data you need is not deleted during the hard reset process. You can keep the data in a safe place. You can backup it if your Samsung Galaxy S9 or S9 plus is not locked. 

Before performing a hard reset, we will review the Samsung Galaxy S9 specs.
  • Released: 2018, March
  • Display: 5.8 inches, 84.8 cm2. Super AMOLED capacitive touchscreen, 16M colors
  • OS: Android 8.0 (Oreo)
  • Chipset: Exynos 9810 Octa
  • CPU: Octa-core (4x2.7 GHz Mongoose M3 & 4x1.8 GHz Cortex-A55)
  • GPU: Mali-G72 MP18
  • Camera: 12 MP on primary camera and 8 MP on secondary camera.
    hard reset samsung galaxy s9
    hard reset Samsung galaxy s9

The reason's why people performing a hard reset on Samsung Galaxy S9.

  1. Phone become a blank or Frozen screen
  2. The App runs on the Samsung Galaxy S9 crash or freezing.
  3. You can't hear the phone speaker.
  4. The device making any noises.
  5. You can't make and receive calls from someone.
  6. You can't sync your account 
  7. You have forgotten the password, PIN, or security pattern lock screen.

Hard Reset Samsung Galaxy S9 - (First Method).

You can use this method if your Samsung Galaxy S9 is still responsive and can be powered on normally. Just follow this step below to perform a hard reset on Samsung Galaxy S9 with this method.
  1. Power On your Samsung Galaxy S9.
  2. Then from the home screen, you can swipe Up or Swipe down from the center of the display to access the apps screen.
  3. Now, navigate to Settings General management - Reset.
  4. Then, you can tap Factory data reset. Here you can review the tap Reset. If your phone needs to enter the PIN, password, or pattern. You must provide the correct PIN, password, or pattern previously setup on the phone.
  5. Then, Tap delete all.
  6. Here, you need to Allow several minutes for the factory data reset and reboot processes to complete. Once it complete, you need to set up the device after the process.

Hard Reset Samsung Galaxy S9 - (Second Method.)

If the first method is not possible for you to follow, because your device is locked by a forgotten PIN password or Pattern. You can perform a hard reset on your Samsung Galaxy S9 / S9 plus using the second method. This method will explain step by step how to perform a hard reset to remove a forgotten password, PIN, or pattern on your Samsung S9 / S9 Plus.
  1. Power Off the Samsung Galaxy S9 / S9 Plus.
  2. Once your phone is completely powered off. Now you can do the following step.
    • Press and hold the Volume UP + Power Button + Bixby Button 
    • Hold all three button at the same time.
  3. Release all button, when you see Android System recovery comes up on the screen.
    hard reset samsung galaxy s9
    hard reset Samsung galaxy s9
  4. You can scroll down across the menu using volume Up or volume down button. both volume buttons serve to navigate across menus.
  5. Now, highlight wipe data/factory reset.
  6. Then, hit the power button to confirm.
  7. On the next screen, you will select two options (Yes and No). You will be warned "Wipe All User Data, This Can not Be Undone". in order to continue, you need to highlight yes and hit the power button to confirm. Otherwise, you can select No.
    hard reset samsung galaxy s9
    hard reset Samsung galaxy s9
  8. Once you already to do, the hard reset process on Samsung Galaxy S9 / S9 Plus will begin. Let's go ahead and do it. The process gonna say that our wipe completes down shown at the bottom of the screen.
  9. That means, that your Samsung Galaxy S9 / S9 Plus was cleared out. Everything stored on the phone memory was erased.
  10. Now, we can back to the Android System recovery main screen. To end the hard reset process, you need to highlight the reboot system now and make your Samsung Galaxy S9 / S9 Plus reboot.
  11. After your phone turns on again, you will see a Password, PIN or pattern is gone from your phone.

Bypass FRP or Remove Google Account or Remove Android Device Protection Samsung Galaxy S9.

Samsung Galaxy S9 or S9 plus already support FRP protection, to protect your phone from unauthorized people after they perform a hard reset. They must provide a correct Google account information previously synced with your Samsung Galaxy S9. So, what will you do if you have forgotten your Google account information? here you can find the solutions.

Prerequisite.

  1. Original/Genuine USB Cable for Samsung Galaxy S9 / S9 Plus
  2. Make sure you have at list 80% of battery capacity, it will keep your phone alive during removing FRP process.
  3. Always backup everything before proceeding with this task.
  4. Files.
    • Samsung USB Driver. Here
    • ODIN software Here
    • Z3X Tool Pro - Samsung Tools Pro C**cked Version! Here
    • Samsung Jx Combination files. Here  
    • Samsung Jx Firmware. Here
      • (where Jx stands for your phone model. for example, J530F 2017)

Instruction Guide.

  1. Once all files above already downloaded, now put all file in the same folder.
  2. Install Samsung USB driver
  3. Now, install Z3X Tools, you must disable antivirus currently run on your computer. Install in the same folder where you have tnt enforcer and Z3X 24.3 loader
  4. Run tnt enforcer as Administrator and then enable it.
  5. Then run Z3X 24.3 loader as Administrator.
  6. Now, extract combination files.
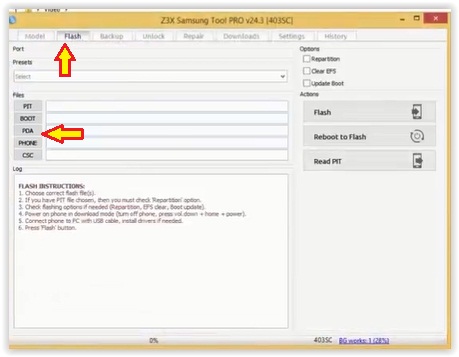
  7. Once Z3X Samsung tool pro windows come up, select Flash tab - then click PDA to browse the combination file.
    bypass FRP Samsung S9 and S9 plus
    bypass FRP Samsung S9 and S9 plus
  8. Now, connect your Samsung Galaxy S9 to the computer via USB cable and enter your phone into download mode. How to enter Samsung Galaxy S9 / S9 Plus into download mode?
    • Press and hold the Volume down button + Bixby Button + Power Button.
    • Then press Volume Up button to continue.
  9. Then, you must click Flash button to start flashing process.
  10. Just wait until finish, and your phone will reboot.
  11. When your phone start, it will have a strange look. Don't worry about it. This is normal.
  12. When phone starts to boot menu, press Reboot to flash to get back to download mode.
    bypass FRP Samsung S9 and S9 plus
    bypass FRP Samsung S9 and S9 plus
  13. Now, extract original firmware and ODIN in the same folder.
  14. You should extract these 3 files: AP, HOME CSC, and BL
  15. Now, flash with ODIN
    bypass FRP Samsung S9 and S9 plus
    bypass FRP Samsung S9 and S9 plus
  16. Start to flash the original firmware, click the start button on ODIN windows.
  17. Just wait the process done, you can see the flashing progress on your phone in download mode.
    Download mode Samsung S9 and S9 plus
    Download mode Samsung S9 and S9 plus
  18. Once it finishes, your phone will boot. And you can make the initial setup.

Wednesday, 22 November 2017

Bypass FRP Reset or Google Verification Huawei Mate 9

Bypass FRP Reset or Google Verification Huawei Mate 9

FRP Reset Huawei Mate 9. In this guide, we will explain to you how to bypass verification Gmail account after performing the hard reset on Huawei Mate 9. Now, on at least Lollipop-based Android systems are already using FRP or factory reset protection to protect Android device for an unauthorized user to access the phone after they perform a hard reset. If they are not the Huawei Mate 9 phone user, surely he does not know the Gmail account previously synced to the device. To bypass the FRP on Huawei Mate 9 you need to enter the correct Gmail user and password. But, what should you do if you forgot the Gmail account? while you are the phone owner?

Ok, here is the solution to your problem, this guide created from this video. The tutorial begins here.

Bypass FRP Huawei Mate 9.

  1. After a hard reset on this device completed, you will see the verifying your account screen as shown the image below.
  2. remove FRP Mate 9
    remove FRP Mate 9
  3. You must enter the Google account information previously synced with this device. If you forgot it then you continue to step no. 3 below
  4. Power Off your Huawei Mate 9.
  5. Then, Insert SIM card.
  6. Now, Power On again your phone.
  7. Just wait for your phone to boot up, once your phone comes to the following screen. You need to tap emergency call.
  8. remove FRP Mate 9
    remove FRP Mate 9
  9. At the dial screen, you need dial this number. *#*#6130#8#*
  10. remove FRP Mate 9
    remove FRP Mate 9
  11. It will enter the testing screen.
  12. From this screen, tap Phone Information.
  13. At the bottom of the screen, you need to select SIM card service.
  14. Then, you will see Phone Info screen.
  15. Tap three dots located at the top right of the screen, and then tap View SIM Address book.
  16. remove FRP Mate 9
    remove FRP Mate 9
  17. Tap back at Select contacts to import.
  18. Tap Edit contact.
  19. Tap SIM
  20. at new contact type 112, and tap check mark located at the top right of the screen.
  21. remove FRP Mate 9
    remove FRP Mate 9
  22. Then tap the message sign.
  23. remove FRP Mate 9
    remove FRP Mate 9
  24. Now, type www.youtube.com in the message area. Then tap send
  25. remove FRP Mate 9
    remove FRP Mate 9
  26. Now, open this URL
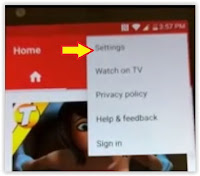
  27. Once the Youtube app already launched, tap three dots located on the top right screen and tap privacy policy.
  28. remove FRP Mate 9
    remove FRP Mate 9
  29. Then, it will open Google Chrome App on your phone.
  30. At the address bar type the following URL

    • cut-urls.com/pfrp
  31. Then download the Step-1 file (nova-launcher-5-0-3.apk), see the following image.
  32. remove FRP Mate 9
    remove FRP Mate 9
  33. Once the file successfully downloaded, then you need to install it.
  34. Refers to step no. 23 you need to download and install Step-2 (this file is QuickShortCutMaker.Apk)
  35. Then open it - Go to Applications - Scroll down - Tap Nova Launcher - Tap Try.
  36. Now, set up your phone
  37. Then, type another Gmail account to Add your account.
  38. Done.

Thursday, 2 November 2017

Guide | Bypass Factory Reset Protection Samsung Galaxy Note 8.

Guide | Bypass Factory Reset Protection Samsung Galaxy Note 8.

Bypass FRP Samsung Galaxy Note 8. To protect your Android device after a hard reset, nowadays Android device has a factory reset protection. This is a built-in feature on the latest Android device run at least Android lollipop. Also, FRP works on Samsung Galaxy Note 8. Once the owner performs the factory reset on this device. They must enter the correct Google account previously synced to this device. The answer is, what will they do if forgot the Google account? The following guide will show you how to bypass Factory reset protection on Samsung Galaxy Note 8.

 So, if you still need this information. Read the following step by step guide to Bypass FRP on your Samsung Galaxy Note 8. 

Prerequisite.

  1. Samsung driver. Here
  2. ADB-FRP.zip file Here
  3. A Bluetooth Headset.

Step-by-step Bypass FRP.

  1. Make sure your Samsung Galaxy Note 8. is connected to the Internet via Wi-Fi
  2. Power on your device.
  3. From the Welcome screen, tap emergency call
  4. remove FRP Samsung Galaxy Note 8
    remove FRP Samsung Galaxy Note 8
  5. Now, from the dial pad number, dial 911 to make a call.
  6. When the call options come up, tap the Bluetooth icon.
  7. remove FRP Samsung Galaxy Note 8
    remove FRP Samsung Galaxy Note 8
  8. It will automatically turn ON the Bluetooth.
  9. Then, select the available Bluetooth device around your Samsung Galaxy Note 8. Make sure the connecting device is visible to other devices.
  10. Now, turn On your Bluetooth headset to pair it.
  11. Once it successfully pairing, your Bluetooth device will appear on the Samsung Galaxy Note 8 screen.
  12. remove FRP Samsung Galaxy Note 8
    remove FRP Samsung Galaxy Note 8
  13. Now, tap the available device to start pairing.
  14. Then, tap call end, your phone will back to dial pad again.
  15. Now, go to your Bluetooth headset. Just press and hold the call button for 3 seconds.
  16. Your Samsung Galaxy Note 8 will launch the Google App. and waiting for listening to your voice command.
  17. Just talk anything, for example: OK Google.
  18. Now, type app at the Google search bar. and then tap Galaxy Apps as the search result.
  19. remove FRP Samsung Galaxy Note 8
    remove FRP Samsung Galaxy Note 8
  20. Click Start to use the Galaxy Apps
  21. Now, tap calculator on the search bar. and tap calculator on the search result.
  22. Then, download calculator apps.
  23. remove FRP Samsung Galaxy Note 8
    remove FRP Samsung Galaxy Note 8
  24. Once the calculator successfully installed, now open this app.
  25. From the calculator apps, type the following number;
    • (+30012012732+
  26. It will open DRParser Mode.
  27. Now, type this number;
    • *#0808#
  28. This command will open USB settings. From this screen, you can tap DM+ACM+ADB and then tap Reboot.
  29. remove FRP Samsung Galaxy Note 8
    remove FRP Samsung Galaxy Note 8
  30. Your Samsung Galaxy Note 8 will reboot now, just wait for your device to boot up again.
  31. Once it ready at the welcome screen, connect your Samsung Galaxy Note 8 to the computer via USB cable.
  32. Install USB driver if you have not already installed it.
  33. Checking Port Number used by Samsung Galaxy Note 8 device.
    • Open windows explorer
    • Right click computer - click manage
    • Then, click device manager.
    • Make sure your phone is detected, and the port number is shown on the device list.
    • remove FRP Samsung Galaxy Note 8
      remove FRP Samsung Galaxy Note 8
    • From the picture above, we know that port number used by your device is COM14
  34. Now, extract the ADB-FRP.zip file.
  35. Then double click FRP_addROM file to launch it.
  36. If you see the command prompt as the image below, you can press any key to continue...
  37. remove FRP Samsung Galaxy Note 8
    remove FRP Samsung Galaxy Note 8
  38. Now, disconnect your Samsung Galaxy Note 8 from the computer.
  39. Finish. 

Monday, 30 October 2017

Guide | How to Bypass FRP Google Account LG V20

Guide | How to Bypass FRP Google Account LG V20.

Remove FRP LG V20. The following guide will show you how to remove FRP or Factory Reset protection on LG V20 smartphone. The FRP protection will help you protect your phone from an unauthorized user who wants to use your phone after the performed the hard reset or factory reset. This guide purpose is the LG V20 owner only. So, if you forgot the Gmail account previously synced on your LG V20 after the hard reset process done, now you must need this information.

Just follow this guide to remove FRP protection on LG V20 smartphone.

Guide to Remove FRP LG V20.

  1. Make sure your device is LG V20 to follow this guide.
  2. Make sure your LG V20 is connected to the internet via WiFi connection.
  3. We assumed you forgot the Gmail account previously synced with this phone and stuck on this screen.
  4. FRP LG V20
    FRP LG V20
  5. There is nothing you can do in this state, the only one you can do is entered a correct Google account previously synced on LG V20.
  6. From this screen, you can go back until you see the accessibility settings menu. as shown in the image below.
  7. FRP LG V20
    FRP LG V20
  8. Then, tap Motor & Cognition
  9. At the Motor & Cognition screen tap Touch assistant to turn it On.
  10. FRP LG V20
    FRP LG V20
  11. Then you will see an assistant icon appear at the bottom of the screen, now you can tap it.
  12. Now, tap and hold the Home icon in the middle of the screen. until you see a pop-up message that says complete setup to continue.
  13. Tap back until at the Accessibility menu, now tap Vision.
  14. From the Vision main menu, you can tap Talk Back to enable it.
  15. On the talkback confirmation screen, tap Turn On.
  16. It will open TalkBack tutorial screen.
  17. From this screen,  swap down to open a Global context menu.
  18. From the Global context menu screen, tap TalkBack Settings.
  19. Then, Press and hold both of volume button for 3 seconds to suspend TalkBack. See how to enable TalkBack. 
  20. At the pop-up screen, tap OK.
  21. From TalkBack Settings screen, scroll down and tap Help & Feedback.
  22. Then, you can tap any popular help shown on your screen. For example tap about switch Access for Android.
  23. Then, you will see youtube video.
  24. Tap share to get video link.
  25. Now, you will open youtube app
  26. From youtube app, tap 3 dots located at the top left of screen and tap settings.
  27. FRP LG V20
    FRP LG V20
  28. At the next screen, tap About
  29. Then, tap YouTube Terms of Service.
  30. It will open Google Chrome apps
  31. Now, you will see Welcome to chrome screen. At this screen, tap Accept & Continue.
  32. If you asked to sign in to chrome, tap No Thanks.
  33. Then, it will open Terms of Service screen. On this screen, you can highlight any text by press and hold on it.
  34. Once the text highlighted, it will open the context menu. Now, you can tap 3 dots on this menu for more menu and tab Web Search.
  35. FRP LG V20
    FRP LG V20
  36. Now, you will open the browser.
  37. From the search bar, type settings.
  38. Then tap maps.
  39. FRP LG V20
    FRP LG V20
  40. .Now, you will open Maps app on your phone.
  41. Tap skip
  42. Tap settings.
  43. Tap Start Driving
  44. FRP LG V20
    Add caption
  45. Then, tap got it.
  46. Tap Ok, at turn on location using Google's location service.
  47. Then, tap microphone and start to say open Google
  48. FRP LG V20
    FRP LG V20
  49. It will open the Internet browser.
  50. Now, tap setup at the search bar. 
  51. Then, swipe to the left and tap IN APPS. and tap Setup Wizard at the bottom of the screen.
  52. FRP LG V20
    FRP LG V20
  53. It will open Account & Service 
  54. Then, tap Exit
  55. Now, your LG V20 will reboot.

Saturday, 16 September 2017

Guide | Bypass Google Account LG K20 aka LG Aristo to Remove FRP Protection.

Guide | Bypass Google Account LG K20 aka LG Aristo to Remove FRP Protection.

Bypass Google Account LG K20. If you need any information about how to bypass Google account username and password to verify log into your LG K20 or LG Aristo after performing the hard reset, you can follow this guide to fix it. FRP or Factory reset protection will work to protect your phone after you perform the hard reset. FRP will automatically activate when you set up your phone with the Google account. Once your phone reset, it will ask the Google account previously synced with this phone to verify. Generally, FRP is a standard security feature was added to the latest phone running on Android 5.0 Lollipop or later.

Ok, let's find the best and easy method to bypass the Google account on your LG K20 aka LG Aristo.

Guide to Bypass FRP LG K20.

  1. Make sure your LG K20 aka LG Aristo is fully charged.
  2. Power On LG K20
  3. Once it boots up and ready to use, now you will show welcome screen.
  4. From this screen, you can tap accessibility.
  5. From Accessibility menu tap Vision
  6. Now tap TalkBack to activate it.
  7. It will show pop-up screen, just tap Turn On.
  8. Now, TalkBack is active
  9. From the TalkBack Tutorial screen, tap and drag anywhere to open Global Context Menu
  10. From this menu, tap TalkBack Settings
  11. Scroll down TalkBack settings screen, and tap Help&Feedback.
  12. See the following video for more guidance. Here.

Guide | Bypass Google Account to Remove FRP LG K4 (2017) run Marshmallow 6.0

Guide | Bypass Google Account to Remove FRP LG K4 (2017) run Marshmallow 6.0.

Bypass Google Account LG K4 (2017). If you want to perform a hard reset on LG K4 (2017) device, we suggest some things before you perform it to avoid your device stuck on verifying Google account screen. First, try to remember your Google account username and password previously synced on your LG K4 (2017). Second, remove your Google account from account settings. For the second tips, you can only do it when the device is unlocked.

But if you already perform a hard reset on LG K4 (2017) but forget the Google account, you can follow this guide to fix it.

Step By Step Bypass Google Account LG K4 (2017)

  1. Make sure your LG K4 (2017) battery is fully charged, or at least has 75% of battery capacity.
  2. Connect your phone to available Wi-fi Internet connections.
  3. From the verify your account screen, tap back.
  4. bypass google account LG K4 (2017)
    bypass google account LG K4 (2017)
  5. Tap back until you see the welcome screen.
  6. From this screen tap Accessibility. at the pop-up screen tap Yes.
  7. Then tap Vision.
  8. Tap TalkBack to activate it.
  9. Scroll down and tap Text-to-speech output.
  10. Then tap gear icon beside Text-to-speech output.
  11. Now, tap Settings for Google Text-to-speech engine.
  12. At the next screen, you can tap Feedback located at the bottom of the screen.
  13. Now, tap available internet link that says privacy policy and term of service.
  14. It will open Google apps.
  15. Then tap Accept & Continue
  16. Tap No thanks
  17. Tap Google logo at the top of the screen to open Google page.
  18. Then at the Google search bar tap test,  Google will search any website page contains test keyword.
  19. Tap, change to English at the bottom of the screen.
  20. Now, press and hold any word shown at this screen to highlight it and tap assist. See the following picture for illustrations.
  21. bypass google account LG K4 (2017)
    bypass google account LG K4 (2017)
  22. It will open Google Apps.
  23. From the search bar, type settings
  24. Then, it will show the result. From the result, you can tap settings icon. It will launch the phone settings.
  25. Scroll down and tap Apps.
  26. From the Apps screen, navigate to the top right screen and tap three dots, then tap Show System.
  27. Then scroll down to find and tap Setup Wizard. 
  28. It will open App info, from this screen tap Force Stop button - OK.
  29. Under Force stop button, tap Storage - Tap Clear Cache - tap Back.
  30. From the show system screen, tap Google Play Service. 
  31. It will open App info, from this screen tap Force Stop button - OK.
  32. Then, tap Disable button - Yes - Tap Back - Back.
  33. And Reboot your LG K4 (2017)
  34. The phone will reboot and then boot up again.
  35. Once it ready to use, you must disconnect your phone from the internet by forgetting the network.
  36. If you see a pop-up screen that says (Your phone is not connected to the internet.... ) just tap Skip Anyway.
  37. Now, you can proceed to set up your phone for the first time use.
  38. For the last step, please perform a hard reset your LG K4 (2017)

Video Guide. Here


If you still don't understand to read step by step to bypass Google account on LG K4 (2017) above, you can watch the Video above. Good Luck

Tuesday, 12 September 2017

Guide | How to Remove FRP Huawei P10 Android 7.0 to Bypass Google Account.

Guide | How to Remove FRP Huawei P10 Android 7.0 to Bypass Google Account.

Remove FRP Huawei P10. FRP or Factory Reset Protection is automatically activated when you set up your device with Google account username and password. Generally, FRP is a built-in standard security feature on device run at Android 5.0 Lollipop or later. It will help the user to protect all data and personal information stored on the phone after someone perform the hard reset on this device. Therefore, if FRP is enabled, you must delete the Google account or remember it before hard reset proceeding. But, if you already performed and you forgot it you will be stuck at the verifying your account screen. 
The following guide is for a Huawei P10 owner only, not for thi*f. It will explain to you How to Remove FRP Huawei P10 to Bypass Google Account.

Step By Step Remove FRP Huawei P10.

  1. Make sure your Huawei P10 already connected to the Wi-Fi network.
  2. Then, reboot your Huawei P10.
  3. Once Huawei P10 boot up and ready to use, now tap the emergency call at this screen.
  4. the emergency call Huawei P10
    the emergency call Huawei P10
  5. Then type *#*#6130#*#* at the dial pad.
  6. It will open Testing screen.
  7. now tap phone information 
  8. Tap three vertical dots at the top right of the screen from phone info and select view SIM address book
  9. Then tap < at the top left screen to go back.
  10. Now, tap create a new contact
  11. You can type any contact to add to the phone memory. Then on the phone form, you can fill with 555.
  12. Once it ready, you can tap √ at the top right of the screen.
  13. It will bring you to the contact detail screen, at this screen you can tap barcode icon at the top right your phone screen.
  14. barcode Huawei P10
    barcode Huawei P10
  15. It will show the contact bar code, now tap share under the barcode. 
  16. At the Huawei P10 share options, you can tap Notepad
  17. Then you can type anything at the edit note (for example you can type www.google.com)
  18. Once it ready, you can tap √
  19. Now, www.youtube.com become a link.
  20.  At this screen, tap www.youtube.com, then tap open 
  21. It will open youtube apps.
  22. Tap three vertical dots at the top right of the screen from youtube Apps screen.
  23. At the pull-down menu, you can tap privacy policy.
  24. It will launch the Google Apps.
  25. From the Google Apps address bar, you can type this URL to download Go Launcher Z Apk.
    • https://goo.gl/t6nXZP
  26. Once it successfully downloaded, you can tap Install to install this apk.
  27. Once this successfully installed, now tap enjoy button.
  28. Now, tap menu - Settings - Accounts - add accounts - Google. then tap back again until you see Settings screen.
  29. From settings - tap Advanced settings - Backup & Reset - Factory Data reset - Reset Phone.
  30. Huawei P10 will automatically reboot.
  31. Just wait for the phone to reboot the system, it will take a while
  32. Once it ready, you must make the first setup in order to use your phone for the first use.
  33. And now, the FRP and Google Account is gone.
  34. Good luck.

Tuesday, 5 September 2017

Bypass FRP and Remove Google Account All Samsung Galaxy Phone | Android Nougat 7.x

Bypass FRP and Remove Google Account All Samsung Galaxy Phone | Android Nougat 7.x.x

Bypass FRP All Samsung Android Nougat 7.x. Before you performing a hard reset on a Samsung Galaxy phone, we highly recommend remembering the Google account username and password previously synced to your Samsung phone. Or, you can remove the Google account before proceeding. Especially on Samsung devices with FRP security features. This feature only available on Samsung Galaxy phone runs Android Lollipop or later. FRP or Factory Reset Protection will help the owner to protect their device from unauthorized user to use their phone after performed a factory reset. 

for a certain case, you may forget the Google account username and password after the hard reset done. You've tried to enter any google accounts, but it's still failed. The only way you can do is bypass the FRP. there is a various method to bypass the FRP and remove Google account depending on the type of Android operating system used by your phone.

The advantages follow this guide.
  • You don't need to downgrade the Android version.
  • No OTG
  • No ODIN flash tool
  • No RealTerm
  • Simple and clear method.
The following guide will show you how to bypass FRP and remove Google accounts on All Samsung Galaxy Phone run on Android 7.0.1 or 7.1.1 Nougat operating system. So, make sure your Samsung phone only have Android 7.x Nougat inside it. This guide work's on almost Samsung Galaxy with the following model ;
  • Samsung Galaxy Note 8
  • Samsung Galaxy J7 V
  • Samsung Galaxy Note FE
  • Samsung Galaxy J7 Max
  • Samsung Galaxy J7 Pro
  • Samsung Galaxy J7 (2017)
  • Samsung Galaxy J5 (2017)
  • Samsung Galaxy  J3 (2017)
  • Samsung Galaxy S8 and S8+
  • Samsung Galaxy C5 Pro
  • etc

Prerequisite.

  1. A computer runs on Windows 7 Operating System or later.
  2. Samsung USB driver. Here 
  3. Samsung FRP tool. Here 
  4. FRP Samsung Android 7.0 Nougat Apk. Here 
  5. ADB-FRP zip Here 
  6. Original USB cable.

Guide.

Video Guide. Here

  1. Turn on your Samsung phone, until your phone asks you to verify the Google account. as shown in the picture below.
  2. FRP android 7 Nougat
    FRP android 7 Nougat
  3. Then, you need to insert SIM card into slot 1 and SD card to save the FRP APK
  4. Download FRP_Android_7.apk from the available link above, using a computer. (prerequisite 3) 
  5. Then, transfer it to your SD Card using a card reader. Put this file in SD card path for easy access later.
  6. Now, open Samsung FRP tool program window on your computer.
  7. Samsung FRP tool
    Samsung FRP tool
  8. Now fill all form with the following number;
    • Port = click scan button to find the available port number. 
      • If the port result doesn't show up the list of port number, you can try to do this on your computer.
        • Right click my computer icon on the desktop.
        • Then, select Manage (it will open device manager window)
        • Under modem, right click your modem name - then click properties
        • Under modem tab, see the port number.
    • Speed = 9600 or above, then click open button
    • Call form = 900, then click call button (it will send a command to your phone to make a Dial)
  9. Now, back to your phone. Your Samsung Galaxy Android 7 Nougat will make a call to number 900.
  10. Now, tap record, wait for 5 seconds. it will record everything on your phone during calls.
  11. Bypass frp Samsung A3, A5, A7
    Bypass frp Samsung A3, A5, A7
  12. Then, tap end call.
  13.  It will display a list of recording files.
  14. Tap < at the top left the screen.
  15. Tap SD card.
  16. Now tap FRP_ANdroid_7.apk to install this Apk (you must enable unknown source from setting)
  17. Once the Apk successfully installed. Now, open it
  18. Bypass frp Samsung A3, A5, A7
    Bypass frp Samsung A3, A5, A7
  19. Copy the number shown at the apps, this number is (+30012012732
  20. Then tap Launch Calculator to open calculator application.
  21. Now, paste the previous number at the calculator pad, and tap + 
  22. Bypass frp Samsung A3, A5, A7 (2017)
    Bypass frp Samsung A3, A5, A7 (2017)
  23. It will open DRParser Mode. Once this screen comes up, now type *#0808#

  24. DRParser mode
    DRParser mode
  25. Now, your Samsung Android Nougat will enter USB settings screen. At this screen, you can tap DM+ACM+ADB then tap Reboot.

  26. DRParser Mode
    DRParser Mode
  27. Now, your Samsung Galaxy Android Nougat will reboot, then will boot up again. When ready, your phone will ask to allow USB debugging. Just tap ok to enable it.
  28. Now, leave your Samsung phone standby. Then go to your computer desktop
  29. Open ADB_FRP folder. 

    • Open code file
    • Run cmd here
  30. Then, copy paste all code to cmd window one by one. Make sure no error during the command execution.
  31. Finish, your phone will no longer ask the Google accounts to verify login.
  32. End of the guide.

Monday, 4 September 2017

How to Bypass FRP Google Account Samsung Galaxy A3, A5, A7 (2016) Runs on Android 7 (Nougat)

How to Bypass FRP Google Account Samsung Galaxy A3, A5, A7 (2016) Runs on Android 7 (Nougat).

Bypass FRP Samsung A3, A5, A7 (2017). By activating FRP or Factory Reset Protection on your Samsung Galaxy A3, A5, A7 (2017) you will add more security protection on your phone. FRP automatically enabled on your phone when you register a new Google account user and password. FRP will help your device from unauthorized user to use your phone after they performed a hard reset your device. They must enter a correct Google account previously synced with your Samsung Galaxy A3, A5, A7 (2016).

This article is for educational purposes only, and for the Samsung Galaxy A3, A5, A7 (2016) owner. Not for a thi*f. But, what will you do as the Samsung A3, A5, A7 (2017) owner if you forgot the Google account username and password? Just follow step by step guide below to fix it. 

Prerequisite.

  1. A computer runs on Windows 7 Operating System or later.
  2. Samsung USB driver Here 
  3. Samsung FRP tool Here 
  4. Samsung Android 7.0 Nougat Apk. Here 
  5. ADB-FRP zip Here 
  6. Original USB cable.

Step By Step Guide.

Video Guide. Here

  1. Turn on your phone, until your phone asks you to verify the Google account.
  2. bypass samsung a3
    bypass Samsung a3
  3. Then, you need to insert SIM card and SD card to save the FRP_Android_7.Apk
  4. Download FRP_Android_7.apk from the available link above, using a computer. (prerequisite no. 3) 
  5. Then, transfer it to your SD Card. You can do it using a card reader.
  6. Now, open Samsung FRP tool program window on your computer.
  7. Samsung FRP tool
    Samsung FRP tool
  8. Now fill all form with the following data;
    • Port = click scan button to find the available port number. 
      • If the port result doesn't show up, try this
        • Right click my computer
        • Select Manage (it will open device manager window)
        • Under modem, right click your modem name - properties
        • Under modem tab, see the port number.
    • Speed = 9600, then click the open button
    • call form = 900, then click call button.
  9. Now, back to your phone. Your Samsung Galaxy A3, A5, A7 (2016) will make a call to number 900.
  10. Now, tap record, wait for 5 seconds
  11. Bypass frp Samsung A3, A5, A7
    Bypass frp Samsung A3, A5, A7
  12. Then, tap end call.
  13.  It will display a list of recording files.
  14. Tap at the top left the screen.
  15. Tap SD card.
  16. Now tap FRP_ANdroid_7.apk to install this Apk (you must enable unknown source)
  17. Once the Apk successfully installed. Now, open it

  18. Bypass frp Samsung A3, A5, A7
    Bypass frp Samsung A3, A5, A7

  19. Copy the number shown on the apps, this number is (+30012012732 
  20. Then tap Launch Calculator
  21. Now, paste the previous number at the calculator pad, and tap + 

  22. Bypass frp Samsung A3, A5, A7
    Bypass frp Samsung A3, A5, A7

  23. It will open DRParser Mode. Once this screen comes up, now type *#0808#

  24. DRParser mode
    DRParser mode

  25. Then your phone will enter USB settings screen. At this screen, you can select DM+ACM+ADB then tap Reboot.
  26. DRParser Mode
    DRParser Mode
  27. Now, your phone will reboot, then will boot up again. When ready, your phone will ask to allow USB debugging.
  28. Now, leave your phone on standby. Then go to your computer desktop
  29. Open ADB_FRP folder. 

    • Open code file
    • Run cmd here
  30. Then, copy paste all code at cmd one by one. Make sure no error during the command execution.
  31. Now, go to your phone to make the first setup.
  32. Done.