smartdroid

Monday, 4 December 2017

How to Flash a Custom ROM on Android LG G6 H870 and US997 (2017).

How to Flash a Custom ROM on Android LG G6 H870 and US997 (2017).

Flash Custom ROM LG G6. Actually, your LG G6 device already has stock ROM or stock firmware when you buy it. This is preinstalled Android operating system. Stock ROM coming from the manufacturer usually has limited functionality. Therefore, if you want to get more features and experience on your phone you need to install or flash a custom ROM. And now, you can learn how to flash a custom ROM on LG G6 H870 smartphone. To install this custom ROM is easy, just follow this guide to get results as your expectations.

LG G6 released in 2017, March. Comes with 5.7 Inches IPS LCD capacitive touchscreen, 16M colors. Powered by Quad-core (2x2.35 GHz Kryo & 2x1.6 GHz Kryo) CPU, Qualcomm MSM8996 Snapdragon 821 chipset, Adreno 530 GPU, and 4 GB of RAM. The following is the LG G6 version, H870, US997, LS993, H870DS, G6+, H871, H872, H873, H870K, VS998.

Actually, flash custom ROM can cause your phone bricked or totally dead. For that, you have to be careful to do it. You will get some benefit if flash custom ROM on android device. Here are some of the benefits of flashing a Custom ROM.

  • Performance. You can overclock LG G6 to improve hardware performance. This performance can really feel when you are playing a graphics games. in addition, you can improve the ROM performance by removing the carrier and OEM-installed apps. Some people call it with remove bloatware to make a free up system resource.
  • Updates. You don't need to waiting for your LG G6 manufacturer to push an update to your Android phone to get the latest features. Simply you can update your phone by yourself by flashing a custom ROM on the newest Android version. Term to update Android phone use this method is called Nightlies.
  • Battery Life. You can slow down the speed of the speed of your massive processor by underclocking it. If your LG G6 processor is running at a lower speed, it will automatically extend battery life by days. Also, removing bloatware will help you free up the processor to do less. It will force your LG G6 running a fewer Apps in the background. and more.
Ok, if you understand what I mean in this guide, lets to start this guide.

Prerequisite.

  1. Download Custom ROM for LG G6 from the XDA forum. Here
  2. Download SuperSU-v2.82-201705271822.zip Here 
  3. You need to Flash TWRP Recovery. Visit this guide how to do it?
  4. Then Unlock Bootloader LG G6. Visit this guide to unlock bootloader LG G6.

Custom ROM LG G6 Installation.

  1. We highly recommend to backup everything stored on your phone.
  2. Make sure you have a full battery charged during the flashing process, it will keep your LG G6 life and avoid the system down during flashing process.
  3. Make sure all prerequisite above has done.
  4. Then, transfer or copy the custom ROM and SuperSU to the root directory phone internal memory.
  5. Once TWRP successfully installed on LG G6, boot your phone into fastboot mode. How to do it?
    • Press and hold Power Button + Volume UP.
  6. Once you're at the TWRP main menu, tap Install.
  7. TWRP LG G6
    TWRP LG G6
  8. Now, browse SuperSU from the internal memory root directory.
  9. Then, Swap to confirm flash.
  10. Then, back to the TWRP main menu.
  11. tap Wipe button to wipe all data on your LG G6 phone
  12. Then, back to TWRP main menu.
  13. Tap Install.
  14. Now, browse your custom ROM from the internal memory root directory.
  15. Then, Swap to confirm flash.
  16. As a final step, please tap reboot to reboot your device into the system.
  17. Finish.

Saturday, 2 December 2017

Guide to Flash TWRP Recovery 3.0.1 LG G6 H870

Guide to Flash TWRP Recovery 3.0.1 LG G6 H870.

Install TWRP LG G6. The following guide you will get an information how to flash or install TWRP recovery 3.0.1 on LG G6 H870 smartphone. By default, Android smartphones already have a recovery system from the manufacturer. By entering phone recovery, you can perform hard reset the phone to restore factory setting when your phone is locked. But, a standard recovery can't install or flash some stuff like custom ROM, tweak, or kernel. Therefore, you need to install a custom recovery. 

By installing a custom recovery (TWRP recovery) on LG G6 H870, you can make a full backup and restore the android system or Nandroid backup and root your device. Besides having many benefits, installing TWRP on the Android device will affect OTA updates, you can't get automatically update anymore. But, you can manually download it and flash via TWRP recovery. Flashing ROM - Stock ROM - Kernel - update.zip is easy. Simply boot your phone into recovery mode, then select a file to install it. Make sure your device is LG G6 H870 in order to follow this guide.

Ok, now let's start this guide.

Prerequisite.

  1. Before performing this task, you need to Unlock Bootloader LG G6 H870 first. Visit this guide how to unlock the bootloader LG G6.
  2. TWRP 3.0.1 for LG G6 H870.
    • TWRP Recovery for Americas - Here
    • TWRP Recovery for Europe - Here 
  3. Developer option is enabled on your phone, then enable USB debugging and OEM Unlock. (see this guide on how to enable USB debugging)
  4. D0wnload ADB and fastboot for LG device. Here
    • or full ADB setup

Instruction Guide.

  1. Make sure to backup everything before proceeding flash TWRP on LG G6, all data will be wiped during flashing process. 
  2. Extract and install ADB and fastboot for LG device.
  3. Install USB driver. usually, after installing ADB and fastboot, the USB driver will automatically installed.
  4. Now, move the twrp-3.1.1-0-h870 file to adb-fastboot-tool folder.
  5. Then, rename the twrp-3.1.1-0-h870 to recovery.img
  6. Connect LG G6 H870 to the computer using the original USB cable.
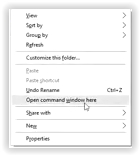
  7. Then, from the ADB fastboot folder you need to right click and hold the shift button, and click open command window here or Open with Powershell
    open command in adb fastboot
    open command in adb fastboot
  8. Now, you need to verify your LG G6 H870 connected to the computer or not by type the following command.
    • adb device.
  9. Once your LG G6 H870 successfully connected to the computer, you will see that your device ID is listed in the prompt window.
  10.  Then you need to reboot your LG G6 H870 into bootloader using this command and press enter
      • adb reboot bootloader

  11. Just wait a minute, your device will automatically shut down and reboot into bootloader mode.
  12. Once your LG G6 H870  in the fastboot mode, now you need to type the following command to flash TWRP recovery into your phone.

    • fastboot flash recovery recovery.img

  13. wait for 2 or 3 seconds for the complete flashing process.
  14. Now, type the following command to reboot your device from fastboot.

    • fastboot reboot

  15. Finish, TWRP recovery has been successfully installed on your device.

    Tuesday, 28 November 2017

    Guide | Flash LG Stock Rom KDZ For All LG Devices to Fix a Bootloop - Stuck Logo

    Guide | Flash LG Stock Rom KDZ For All LG Devices to Fix a Bootloop - Stuck Logo.

    Flash LG Firmware. when your android phone has boot loop or stuck on Logo, you can not continue to use that phone. Bootloop is a situation where your Android phone is booting and only display logo. then reboot again and back to stuck at the logo again. then, how to unlock Android stuck in the logo? to solve the problem, you need to flash stock ROM or a new firmware to your phone. And, now guidebelajar will show you how to flash stock ROM on LG smartphone Android device.

    It is not difficult to flash LG mobile phone, just follow the guidelines below with a little understanding. Also, you do not need to be an Android expert to flash stock ROM on LG device. There are many tutorials that present this method on the internet. But, in the following guidelines, we will present a quite simple and easy method to understand for everyone, even they are a beginner though.

    Generally, stock firmware for LG device comes in KDZ format, sometimes also in TOT format. you can flash the firmware or stock ROM to the LG devices using LG flash tool. You can run LG flash tool on a computer that runs with Windows operating system. By flashing the stock firmware into LG device, you will restore a device stock firmware or you can make a downgrade from the latest update release.
    Let's start this guide, follow all the step-by-step instruction below for the best result.

    Prerequisite.

    To start the following guidelines, you need to download following files.
    1. LG Flash tool 2014 by Quang Nhut. Here 
    2. LG phone driver. Here 
    3. LG KDZ firmware. 
      • Download LG KDZ firmware forms the official website. Here 
      • Download LG KDZ using your IMEI directly from your Google Chrome. Here 

    Flashing Guide.

    1. Make sure all the files in prerequisite have been successfully downloaded to the PC.
    2. The LG Flashtool is a program window. You need a PC run on Windows OS.
    3. Then Install LG driver on the PC.
    4. Extract / Unzip the LG flashtool.zip file that you download above.
    5. To avoid LG flash tool cannot run on your Windows PC, you need to install Visual C ++ Runtime Library from here.
    6. Then, double-click/Run LGFlashTool2014.exe file to Open LG Flash Tool program window. We recommend opening this program as Administrator.
    7. Flash Stock ROM ALL LG device
      Flash Stock ROM ALL LG device
    8. Once the LG flash tool 2014 launched, now you need to select a type from the drop-down menu and click 3GQCT.
    9. Flash Stock ROM ALL LG device
      Flash Stock ROM ALL LG device
    10. At the phone mode, you need to select DIAG.
    11. Flash Stock ROM ALL LG device
      Flash Stock ROM ALL LG device
    12. Then, load the .kdz Stock ROM or firmware file into LG Flash Tool window on your PC. Click the browse button shown at the image below to Select KDZ file. 
    13. Flash Stock ROM ALL LG device
      Flash Stock ROM ALL LG device
    14. Once the KDZ file successfully inserted into the LG Flashtool. Now click a normal flash button.
    15. Flash Stock ROM ALL LG device
      Flash Stock ROM ALL LG device
    16. There are two flash methods on LG flash tool.
      • Normal Flash. If you select normal flash, it will Flash Stock ROM without wipe any data
      • CSE flash. Select CSE flash if you want to upgrade or downgrading from the current stock firmware, this task will delete everything stored in phone internal memory. And you will get a fresh firmware on your LG phone.
    17. At the next windows, you need to click Start button.
    18. Flash Stock ROM ALL LG device
      Flash Stock ROM ALL LG device
    19. Then, you’ll see “Select Country & Language” window.  At this window click phone software update registry button. Then, at the pop-up window click accept button.
    20. Flash Stock ROM ALL LG device
      Flash Stock ROM ALL LG device
    21. Select “Different” from the country list and then “English” from the language list. 
    22. Remember to NOT tick the Smartphone upgrade checkbox, it’s for Windows Mobile phones, not your LG phone running on Android.
    23. Now, Boot your LG phone into Download Mode, how to do it?
      • Power off your LG phone
      • Press and hold Volume Up button. 
      • While connecting your LG phone to the PC with a USB cable.
      • You’ll boot into download mode with “Firmware Update” written on your phone screen.
    24. Or, you can visit this link how to enter download mode LG phone.
    25. From step no. 13 above. You need to click OK button.
    26. You’ll see a progress bar at the LG Mobile support tool window now. 
    27. Flash Stock ROM ALL LG device
      Flash Stock ROM ALL LG device
    28. Just wait for the process until the progress bar reach 100%, 
    29. If this dialog appears "Connection to server failed, try again for a moment" just ignore that window and the installation process will continue without any problem. Don't disconnect the LG device. 
    30. Connection to server failed, try again for a moment
      Connection to server failed, try again for a moment
    31. Once it’s complete, your LG device will automatically reboot. And then you can disconnect your LG device from PC and close the LG Flash Tool utility as well.

    Monday, 27 November 2017

    Bypass Google Account Verify APK for Samsung Android Phone 2017.

    Bypass Google Account Verify APK for Samsung Android Phone 2017.

    Bypass FRP Samsung 2017. Google has introduced a new feature on Android Lollipop version 5.1, this feature will protect your Android phone. This is a new standard security feature called Factory Reset Protection or FRP. FRP lock work on your Android phone and ensure that no one cannot perform a hard reset or master reset to your phone when this phone lost or has been stolen. This security feature has been widely applied by mobile manufacturers to protect user's data. A number of Android users who have performed a hard reset for forgotten passwords or PIN, but they forget the google account previously synced to the device.

    How The FRP Bypass Google Account Apk Work?

    The first time you sync your device with a Gmail account, it will automatically activate FRP lock. This means that you will be asked to enter the Google account information (username and password) that has been synchronized with the device every time you perform a hard reset. 

    problems will arise if you are using a second-phone, or you forgot the last Google account details used to login to your phone. There are many types and methods used to bypass FRP and remove Google accounts. For example, Gmail bypass apk or Samsung bypass google verify apk file. Basically, all apk files will access device settings and delete previous phone data as well as google accounts details.

    After all details are deleted using FRP bypass tool, now you can set up the Samsung phone as a new phone. Maybe you can find dozens of methods on the internet to bypass Google account FRP on Samsung phone, but they present in a complicated and elusive way. the goal of the Samsung users after the resetting is bypassing the Google account verification. So, they don't lock on Google account verification screen.

    We highly recommend removing or disable Googlelge Account (Gmail - username and password) before performing a hard reset/factory reset on Samsung devices running on at least Android 5.1 Lollipop. So you do not get stuck in FRP lock. Or at least you writedown a Google account on paper and then keep it.

    How to Samsung Bypass Google Account Apk Unlock Android Phone?

    Read the following guide to unlock your phone bypass Google account previously synced with your Samsung phone. Simply using Samsung bypass Google Verify Apk file. Actually, this apk can work on the following phone types; LH, Google Pixel, Samsung Galaxy, Huawei, Alcatel, Sony Xperia, Motorola, etc. Let's start this guide.

    Prerequisite.

    1. Download Samsung bypass google verify APK or known as with Samsung bypass apk
      • File description.
        • File type: Application
        • File Size: Approximately 56,7 Kb
        • File Extension: Apk
        • Download Link (scroll down the page to find downl0ad link)
    2. USB driver, (some method requires connection between Samsung device with PC, to access file manager in handphone - in general this driver is not required)

    Step by Step Instruction Guide.

    1. Turn on your Android phone
    2. Then, connect it to the WiFi network to get an Internet access.
    3. Downl0ad file in the prerequisite section above.
    4. Once Samsung bypass google verify APK or known as with Samsung bypass apk successfully downloaded, you need to locate this file and install on your Android phone.
    5. After FRP unlock applications successfully installed, you can follow one of the step-by-step guides below.
    6. Once you have successfully unlocked FRP on your phone, you need to perform a factory reset on your phone again.
    7. Enjoy your Android phone as a new device.

    Sunday, 26 November 2017

    Windows Server 2016 Installation Problem - We Couldn't Find Any Drives.

    Windows Server 2016 Installation Problem - We Couldn't Find Any Drives.

    Windows Server 2016 Drives Problem. This problem occurs when you install windows server 2016. Installation setup will say that ' We couldn't find any drives. to get a storage driver, click load drives' with yellow triangle exclamation. This happens when you install windows server 2016 on HP Proliant ML10 V2 server. Even though your computer server is already installed hard disk drive. But the setup cannot display it. 

    Actually, this problem occurred because your server computer has not installed drivers for a hard disk that compatible with windows server 2016. Then, how to solve the problem. and windows server 2016 can be installed on HP Proliant ML10 V2 server. The way is very easy. Take a good look at the following guide to solving the problem. This guide has been successfully tested on an HP Proliant ML10 V2 server.

    Prerequisite.

    1. You must have a CD/DVD Drive installed on your HP Proliant ML10 V2. for some countries this device is not included in the package. This used to run Windows Server 2012 R2 DVD.
    2. or, you can use a USB stick to run the Windows Server 2016.
    3. You need to get the hard disk driver from HP Service Pack for Proliant or SPP. How to get it?
      • Extract SPP using 7Zip
      • Put extracted file and folder into USB flash disk.
      • This driver file name is cp024079.exe
      • Extract this exe file again using 7zip.
      • You can find this file on HP Service Pack for ProLiant version 2015.06.0 Contents. Here 
    4. or, you can directly get the cp024079.exe download link here 

    Installation Guide.

    1. Extract cp024079.exe using 7Zip or other ZIP program windows.
    2. Then copy this file into the flash disk
    3. Make sure your server computer can boot from USB or CD / DVD.
    4. Then run the Windows Server 2016 installation.
    5. When windows setup displays the message 'We could not find any drives. to get a storage driver, click load drives' as shown below, You need to prepare the driver file on the flash disk.
      Windows Server 2016 installation problem
      Windows Server 2016 installation problem
    6. Now, click Load Driver.
    7. Then, navigate to the Extract cp024079.exe folder.
    8. Select the file you want to install.
    9. Then, click next 
    10. Now you can install Windows Server 2016 and select drives you want at 'Where do you want to install Windows?' window.

    Saturday, 25 November 2017

    Guide | Install TWRP Recovery Huawei GR5 2017 - Honor 6X EMUI 5.0 Android 7.0 Nougat.

    Guide | Install TWRP Recovery Huawei GR5 2017 - Honor 6X EMUI 5.0 Android 7.0 Nougat.

    TWRP Recovery Huawei GR5 2017.  Hi guys, the following guide will show you how to Install TWRP Recovery Huawei GR5 2017. This device also is known as with Huawei Honor 6X. So, if you looking for about this guide you can follow it. By installing a TWRP recovery on your Huawei GR5 2017, you can backup and restore the system, flash any custom ROM, or root this device. This guide is taken from the following video so we can be sure this guide has been successfully tested on the Huawei Honor 6X device. please follow the following guidelines slowly for the expected results.

    So, let's get started this guide.

    Requirement.

    1. Make sure your Huawei Honor 6X run Android Nougat 7.0 and EMUI 5.0.
    2. Enable USB debugging and OEM Unlock
    3. Unlock Bootloader your Huawei GR5 | Honor 6X. You can read this guide to unlock bootloader Huawei phone.
    4. Downl0ad and install Hisuite or Huawei Driver. Here
    5. Downl0ad ADB-fastboot-tool-2016.zip - Here 
    6. D0wnload TWRP For Huawei GR5 2017 EMUI 5.0 - Here 

    Installation Guide.

    1. Before flash a custom TWRP, you need to backup everything 
    2. Connect your Huawei Mate 9 to the computer via USB cable.
    3. Install Hisuite or Huawei driver.
    4. Extract ADB fastboot tool 2016, the ZIP file contains the following files and folder;
      • adb
      • driver
      • xp
      • install.bat
        ADB fastboot mate 9
        ADB fastboot mate 9
    5. Then, copy twrp-GR5-2017.img to the adb folder.
    6. Now rename to recovery.img
      TWRP Huawei Mate 9
      TWRP Huawei Mate 9
    7. Then, from the ADB fastboot folder right click and hold the shift button, and click open command window here or Open with Powershell
      open command in adb fastboot
      open command in adb fastboot
    8. Now, you need to verify your Huawei GR5 connected to the computer or not by type the following command.
      • adb device.
    9. Once your Huawei GR5 2017 successfully connected, you will see that your device ID is listed in the prompt
      • list of devices attached ...
      • device ID
    10. Then you need to reboot your Huawei GR5 2017 into bootloader using this command and press enter
        • adb reboot bootloader

    11. Just wait a minute, your device will reboot into fastboot and rescue mode.
    12. Once your device in the fastboot and rescue mode, it's time to flash TWRP recovery to your device. Therefore you need to type this command at prompt and then press the enter button

      • fastboot flash recovery recovery.img

    13. wait for 2 or 3 seconds for the complete flashing process.
    14. Done, now you have successfully installed/flashed TWRP-GR5-2017 on Huawei Mate 9 with EMUI 5.0.
    15. Enjoy it.

    How to Hard Reset - Factory Reset Huawei Y7 Prime Remove Forgotten Password.

    How to Hard Reset - Factory Reset Huawei Y7 Prime Remove Forgotten Password.

    Master Reset Huawei Y7 Prime. If you are looking for an information on how to perform a hard reset on Huawei Y7 Prime, now you are in the right place. A hard reset is also called a master reset or factory reset. Basically, performing a hard reset is returning all the phone settings that has made by a user to the factory settings. So, if you forget the password or pattern lock screen hard reset can solve the problem. To perform a hard reset is not a difficult thing, simply understand the following article to find the buttons that will be used to perform a hard reset. Just do a few minutes, and will save your Huawei Y7 Prime from forgotten password or pattern lock screen.

    Now, let's we start this guide. please read carefully how to do hard reset Huawei Y7 prime.

    Instruction Reset Huawei Y7 Prime.

    1. Make sure you have a fully charged battery, or you have at least 78% of battery capacity.
    2. Before proceed, we highly recommend to backup everything on your phone (accounts, contact, messages, Apps, files, etc)
    3. Turn off your Huawei Y7 Prime.
    4. Once it completely Powers off, then turn on again by press and hold the following key at the same time.
      • Power buton + Volume Up 
      reset Huawei Y7 Prime
      reset Huawei Y7 Prime
    5. Don't move your finger until your phone enter recovery mode as shown in the picture below.
      reset huawei Y7 Prime
      reset huawei Y7 Prime
    6. From this screen, you can use volume down key to navigate between the menu and use power key to confirm.
    7. Now, highlight Wipe data/factory reset and press power key.
    8. On the next screen, highlight Wipe data/factory reset again. At this step, you can't be undone.
    9. Now, the Huawei Y7 Prime will start to erase everything and restore your device to the factory settings.