smartdroid

Saturday, 22 September 2018

How to Remove Google Account Samsung Galaxy J4 2018 to Bypass FRP

How to Remove Google Account Samsung Galaxy J4 2018 to Bypass FRP.

Unlock Samsung J4 2018. You need to be careful in performing a hard reset on Android devices running on the lollipops 5.1 operating system. Because on Lollipop Android already has the FRP feature. FRP or called factory reset protection serves to protect your device from being used by people who are not responsible after they do a hard reset. The person must provide a Gmail account that has been synchronized with the device. Usually, people do a hard reset or factory reset to delete all personal data on the cell phone, and also remove the screen lock. This tutorial is intended for learning onlyif you have done a hard reset on your own cell phone then forgot your Gmail account, please follow this guide.

The guide below explains how to bypass FRP or remove Gmail accounts that have been synchronized on Samsung Galaxy J4 2018. Actually, the FRP feature will activate automatically when you add a Google account on your mobile. So you don't have to bother setting up for activation. 

Phones locked by FRP will see the following message on the screen. This Device Was Reset, to Continue, Sing in with a google account, that was previously synced on this device, As shown in the picture below.
bypass FRP Samsung J4 2018

Step By STep Bypass FRP Samsung J4 2018.

  1. Make sure your phone is Samsung J4 2018 because this guide only works on these devices
  2. The most important thing is that you own the cellphone.
  3. Power On the phone. 
  4. If your screen shows an image as shown above. this means that the FRP feature is already working on your device.
  5. To continue using the cell phone is quite easy, just enter the Gmail account that has been synchronized with the device.
  6. Then what do you do if you don't have Gmail user information and password? simply, you can continue following this guide.
  7. From the locked screen, click home button times to launch talkback.
  8. Now, from the talkback tutorial screen make L pattern to open the global context menu.
  9. Then tap talkback settings
  10. Then tap help and feedback
  11. Now tap get started with voices access.
  12. You will be taken to the YouTube application
  13. For detail instructions, you can watch the following video.
  14. Pay close attention to the video above, and make sure it works on your Samsung Galaxy J4 2018 device 
  15. Good luck.

Thursday, 20 September 2018

How to Remove Google Account and Bypass FRP Samsung Galaxy A8 Star Android 8.0

How to Remove Google Account and Bypass FRP Samsung Galaxy A8 Star Android 8.0

Bypass FRP Samsung A8 Star. The following guide explains how to bypass FRP on Samsung X. FRP or Factory Reset Protection is a security feature available on devices with a minimum Android 5.1 Lollipop operating system. FRP works by protecting the phone after a factory reset, whether intentionally or not. someone who does a hard reset must enter the email and password previously synced with the current device. if they don't have Gmail account information, the cellphone will be locked with the following information This device was reset. To continue to sign in with a Google Account that was previously synced on this device

Each cell phones a different way to bypass FRP, in essence, this method aims to delete a google account from a locked device. This guide aims for education only, so use it as well as possible for positive things.

Now, let's see how to perform it.
bypass FRP Samsung A8 Star

Prerequisite.

  1. This guide only works on Samsung A8 star only, so make sure your device is as required.
  2. The Rom combination and stock ROM flash process requires a PC or computer with a Windows-based operating system
  3. Then you need ODIN flash tool to help transfer ROM from PC to the phone. here
  4. You also need Samsung USB driver here
  5. Then, download ROM combination.
    • For Samsung Galaxy A8 Star (COMBINATION_OLM_FA80_G885FDXU1ARG1_Binary1) click here
  6. Now, download Stock ROM.
    • For Samsung Galaxy A8 Star click here

First Step - Flash ROM Combination.

  1. Power off your phone by long press the power button. If this method doesn't work try using this method to force power off your phone.
  2. Then connect your phone to the computer via USB cable.
  3. Now, open ODIN and load ROM combination via AP Button on ODIN window.
  4. For fast loading, you must delete the .md5 at the end of a file.
  5. Once the Combination already inserted, now click start to flash combination ROM into your Samsung Galaxy A8 Star or A9 Star.
  6. Your phone will automatically reboot when the flashing process is done.

Second Step - Reboot Phone into Download Mode.

How to boot Samsung Galaxy A8 Star into download mode?
  1. Turn off the phone after the flashing ROM combination at the first step above is complete.
  2. Once your phone is completely powered off, now turn on it again by press and hold the following button simultaneously.
    • Bixby Button + Volume Down Button 
  3. Release all button when the screen shows a warning.
  4. To confirm enter download mode you can press volume up, to cancel and restart press volume down

Third Step - Flash Stock ROM.

  1. Connect the phone to the computer again.
  2. Do the same thing as when flashing the ROM combination above, but, the firmware that will be flashed is Stock ROM. which you can get from the official website or from the prerequisite link above.
For detail instructions see the following video.


Monday, 17 September 2018

How to Bypass FRP Unlock Google Account Samsung Galaxy A6 (SM-A600) & A6 Plus (SM-A605) 2018 Android 8.0.

How to Bypass FRP Unlock Google Account Samsung Galaxy A6 (SM-A600) & A6 Plus (SM-A605) 2018 Android 8.0.

Bypass FRP Samsung A6 and A6 Plus. FRP or factory reset protection will protect your cell phone from irresponsible hands after they perform a hard reset. The cellphone will be locked by Google account after the hard reset is complete. And the phone will get an issue "This Device Was Reset, to Continue, Sing in with a google account, that was previously synced on this device”. that is, someone who has done a factory reset on the cell phone must provide the Gmail account that has been synchronized with the device. This guide is only for learning purposes, so don't abuse it for bad things. This guide will explain how to delete a google account on Samsung A6 and A6 + devices.

When your cell phone is locked by a forgotten Gmail account that after performing a master reset, here you can do nothing. But, If you still don’t know what is your Gmail account (user and password) and by anyhow you’re unable to recover your Google account, then you have to follow this guide to remove or bypass your Gmail account.

As a suggestion to avoid your device being locked by the FRP feature,
  • If you want to perform a hard reset on the cell phone, make sure You have recorded or remembered the Gmail account ID that has been synchronized.
  • Delete all Gmail accounts that have been synchronized from the settings menu - accounts.
Each Samsung device has a different way to bypass FRP, and this guide only works on Samsung Galaxy A6 and A6 plus only.
bypass FRP Samsung A6 and A6 Plus

Prerequisite.

  1. Make sure the phone you are using is Samsung Galaxy A6 and A6 Plus to follow this guide.
  2. Then, we need a computer or PC to help flashing a combination ROM and stock ROM.
  3. Now, download ODIN flash tool from the following link.
  4. You also need Samsung USB driver 
  5. Then, download ROM combination.
    • For Samsung Galaxy A6 (SM-A600). click here
    • For Samsung Galaxy A6 Plus (SM-A605) click here.
  6. Now, download Stock ROM.
    • For Samsung Galaxy A6 (SM-A600). click here
    • For Samsung Galaxy A6 Plus (SM-A605) click here.

Step By Step Bypass FRP Samsung A6 and A6 Plus.

  1. Make sure all the prerequisite files above have been downloaded.
  2. Now, reboot your phone and connect your phone to an available internet connection via Wi-Fi
  3. If your phone is locked by FRP because forgot the Gmail ID, you will only arrive at the following screen and can't do anything.
    bypass FRP Samsung A6
    bypass FRP Samsung A6
  4. Now, power off your phone.

Flashing ROM Combination.

  1. Make sure your phone is power off
  2. Then connect your phone to the computer via USB cable.
  3. Now, open ODIN and load ROM combination via AP Button on ODIN window.
  4. For fast loading, you must delete the .md5 at the end of a file.
  5. Once the Combination already inserted, now click start to flash combination ROM into your Samsung A6 or A6 +.
  6. Your phone will automatically reboot when the flashing process is done.

Reboot Phone Into Bootloader.

  1. Turn off the cellphone after the flashing ROM combination is complete.
  2. Once your phone is completely powered off, now turn on it again by press and hold the following button simultaneously.
    • Power Button + Volume Up Button 
  3. Release all button when the Samsung Galaxy A6 or A6 plus comes up on the screen.
  4. Wait for a minute until your phone enters Recovery Mode.
  5. From the Android Recovery Mode screen you can use the volume up or volume down to navigate the menu, and use the power button to confirm.
  6. Now, highlight reboot to bootloader and press power button to confirm.
  7. The phone will reboot and then enter bootloader.

Flash Stock ROM.

  1. Connect phone to the computer again.
  2. Do the same thing as when flashing the ROM combination above, but, the firmware that will be flashed is Stock ROM.

Video Guide.

Bypass FRP Samsung Galaxy A6 (SM-A600).

Bypass FRP Samsung Galaxy A6 Plus (SM-A605).


Saturday, 8 September 2018

How to Hard Reset Samsung Galaxy J2 Core to Remove Pattern Lock Screen and Password.

How to Hard Reset Samsung Galaxy J2 Core to Remove Pattern Lock Screen and Password.

Factory Reset Samsung Galaxy J2 Core J260G. The following guide will explain how to perform a hard reset on Samsung Galaxy J2 Core. Hard reset is usually called a master reset or factory reset. Where the cell phone that is reset will be returned to factory settings. All data, files, and applications will be deleted. except for the default application or bloatware. A hard reset can be used to solve minor problems on a cell phone. For example, when a user forgets the password or the pattern lock screen. At this moment the easiest way that can be used is to perform a hard reset. Actually, there are other ways without doing a hard reset and data loss, but this method is very complicated if you are a newbie in knowing the android cellphone technology. but if you still want to know how to remove a forgotten password, pattern lock, PIN, without hard reset and losing data, you can try this guide.

Hard reset on Samsung Galaxy J2 core can delete all stored data. We highly recommend storing and backing up before performing a hard reset. For Android 5.0 devices and above already have the FRP feature. make sure you know Google account information previously synchronized with the current device to avoid your phone locked after performing a hard reset.

Step By Step Factory Reset Samsung J2 Core.

  1. The following hard reset method uses the hardware button located on the cell phone body.
  2. This hard reset uses a combination of several buttons to access Android System Recovery.
  3. Now, power off your Samsung J2 Core and start to perform a factory reset.
    • If your phone is locked by forgotten the password or pattern lock screen, you can power off the phone with the normal procedure.
    • Therefore, you need to replace the battery from the phone, then install it again
  4. Once your phone completely powers off, then turn on it again by press and hold the following button simultaneously.
    • Volume Up + Power Button
    hard reset Samsung Galaxy J2 Core
    hard reset Samsung Galaxy J2 Core
  5. Release all button when your phone vibrates and show white Android logo.
  6. Just wait for a minute your J2 Core will enter Android recovery.
  7. From this screen, you can use the Volume Up or Volume Down button to navigate the menu. And use the power button to confirm.
  8. Now highlight wipe data/factory reset using the volume down button, and confirm with the power button.
    wipe data samsung j2 core
    wipe data Samsung j2 core
  9. On the next screen select Yes.
  10. Once you hit the power button to confirm, the hard reset process will begin.
  11. Make sure you see the wipe data complete at the bottom of the screen,
  12. This will bring back your phone to the Android Recovery main menu.
  13. Now, highlight reboot system now to reboot your Samsung J2 Core.
  14. Finish, in this step you have managed to do a factory reset on the Samsung J2 Core device.

Monday, 27 August 2018

How to Copy and Paste Text Character In the Command Prompt Windows All Versions.

How to Copy and Paste Text Character In the Command Prompt Windows All Versions.

Guide to Copy Paste From MS-DOS. This guide applies to every version of Windows PC, so I made this guide general. For ordinary people, the technique of copy and paste text and characters in the command prompt window will be difficult. Because it can't be copied directly then paste it on the clipboard. Command prompt window or commonly called MS-DOS window also has copy paste features like in other Windows programs. For example, we write scripts or any commands in the command prompt window and then copy and paste it in the browser or other text editors.

There are several ways you can do to copy paste text from a command prompt or MS-DOS window to another text editor program. please note the following method.

Before copying and pasting, you must open the MS-DOS window or command prompt. how to open an MS-DOS window or command prompt?

  1. Press a Windows Logo on the keyboard and R button.
  2. It will run window.
  3. From the current window type cmd
  4. Then hit enter or press OK

Copy Text From MS-DOS window.

  1. Right-click anywhere in the MS-DOS window
  2. Click Mark 
  3. Then, Highlight what you want to copy and then press Enter.
  4. Once the text has been copied, it can be pasted anywhere. E.g browser or another text editor.
    copy paste text in MS-DOS window
    copy paste text in MS-DOS window

Paste Text To MS-DOS Window

  1. Right-click anywhere in the MS-DOS window.
  2. Then click Paste.
  3. Now, the text should appear on the command prompt windows.

Copy Paste Text in the Windows 10 Command Prompt.

This guide is for Windows 10 only. You can now quickly select and paste text within the command prompt window, but first, you have to enable the keyboard shortcuts in the command prompt window. How to enable the keyboard shortcuts in Windows 10?

  1. We assume the command prompt window is open.
  2. Then, Right-click on the command prompt's title bar and choose Properties.
    Copy Paste Text in the Windows 10 Command Prompt.
    Copy Paste Text in the Windows 10 Command Prompt.
  3. Then, uncheck the box next to "Use legacy console (requires relaunch)"
    Copy Paste Text in the Windows 10 Command Prompt.
    Copy Paste Text in the Windows 10 Command Prompt.
  4. This should automatically check the "Enable Ctrl key shortcuts" option.
    Copy Paste Text in the Windows 10 Command Prompt.
    Copy Paste Text in the Windows 10 Command Prompt.
  5. End by clicking Ok. Now you can select text  or character using your mouse or the keyboard (hold down the Shift key and use the left or right arrows to select words)
  6. You can press CTRL + C to copy it, and press CTRL + V to paste it in the window.
  7. Also, You can easily paste the text you've copied from another program into the MS-DOS window using the same shortcut.

Sunday, 26 August 2018

[Guide] - Flash Stock Firmware Samsung Galaxy S9 and S9+ With ODIN Software.

[Guide] - Flash Stock Firmware Samsung Galaxy S9 and S9+ With ODIN Software.

Samsung Galaxy S9 and S9+. Flash stock ROM can be used to upgrade or downgrade a cellphone with an Android operating system. Besides that, flash stock firmware can also be used to solve boot loop issue. a boot loop is an Android operating system fails to start up to the home screen. So that it only displays the logo and restarts repeatedly. boot loop usually occurs due to an error installing a custom ROM. To install the firmware it takes ODIN which only runs on the computer with the Windows operating system. And now I will show you step by step how to flash ROM stock into Samsung Galaxy S9 and S9+ With ODIN.

This Galaxy S9 Android phone was released to the market by Samsung around March 2018. This device has 5.8 inches Super AMOLED capacitive touchscreen, 16M colors display. powered by Octa-core (4x2.7 GHz Mongoose M3 & 4x1.8 GHz Cortex-A55) CPU. Galaxy S9 running on Android 8.0 (Oreo) operating system.

Now, see the following step to install stock ROM to your Samsung Galaxy S9 or S9+.
flash Samsung S9 and S9+

Step 1 (Prerequisite).

  1. The battery must be sufficiently charged, do not flash the firmware in an empty battery. Because it can interfere with the flashing process.
  2. Every time you make changes to your cell phone, you should back up all data to avoid losing the data.
  3. The USB driver must be installed correctly on the computer, this is to guarantee a good connection between the two hardware. You can download the USB driver from the following page.
  4. Now download Odin software tool to transfer firmware from PC to cellphone. here.
  5. To download Samsung Galaxy firmware, you can use one of the available following methods.

2nd Step (load firmware to Odin). 

  1. We strongly recommend applying this guide only to Samsung Galaxy S9 and S9+ devices, Please check your Samsung cell phone model before following this guide. How to check your phone model number.
  2. Then, extract Odin zip into a folder that is easy to find. As an example in the desktop folder
  3. Now, Unzip the Samsung Galaxy S9 and S9+ Stock ROM or Firmware.
  4. First turn off your cell phone before starting the flash firmware.
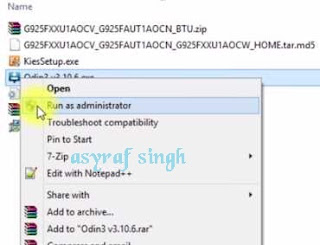
  5. Now, go to the ODIN folder and run the ODIN.exe application by right-clicking choose run as administrator.
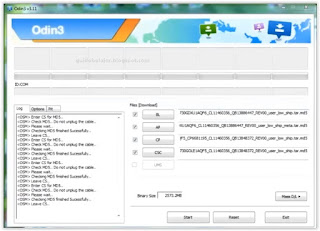
  6. open ODIN windows
    open ODIN windows
  7. Once the ODIN window is open, now you can click the following button at the ODIN application windows, and navigate to the *.tar or *.tar.md5 firmware file to load it into ODIN window. 
    • BL button,
    • AP button
    • CP button
    • CSC button
      flash Samsung Galaxy S9 and S9+
      flash Samsung Galaxy S9 and S9+
  8. Make sure there is no part of the firmware that has been missed insert to the Odin window

3rdStep - Download Mode

  1. Make sure your phone completely shut down to start the flashing process.
  2. How to enter Samsung Galaxy S9 and S9+ into download mode?. You can press and hold the following button simultaneously
    • Volume Down + Power Button + Home button.
  3. Release all button when your phone showed this image on the screen.
  4. download mode Samsung Galaxy S9 and S9+
    download mode Samsung Galaxy S9 and S9+
  5. To continue entering download mode press the volume UP button.
  6. To cancel entering download mode and restart the phone press the volume down button.
  7. More instructions, see this page.

4th Step, Start Flashing Firmware.

  1. Once your phone in download mode screen, now connect it to the computer via USB cable.
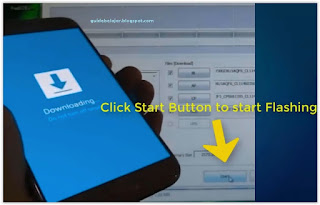
  2. Make sure your Samsung phone screen shows downloading.
  3. Now return to the ODIN application window, then click the start button to start the flash process.
    flash Samsung Galaxy Tab A 8.0 (2017)
    flash Samsung Galaxy Tab A 8.0 (2017)
  4. Wait a while until the ODIN window displays a green PASS. this means the flash process is complete, and the Samsung mobile phone will automatically reboot.
  5. After the flash firmware process is successful, your cell phone is in factory settings. Do the initial settings like when you first bought the cellphone so that it can be reused. Congratulation, flash firmware Samsung Galaxy S9 and S9+ is done.

Flashing Firmware or Stock ROM Into Samsung Galaxy Tab A 8.0 (2017) With ODIN.

Flashing Firmware or Stock ROM Into Samsung GalaxyTab A 8.0 (2017) With ODIN.

Flash Stock ROM Samsung J7 Prime. Flashing firmware can be used to solve some minor issues on Android phones. For example, if we want to upgrade the firmware version which is not available through OTA. or downgrade to an older firmware version. Besides that, flash stock firmware can also be used to solve a boot loop issue on the Android phone. The boot loop phone will restart repeatedly and stop at the showing the logo only. Flash stock ROM can also be used to restore phone settings to factory settings. You can do this if the factory reset process cannot help the cell phone from unresponsive or even stuck.

I will apply the following flashing to Samsung Galaxy Tab A 8.0 (2017) devices, This phone released to the market by Samsung in September 2017. With 8.0 inches, IPS LCD capacitive touchscreen, 16M colors display. Powered by Quad-core 1.4 GHz Cortex-A53 CPU. And this phone run on Android 7.1 (Nougat) operating system, planned upgrade to Android 8.0 (Oreo).

Here is a tutorial how to flash stock firmware Samsung Tab A.8.0 (2017).
flash firmware Samsung Tab A.8.0

First Step (Prerequisite).

  1. Make sure the battery is at least 80% charged, this is to keep the phone alive during the flashing process.
  2. Always back up on important data. this is to avoid the data being lost after the flashing process
  3. Make sure the USB driver is correctly installed on your Windows computer so that the connection between the phone and PC via USB cable is not interrupted. You can download the USB driver from the following page.
  4. the next step, download the Odin software tool from the following page here.
  5. Below are three methods for downloading Samsung Galaxy firmware.
    • You can use 1 of the 3 methods available to download the firmware.
      • One. Download Official firmware file for the model number of your device, download it from - SamMobile.com, or you can visit the other site, samsung-updates.com. 
      • TwoUse the following guide to download Samsung Firmware.  Here
      • Three. Download firmware Samsung Galaxy Tab A 8.0 (2017) directly from the following link, you must Log In to download firmware via this link.

Second Step (load firmware to Odin). 

  1. The following guide can only work on the Samsung model according to the post title above, Please check your Samsung cellphone model before following this guide. How to check your phone model number.
  2. Then, extract Odin zip into a folder that is easy to find. As an example in the desktop folder
  3. Then, Unzip the Samsung Galaxy Tab A 8.0 (2017) Stock ROM or Firmware.
  4. To start flashing firmware, your phone must be turned off.
  5. Now, go to the ODIN folder and run the ODIN.exe application by right-clicking choose run as administrator.
  6. open ODIN windows
    open ODIN windows
  7. Once the application window is open, now you can click the following button at the ODIN application windows, and navigate to the *.tar or *.tar.md5 firmware file to load it into ODIN window. 
    • BL button,
    • AP button
    • CP button
    • CSC button
      flash Samsung Galaxy Tab A 8.0 (2017)
      flash Samsung Galaxy Tab A 8.0 (2017)
  8. Make sure all parts of the firmware have been loaded into the Odin window.

Third Step - Download Mode

  1. Make sure your phone completely shut down to start the flashing process.
  2. How to enter Samsung Galaxy Tab A 8.0 (2017) into download mode?. You can press and hold the following button simultaneously
    • Volume Down + Power Button + Home button.
  3. Release all button when your phone showed this image on the screen.
  4. download mode Samsung Galaxy Tab A 8.0 (2017)
    download mode Samsung Galaxy Tab A 8.0 (2017)
  5. To continue entering download mode press the volume UP button.
  6. To cancel entering download mode and restart the phone press the volume down button.
  7. More instructions, see this page.

Final Step, Start Flashing Firmware.

  1. Once your phone in download mode screen, now connect it to the computer via USB cable.
  2. Make sure your Samsung phone screen shows downloading.
  3. Now return to the ODIN application window, then click the start button to start the flash process.
    flash Samsung Galaxy Tab A 8.0 (2017)
    flash Samsung Galaxy Tab A 8.0 (2017)
  4. Wait a while until the ODIN window displays a green PASS. this means the flash process is complete, and the Samsung mobile phone will automatically reboot.
  5. At this time you have successfully flashed the firmware into the Samsung Galaxy Tab A 8.0 (2017) mobile device. Your phone has returned to factory settings with a new firmware. At this time it usually takes longer when first booting. Don't panic and be patient. Congratulation your phone issue is solved now.