smartdroid

Sunday, 15 April 2018

How to Flash Firmware LG X Mach Return to Stock and Fix a Bootloop.

How to Flash Firmware LG X Mach Return to Stock and Fix a Bootloop.

Flash LG X Mach Firmware.  If your phone gets bootloop it will only show an LG logo and stuck at this screen, and then return to reboot automatically and show this screen again. So, it's also called failed to boot the Android system and go to phone menu. At this state, your phone is still can access recovery menu or enter download mode. On this guide, we will try to fix this boot loop issue on Android LG X Mach by flashing this phone using a new firmware with kdz method. Simply just download the firmware from the available link below and then run LG Flash tool 2014 to help to flash firmware into LG X Mach via download mode. You don't need to take your phone to the service center and you can try it by yourself to fix this issue.

Also, this guide will solve the soft-brick on LG X Mach. Before this flashing guide starts lets we know more about LG X Mach specifications. For some countries, LG X Mach is also known as with LG K600 or LG X Fast.
  • This device released at 2016, September.
  • Comes with 5.5 Inches, IPS LCD capacitive touchscreen, 16M colors
  • Powered by; Hexa-core (4x1.4 GHz Cortex-A53 & 2x1.8 GHz Cortex-A57) processor, Qualcomm MSM8992 Snapdragon 808 chipset, and Adreno 418 GPU.
  • Supported by: 3000 MB of RAM
  • Run on Android 6.0.1 (Marshmallow)
  • Camera specs; 12,3 Mp of primary camera, and 8 MP of secondary camera.
  • Battery specs; Removable Li-Ion 3000 mAh battery.
Now, let's we start to flash the LG X Mach phone. Below is step by step guide you can try by yourself. Please read carefully in order to avoid your device totally damaged.

Preparations.

The following files are used to help you run flashing process on your LG X Mach. Download it one by one until completed.
1. This flashing method using kdz file, therefore you must provide the LG KDZ firmware to proceed this guide. There is two way you can try to download this file.
- Download LG Kdz file by yourself using the web browser and IMEI phone number.

Flashing Guide.

Video Guide.


1. Extract Kdz Firmware and the other file to your computer local disk, we recommend saving this kdz and LG driver to the desktop for easy access later.
2. Make sure your LG X Mach is fully charged or at least has 75% of battery capacity before flashing process.
3. To avoid failed when detecting your LG phone the LG driver should installed correctly on your computer or PC.
4. If you see any error when installing LG driver, try to install Visual C++ Runtime Library first.
5. Now, go to LG flash tool 2014 folder, and run it as administrator. (right click at LG Flashtool2014.exe - select run as administrator).
run as administrator - Flash LG X Skin
6.Once the LG Flashtool 2014 window is launched. Now you can set this windows as the following guide.
flash LG X Skin
flash LG X Skin
  • Number 1: At Select type, you can choose 3GQCT
  • Number 2: Select DIAG at phone mode drop-down menu.
  • Number 3: Browse where your kdz saved on your computer drive.
  • Number 4: Click normal flash, it will Flash ROM without losing any data. Only use this when you need to fix system error. For some selected type, you will see CSE flash beside normal flash. CSE flash used for fresh format your phone. Also, it used to downgrade or upgrade phone firmware.
7. If you click the normal flash button, then you will see next window as shown in the picture below. On this window, you can continue the process by click Start button
flash LG X mach
flash LG X mach
8. Now, you will see country & Language window, on this window click clear phone software update registry button.
9. Now, go to your phone and turn off your LG X Mach.
11. Then connect your LG X Mach to the computer via USB cable while press and hold Volume Up button.
12. Release volume up button when your LG X Mach enter download mode. And your phone will show this screen.
enter download mode LG X Mach
13. Now, back to LG Flash tool 2014 window (country & Language window) and click OK button.
14. Now, you will automatically launch LG Mobile Support Tool window on a screen.
LG Mobile Support Tool
15. Just wait for the flashing process until it done. It will take a while depending on firmware size and phone models.
16. Once it reaches 100% completed, your LG X Mach will reboot automatically, and you can click the exit button.
17. Now, you can unplug your LG X Mach form USB cable, and while it boots up and ready to use you can set up your phone as the first time you bought it.

Saturday, 14 April 2018

Guide to Flash Stock Firmware LG M700TV aka LG Q6 Plus KDZ Method With LGUP and Uppercut.

Guide to Flash Stock Firmware LG M700TV aka LG Q6 Plus With LGUP and Uppercut.

Flash LG Q6 Plus with LGUP. Please use the following guidelines to solve the boot loop problem on your LG mobile phone. This guide will show you how to flash a new stock firmware on LG Q6 Plus. We will show with the KDZ methods, which this guide requires LG UP to help flash the stock firmware. generally, to flash the firmware to LG mobile phone using LG UP you have to provide DLL file. But, now you can use UPPERCUT. By using UPPERCUT it will allow LGUP to instantly work with a ton of different Android LG phones models. You don't need to hunt around for specific model files or being stuck without your model being detected by the LGUP. Just install and run LGUP and then double-click the UPPERCUT.exe and your LG phone model will be detected.

If you understand all the risk to flash a new stock firmware into your Android LG Q6 Plus, let's start this guide.

Prerequisite.

  1. A PC runs on the Windows Operating System.
  2. LG's Windows USB drivers. 
  3. https://goo.gl/7p2FeA
  4. LGUP tool 
  5. https://goo.gl/aqd2sc
  6. Download Uppercut from 
  7. https://goo.gl/eU8mBE
  8. Download Stock ROM LG M700TV aka LG Q6 Plus.
    • Here 
    • https://goo.gl/z2P5b2

Instruction How to flash LG Q6 PLUS.

  1. Make sure all required files above are successfully downloaded on your computer. Then, do the following step.
    • Install LG USB Driver
    • Install the latest LG UP software
    • Extract or Unzip Uppercut.zip
  2. Then, double-click the uppercut.exe before running LGUP. Uppercut.exe requires LGUP 1.14 (not 1.11) installed on the computer.
  3. uppercut LGUP
    uppercut LGUP
  4. Now, put your LG Q6 PLUS Smartphone into download mode, you can manually do it by ;
    • Turn Off your LG Q6 PLUS Smartphone device.
    • Then press and hold Volume UP button while connecting your LG Q6 PLUS Smartphone to the computer using the USB cable.
  5. Then run LGUP tool.
  6. Wait a moment until LGUP detect and recognize your LG smartphone. This will install a necessary USB Drivers for your device.
  7. Now, your LGUP should show up on your computer screen.
  8. Flash LG Q6 using LGUP
    Flash LG Q6 using LGUP
  9. From LG UP screen above, go to process tab and select Upgrade. 
  10. Then click on BIN file under file type.
  11. Flash LG Q6 using LGUP
    Flash LG Q6 using LGUP
  12. Then click the button on the right side of bin file shown in the picture below.
  13. Flash LG Q6 using LGUP
    Flash LG Q6 using LGUP
  14. This action will browse your kdz/tot file you just download.
  15. Once your kdz/tot file already in the LGUP software, now click Start.
  16. Flash LG Q6  using LGUP
    Flash LG Q6 using LGUP
  17. Now, LGUP will start flashing process, this is indicated on the progress bar.
  18. Flash LG VQ6  using LGUP
    Flash LG Q6 using LGUP
  19. Just wait until the step on progress bar shows 100% complete. Once it completed LG Q6 PLUS will automatically reboot.
  20. Now, you can unplug your LG Q6 PLUS device from the computer.

Guide to Flash Stock Firmware Android LG V30 With LG UP + Uppercut.

Guide to Flash Stock Firmware Android LG V30 With LG UP + Uppercut.

Flash Firmware LG V30 for Open Market. The following guide is about how to flash a new stock firmware into LG V30 to fix a bootloop issue on the current device. To fix this issue simply flash the stock firmware using any compatible flash tool for LG phone. And now, we will use the LG UP to flash the firmware. to use the LG UP on all LG phone types, we need Uppercut. So, you don't need hunting around for specific LG phone model files or being stuck without your LG phone model being detected by LG UP.

LG UP and Uppercut is a simple way to flash a kdz or tot firmware to the LG phone. So, you don't need to download a dll file for your device. If you want to use LG UP simply double-click the Uppercut.exe first. 

But, if you still want to use dll files, you can find dll inside the KDZ. Then extract the dll file inside the \LG Electronics\LGUP\model\common folder. the common folder does not default folder, therefore you need to create it manually.

If you ready to flash your LG V30, then we can start this guide now.

Prerequisite.

  1. This guide needs a computer with the Windows OS installed.
  2. LG's Windows USB drivers.  
  3. https://goo.gl/7p2FeA
  4. LG UP tool Hre 
  5. https://goo.gl/aqd2sc
  6. Download Uppercut from 
  7. https://goo.gl/eU8mBE
  8. Download Stock ROM US99810c_03_1216.KDZUS99810c_03_1216.KDZ.
    • Here 
    • https://goo.gl/9KuXfL

Instruction How to flash LG V30.

uppercut LGUP
uppercut LGUP
  1. Make sure all required files above are successfully downloaded on your computer. Then, do the following step.
    • Install LG USB Driver
    • Install the latest LG UP software
    • Extract or Unzip Uppercut.zip
  2. Then, double-click the uppercut.exe before running LGUP. Uppercut.exe requires LGUP 1.14 (not 1.11) installed on the computer.
  3. Now, put your LG V30 Smartphone into download mode, you can manually do it by ;
    • Turn Off your LG V30 Smartphone device.
    • Then press and hold Volume UP button while connecting your LG V30 Smartphone to the computer using the USB cable.
  4. Then run LGUP tool.
  5. Wait a moment until LGUP detect and recognize your LG smartphone. This will install a necessary USB Drivers for your device.
  6. Now, your LGUP should show up on your computer screen.
  7. Flash LG V30 using LGUP
    Flash LG V30 using LGUP
  8. From LG UP screen above, go to process tab and select Upgrade. 
  9. Then click on BIN file under file type.
  10. Flash LG V30 using LGUP
    Flash LG V30 using LGUP
  11. Then click the button on the right side of bin file shown in the picture below.
  12. Flash LG V30 using LGUP
    Flash LG V30 using LGUP
  13. This action will browse your kdz/tot file you just download.
  14. Once your kdz/tot file already in the LGUP software, now click Start.
  15. Flash LG V30 using LGUP
    Flash LG V30 using LGUP
  16. Now, LGUP will start flashing process, this is indicated on the progress bar.
  17. Flash LG V30 using LGUP
    Flash LG V30 using LGUP
  18. Just wait until the step on progress bar shows 100% complete. Once it completed LG V30 will automatically reboot.
  19. Now, you can unplug your LG V30 device from the computer.

How to Create a Digital Wallet, Get an Address, and Mining The Monero XMR Coin.

How to Create a Digital Wallet, Get an Address, and Mining The Monero XMR Coin.

Install The Monero Wallet. When you are really ready to use Monero, the first step you should do is create a Wallet. Wallet here is almost the same as the wallet in the real world. We will create a digital wallet to store digital Monero. There are several options how digital Monero can be stored. Of course, this is similar to the physical cash commonly used by people. Monero wallet also has a balance like a conventional bank. One of the interesting of Monero is how to add and subtract funds from that Balance. So, the Wallet's address is used to receive funds from others people. Generally, the address of Monero Wallet consists of 95 letters and numbers. As seen below.

587gtrHjkRt6EL7Jk7v4RoeCEnJFH2rpD18GuiTk9KTcViQv4Q3eVp4sXS1TNwgN48d6MPJXxn2HPh3BRA6Lq2SWmBHGtreW

A simple overview of the use of Wallet Monero is as follows, My friend sends me 15 Monero for a pizza, Then I would give him my address. The next step is, he would open his digital wallet and send my address with 15 Monero. As well as conventional money, you spend digital money by send or receive it from your digital wallet to other peoples.

How to Create a Digital Wallet on MyMonero.com.

     A. How to create an account.

To create a digital wallet in Mymonero.com is very easy. Here is step by step instruction you can follow.
  1. Go to this website MyMonero.com
  2. Click create an account. Then you will see a banner that your account has been created.
  3. Scroll down the page and you will see Your Private Login Key. You must keep this private key safe. This private key also used as a login key.
    Monero digitall wallet
    Monero digital wallet 
  4. Now, copy the private Login key, and then paste it into the form under Confirm your Private Login Key.
  5. Now, click blue button with I've written down my private login key, log me in!
  6. Once you have successfully logged in, you will see your digital wallet address.
It can be explained, simply that you just go to MyMonero.com and click the big blue button. Your account will instantly be created by login, and your mnemonic seed (or called ‘Your Private Login Key’) will be shown on the screen. Copy paste and Store it in a safe place and don’t share it with the other people. You will use this key to log into MyMonero from this page forward.

    B. How to login Monero account.

To login into Monero account is easy. Just follow the steps below to do it.
  1. Make sure your computer connected to the internet.
  2. Then, open your favorite browser to visit the Monero website or you can click this link
  3. Then click Login button located at the top right side of the screen.
  4. Then, you need to enter Your Private Login Key in the form.
  5. After that, select available language.
  6. Now, hit the blue button say Enter My account.

How to Create a Digital Wallet With Monero Wallet Software.

  1. The first step you should do is download the software Moreno from the official Moreno website. Here
  2. Select your Operating System to download the digital wallet.
  3. Once your file successfully downloaded, just extract this zip file. From the extracted file you can see that there is a number of different files. Then we need to execute two files of them.
    • monerod.exe
    • monero-wallet-cli.exe
  4. This application will connect your PC to the Monero network and download the blockchain. the encrypted will record all transactions that have ever occurred in Monero. When this program downloads the blockchain it will take more than 15 hours. Depending on your internet speed connection. Also, need more than 20 - 30 GB free space of your computer drive. Before done, make sure you all requirements are met on your computer. 
  5. If you ready, now double click to run monerod.exe. If you see security warning just click OK. This program will synchronize your computer with the blockchain, it will take a very long time.
    synch to blockchain
    synch to blockchain
  6. Once your computer already synchronized, you will see this picture on the screen as shown below.
  7. The green word on the screen says that SYNCHRONIZED OK. This means your PC is synced and you are ready to use your digital wallet.

How to Create Wallet.

  1. Once your computer already synched, now you can create a Monero digital wallet.
  2. Now, you need to run the Monero-Wallet-CLI.exe program to create a wallet. This application will ask you to give a wallet name and password. It will then display your new 95-character address, as well as give you a mnemonic seed.
    wallet and mnemonic seed
    wallet and mnemonic seed
  3. You must write down and keep it in a safe place. Never lose this wallet address and Mnemonic seed.

How to Mine Monero Using Your Own PC.

Now everyone has the opportunity to Monero mine coin using CPU power consumption. You do not need to pay a high cost to buy expensive ASIC based mining hardware. You can mine the Monero coin on almost Operating System running on the PC. For example Windows and Linux. Once you have successfully created Monero wallet as described above, now is the time you start to mine the Monero coin using PC.

Prerequisite To Mine the Monero Coin Using PC.

  1. Mining Pool. you can select the mining pool you wish to use from the list below
    • https://minexmr.com/
    • http://supportxmr.com
    • http://monerohash.com
    • http://monero.crypto-pool.fr
    • http://xmrpool.net
    • http://moneropool.com
    • http://xmr.prohash.net
    • http://pool.xmr.pt
    • http://poolmining.org
    • http://usxmrpool.com
    • http://xmr.poolto.be
  2. Mining Software. Once you have defined the mining pool, then you need to choose the mining software that can run on your PC.
You can specify the type of operating system running on your PC that is supported by the Mining software. Happy mining.

Sunday, 8 April 2018

How to Install Free Antivirus (MSE) On Windows Server 2012 and 2008.

How to Install Free Antivirus (MSE) On Windows Server 2012 and 2008.

Free Antivirus For Windows Server 2012. By default windows server 2012 does not have with a built-in anti-virus. for that, you can use free antivirus from a Microsoft. The Antivirus that can be installed on Windows server 2012 is Microsoft Security Essential or MSE. But there are little tricks to install it. And now I will show you how to install Antivirus on Windows server 2012. This is a basic level Antivirus for your home server or a small business server environment. But if you have any kind of sensitive data or if you're a small to medium business or larger, you should really be installing an enterprise level solution. MSE is a free Antivirus to give you an alternative to essentially having nothing in a server environment.

The reason for this is standard Antivirus like AVG, Kaspersky, Avast, simply will not install in a Windows server environment. What we are going to do is download Microsoft Security Essential or MSE, and we are going to manipulate it slightly. So, the MSE will install into a Windows Server Environment. This guide is not a perfect solution but what it does is it gives you a basic level of Antivirus protection on a home server or a small business server that doesn't yet justify the cost of an enterprise level solution. You will need a few things in order to do this you will need a windows server installation.

Let's get started this guide.

  1. Open your favorite browser, then type google.com at the address bar.
  2. Now, type download mse at search bar.
  3. Once MSE already downloaded, move the MSE application into the drive C
  4. We to do it just to make it easier to navigate to the command line.
  5. Now, run MSE application to install it.
  6. Once the installation run, you will see the actual issue that the MSE application is not supported with the Windows Server operating system.
    error installing MSE
    error installing MSE
  7. The installer will say "Microsoft Security Essential Cannot be Installed on your Operating System"
  8. Now, just click close this windows.
  9. Then, go to drive C (where the MSE.exe located)
  10. Right-click MSE.exe - Then click Properties.
    install MSE Windows Server 2012
    install MSE Windows Server 2012
  11. It will open mseinstall properties window. You need to click the compatibility tab.
    install MSE Windows Server 2012
    install MSE Windows Server 2012
  12. From the compatibility tab, select Windows 7 under Compatibility mode. Make sure "run this program in compatibility mode for" is checked.
  13. Now, click Apply and then OK.
  14. If you try to run the mse installer again. You will see an error in step 6 above. This means the issue hasn't actually fixed.
  15. What we need to do is go to the command line.
  16. Type CMD at the windows search - Right-click and select Run as Administrator.
  17. Once cmd window already to use, then navigate the prompt to drive C. Type the following command :
    • cd c:\
  18. From the C command prompt, type the following command.
    • mseinstall /disableoslimit
  19. This command should run the mse application and disable the limitation.
  20. That is basically you need to do to manipulate the mse installation. Now we can go through the install wizard as if we are installing any other pieces of software. Just don't check anything at the setup windows.
  21. Make sure the firewall rule is turned off. Because Windows Server typically has a firewall already  
  22. Once the installation completes you will be prompted to run a scan.
  23. Once you have finished downloading updates just hit yes and it will begin downloading for you, this may take some time depending on what kind of connection. Once the updates already downloaded, you'll have a full installation of Microsoft MSE on the Windows Server 2012.
  24. If you install on the desktop as soon as the icon on the top turns green. This mean, you're covered and you can start running a scan 


Wednesday, 4 April 2018

How to Bypass FRP or Google verification bypass LG ARISTO (LG MS210) version 7.0 2017/2018

How to Bypass FRP or Google verification bypass LG ARISTO (LG MS210) version 7.0 2017/2018

Bypass FRP LG Aristo. At some time ago, an Android device running on at least Android 5.1 lollipop or higher has introduced new security features. This is built-in security features you can use to protect your phone and data. And now this features called for data protection, or Factory Reset Protection (FRP), so do your LG aristo has this feature. This feature will prevent others from using your phone after performing a hard reset. Unless they know Google username and password previously set up on your LG Aristo. Then, what if you forget your google account? but you've done performed a hard reset. Therefore, you need to read the following guide. 

This guide will show you how to Bypass FRP or Google verification bypass LG ARISTO version 7.0 2017/2018.  This guide is for personal use only.

Instruction Guide.

  1. On the screen, you will find a warning like in the picture shown below. It will say "this device was reset. To continue, sign in with a Google account that was previously synced on this device"
  2. Remove FRP LG ARISTO
    Remove FRP LG ARISTO
  3. From this screen tap back, until the welcome screen. Then tap Accessibility.
    bypass FRP LG Aristo
    bypass FRP LG Aristo
  4. If a pop-up screen appears, Tap Yes.
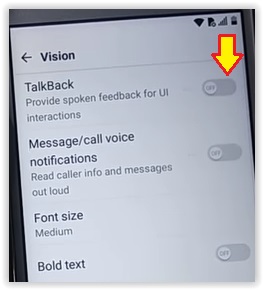
  5. From the Accessibility menu, tap Vision.
    bypass FRP LG Aristo
    bypass FRP LG Aristo
  6. Then enable Talkback.
    bypass FRP LG Aristo
    bypass FRP LG Aristo
  7. Then you will see the Turn On Talkback Pop-up menu, from this menu tap TurnOn.
  8. Now wipe the screen with L shape, to open Global Context Menu.
  9. From the Global Context Menu screen, tap Talkback Settings.
  10. To suspend the Talkback, press and hold both volume button. If you ask "are you sure you want to suspend TalkBack?" tap OK.
    bypass FRP LG Aristo
    bypass FRP LG Aristo
  11. Then, scroll down the TalkBack settings menu and tap Help & Feedback.
    bypass FRP LG Aristo
    bypass FRP LG Aristo
  12. When the help menu appears, select one of the available topics. for example "About Switch access for Android"
    bypass FRP LG Aristo
    bypass FRP LG Aristo
  13. Now you will open a guide about the topic you selected earlier, at the middle screen you will see a video tutorial. From this video, you need to tap share arrow sign.
    bypass FRP LG Aristo
    bypass FRP LG Aristo
  14. Now, press and hold the available link. It will show you the context menu.
    bypass FRP LG Aristo
    bypass FRP LG Aristo
  15. At the right side of the context menu, press three dots and tap Assist.
    bypass FRP LG Aristo
    bypass FRP LG Aristo
  16. Once you click the assist, so it will take you to Google App screen.
  17. From the search bar, type settings.
  18. bypass FRP LG Aristo
    bypass FRP LG Aristo
  19. From the search results, please tap settings to enter the settings menu.
  20. Once you enter the settings menu, scroll down the screen and tap Security.
    bypass FRP LG Aristo
    bypass FRP LG Aristo
  21. Then, tap phone Administrator. make sure the phone Administrator is OFF
    bypass FRP LG Aristo
    bypass FRP LG Aristo
  22. Then, you need to go back. You will see that Unknown Resource is disabled.
  23. Now, go back to the Settings menu. Then Tap Apps.
  24. From the Apps screen, tap 3 dots located in the right corner and select Show System. Then scroll down and tap Setup Wizard - Force Stop - Ok - Storage - Clear Cache and go back to Apps screen.
  25. Now, tap Setup Wizard - Force Stop - Ok - Storage - Clear Cache - Clear Data - Ok
  26. Now tap back to the Apps screen, then tap Google Account Manager - Disable - Yes - Force Stop - Ok - Storage - Clear data - Ok 
  27. Back to Apps screen menu again, tap Google Play Services - Disable - Yes - Force Stop - OK.
  28. Now, Restart your LG Aristo.
  29. Just wait your phone boots and ready to use.
  30. Now, turn on Wi-Fi
  31. On protecting your phone screen, select Not Now
  32. If you have reached the Legal Documents page, scroll down the page and find the Email Address (output@lge.com). If you select Agree and hit next on this page, you will bring to back to the main screen. 
  33. Then complete action using Gmail app. if you are prompted to enable google play service. Then you must select Enable.
  34. Back to step 30 above, click the email address. Once the complete action using pop-up menu appears. Press and hold Gmail app icon.
  35. It will open App info screen, now tap Notifications. and tap the App settings
  36. Once enter App settings, now tap three dots located at the right top corner and tap Manage account - Continue - it will bring you t the phone settings.
  37. From the Settings menu 
    • Tap Wifi to turn On it on the Network Tab
    • Then, go to Tab General - Security - Enable Unknown Source - Allow 
    • From tab general - Tap Apps - Scroll down and tap Youtube Apps - Notification - Then tap Youtube App Settings (see step 33 above) - Tap About - Google Privacy Policy - It will open the Browser on your phone.
  38. Now, type the following URL at the address bar to download the 3rd party apps over the Google search. sidebar apk free download
  39. Select the following link in the search results.
  40. Now, continue to download and install Sidebar Apk.
  41. Once finished now download and install quickshortcutmaker_2.4.0
  42. For the next step, download and install Quick shortcut Master Apk or shortcut master (lite)
  43. for the next step, please watch this video;

Saturday, 10 March 2018

How to Install TWRP Recovery and Root Magisk All Razers Phone

How to Install TWRP Recovery and Root Magisk All Razers Phone.

TWRP and Root Razer Phone. The following is the latest guide to root and install TWRP on all types of razer phones. Please use this guide, then you will be spared from root problem. Because this is an official way from xda member (nikitis). If using other methods, then your wifi cannot work. Once you have successfully install TWRP correctly, the next step is root razer using Magisk.

Then, how to install the correct TWRP and Root Razer. let's continue the following tutorial.

Prerequisite.

  1. Although installing TWRP does not erase all data, but we strongly recommend to backup everything stored on your phone.
  2. Always use a USB 3 Type-A to Type-C
  3. Download boot.img from the latest Razer factory image.
  4. If your Razer phone is not already at the latest, best to just flash it using Razers guide to restore using the factory image. You can see the following instruction below How To Flash All Razer Phone With factory Images.
  5. Download the latest USB driver.
  6. Download the latest fastboot tool version 23.0.1 or later. Store unzipped directories in a known path (for example C:\platform-tool )
  7. Then, Obtain TWRP.img and TWRP.zip at the following link.
  8. Download Magisk from here.
Instruction Guide.
Root and TWRP Razer phone


Step #1.

Push TWRP, Boot.img, and Magisk to Razer Phone.

  1. We assume that the platform-tools on drive C (for example C:\platform-tool )
  2. Make sure 3 files from prerequisite above are inside of your platform-tools folder with adb.exe and fastboot.exe.
  3. From C:\platform-tool
    • Press and hold shift button, then right-click your mouse
    • Now, select Open command window here
  4. Make sure your drivers are working, type the following command and press enter to test it.
    • fastboot devices
  5. From the command prompt window, type the following command and press enter.
    • adb push boot.img /sdcard
  6. Then type the following command and press enter.
    • adb push twrp-installer-3.2.1-0-cheryl.zip /sdcard
  7. Now, type this command and press enter.
    • adb push Magisk-v16.0.zip /sdcard
  8. Then boot your Razer phone, type the following command and press enter
    • adb reboot bootloader
  9. Once your Razer phone in the bootloader and you see "Download Mode" on the phone screen, type the following command and press enter.
    • fastboot flash boot twrp-3.2.1-0-cheryl.img && fastboot reboot
  10. Now your Razer phone should enter TWRP.
  11. Select Reboot button.
  12. Then, check which slot you are on and follow instructions accordingly below.
  13. You can Skip down to "Slot B Guide" if you are starting out in Slot B.

Step #2

Slot A Guide.

  1. Boot your Razer phone into TWRP recovery
  2. Make sure you're in Slot A, how to verify it?
    • Reboot your Razer phone.
    • Then viewing what slot you are currently on. It should say Slot A.
  3. Now, back out and go to Install.
  4. Then, select "Install IMG" button at the bottom, then browse to the boot.img file.
  5. Now, select boot.img and swipe to install it
  6. Once it successfully installed, then back to TWRP main menu
  7. Now, select the "Reboot" button and change your slot to Slot B.
  8. Once your Razer phone in Slot B, you can back to "download mode" This will force it to Slot B.
  9. Then type the following command.
    • fastboot flash boot twrp-3.2.1-0-cheryl.img && fastboot reboot
  10. Once there, to go the "Install" button, and select "Install IMG" button, and select and flash boot.img again. This will give you a clean boot.img on Slot B, as well as Slot A. Your Razer is now corrected, and you can do it the proper way.
  11. Doesn't matter which flash you are on now, now install zip file.
    • Goto TWRP main menu
    • Tap Install
    • Select TWRP-installer-3.2.1-0-cheril.zip file
    • Then swipe to complete.
    • This task will PATCH BOTH Boot.img images on your Razer phone. (this is required)
  12. Now, Reboot to System so that it can get a proper boot and verify that Wifi works. (It should if you followed instructions to the letter.)
  13. Once it has done, now type the following command and press enter.
    • adb reboot recovery
  14. Here, please don't do download mode and boot the TWRP.IMG.
  15. Just go to Reboot Button, and change your slot, then select "Recovery" to force a reboot to force the slot change.
  16. Now, go to the Install Button and select Magisk-V16.0.zip and flash it over the boot.img from the new slot we just changed too.
  17. Now both slots are flashed properly, and it doesn't matter which one you boot from, it should work with Wifi.

Step #3

Slot B Guide.

  1. You can skip this guide, if you started originally on Slot A, you are done here.
  2. Make sure you're in Slot B, how to verify it?
    • Reboot your Razer phone.
    • Then viewing what slot you are currently on. It should say Slot B
  3. Now, back out and go to Install.
  4. Then, select "Install IMG" button at the bottom, then browse to the boot.img file.
  5. Now, select boot.img and swipe to install it
  6. Once it successfully installed, then back to the TWRP main menu
  7. Now, select the "Reboot" button and change your slot to Slot A.
  8. Once your Razer phone in Slot A, you can back to "download mode" This will force it to Slot A.
  9. Then type the following command.
    • fastboot flash boot twrp-3.2.1-0-cheryl.img && fastboot reboot
  10. Once there, to go the "Install" button, and select "Install IMG" button, and select and flash boot.img again. This will give you a clean boot.img on Slot A, as well as Slot B. Your Razer is now corrected, and you can do it the proper way.
  11. Doesn't matter which flash you are on now, now install zip file.
    • Goto TWRP main menu
    • Tap Install
    • Select TWRP-installer-3.2.1-0-cheril.zip file
    • Then swipe to complete.
    • This task will PATCH BOTH Boot.img images on your Razer phone. (this is required)
  12. Now, Reboot to System so that it can get a proper boot and verify that Wifi works. (It should if you followed instructions to the letter.)
  13. Once it has done, now type the following command and press enter.
    • adb reboot recovery
  14. WARNING. please don't do download mode and boot the TWRP.IMG as it will overwrite all of your work thus far.
  15. Just go to Reboot Button, and change your slot, then select "Recovery" to force a reboot to force the slot change.
  16. Now, go to the Install Button and select Magisk-V16.0.zip and flash it over the boot.img from the new slot we just changed too.
  17. Now both slots are flashed properly, and it doesn't matter which one you boot from, it should work with Wifi.

Step #4

Install TWRP for the First Time ( factory image shouldn't be required).

This guide is for the clean way for the first time. so you can skip step 2 and 3 above.
  1. Make sure 3 files from prerequisite above are inside of your platform-tools folder with adb.exe and fastboot.exe.
  2. From C:\platform-tool
    • Press and hold shift button, then right-click your mouse
    • Now, select Open command window here
  3. Connect your Razer phone to the computer via USB cable.
  4. Make sure your drivers are working, type the following command and press enter to test it.
    • fastboot devices
  5. Now, type the following command and press enter.
    • adb reboot bootloader
  6. Then type the following command and press enter.
    • fastboot flash boot twrp-3.2.1-0-cheryl.img && fastboot reboot
  7. Once your Razer phone booted into TWRP via the image, then Push the 3 files from prerequisite above to your phone.
  8. From the command prompt window, type the following command and press enter.
    • adb push boot.img /sdcard
  9. Then type the following command and press enter.
    • adb push twrp-installer-3.2.1-0-cheryl.zip /sdcard
  10. Now, type this command and press enter.
    • adb push Magisk-v16.0.zip /sdcard
  11. Once all file pushed to the Razer phone, select the Install button,
  12. then select "Install IMG" button and select boot.img,
  13. Now swipe to start install it.
  14. Once step 12 above finished, go back to the Install button,
  15. Then "Install Zip", then select TWRP-Installer-3.2.1-0-cheryl.zip and install the zip.
  16. This task will Patch TWRP onto both boot.img's which should both be clean up to this point.
  17. Now that TWRP.zip has been installed to both boot.img's on your Razer phone, you must reboot to SYSTEM!
  18. Once back in the phone verify that your Wifi still works,
  19. Then type the following command and press enter
    • adb reboot recovery
  20. WARNING. please don't do download mode and boot the TWRP.IMG as it will overwrite all of your work thus far.
  21. Once your Razer phone in recovery, go to the install button and select Install Zip, and select Magisk-v16.0.zip.
  22. Once this task is done, you should do this to the other Slot. How to change Slot?
    • Reboot your Razer phone.
    • Then viewing what slot you are currently on. It should say Slot A or Slot B.
  23. Once slots are switched, select Recovery to reboot your phone into recovery
  24. Even though you are already in Recovery, we need a reboot to force the slot change for it to flash the correct boot flash slot) and force a Slot swap.
  25. Now verify that the Slot swapped via the "Reboot" button,
  26. Then, back out,
  27. Select install,
  28. Then install zip,
  29. Now, select Magisk-v16.0.zip again.
  30. Then swipe to install.
  31. Once everything is done, now reboot into the system.