smartdroid

Saturday, 25 November 2017

How to Unlock and Hard Reset Huawei Mate 9 | Forgot Password or Pattern Lock

How to Unlock and Hard Reset Huawei Mate 9 | Forgot Password or Pattern Lock.

Hard Reset Huawei Mate 9. When you forget the password or pattern lock screen, you will be locked on the lock screen. This is very annoying and you can not do anything here. You can not access the app and all the files stored on the phone. The only way you can do to unlock this phone is performing a hard reset. And now, we will explain how to perform a hard reset on Huawei Mate 9. When you perform a hard reset, then all the stored data will be lost. So, if you can still access the file please make a backup first.

Ok, let's start this guide.

Guide to Reset Huawei Mate 9.

  1. Make sure you have a fully charged battery, or you have at least 78% of battery capacity.
  2. Before proceeding, we highly recommend to backup everything on your phone (contact, SMS, Apps, files, etc)
  3. Power off your Huawei Mate 9.
  4. Once it completely Powers off, then turn on again by press and hold the following key at the same time.
    • Power buton + Volume Up
      reset huawei Mate 9
      reset Huawei Mate 9
  5. Don't move your finger until your phone enter recovery mode as shown in the picture below.
    reset huawei Mate 9
    reset Huawei Mate 9
  6. From this screen, you can use volume down key to navigate between the menu and use the power key to confirm.
  7. Now, highlight Wipe data/factory reset and press power key.
  8. On the next screen, highlight Wipe data/factory reset again. At this step, you can't be undone.
  9. Now, the Huawei Mate 9 will start to erase everything and restore your device to the factory settings.
Remember. After the hard reset done, you need to enter a Google account information (user and password) previously synced with your Huawei Mate 9 phone. If you forgot the Gmail account, you can try to bypass it. - Bypass FRP Huawei Mate 9

How to Root Android Huawei Mate 9 in EMUI 5.0

How to Root Android Huawei Mate 9 in EMUI 5.0.

Root Huawei Mate 9. The following guide will show you how to root Huawei Mate 9. This is very simple guide you can follow. Even if you are a beginner in Android experience. You will find many benefit in rooting for your Huawei Mate 9 Android device. For example, you can install or flash any custom ROM or just want to delete unwanted built-in apps by yourself. By default, Android devices coming from the factory do not have root access. So, if you need more feature you must root this device. Although it looks easy but can make your device to break even lose the warranty period.

If you already understand the advantages and risks posed by root Huawei Mate 9, now you can start to read all step by step instruction below.

Prerequisite.

  1. Make sure your device is Huawei Mate 9 in order to continue following this guide.
  2. Donwl0ad superuser-r275.zip. Here
  3. D0wnload Superuser_2.0_Beta_9.apk Here
  4. TWRP 3.03-1 must be installed on your phone. See here how to flash TWRP 3 Huawei Mate 9.

Installation Guide.

  1. Copy superuser-r275.zip & Superuser_2.0_Beta_9.apk to the root directory of phone Internal memory.
  2. Power off phone.
  3. Once your phone completely powers off, you need to boot your phone into TWRP recovery.
  4. Now, tap Install and browse the superuser-r275.zip file that you transferred to your phone in Step 1 above.
    install supersu mate 9
    install supersu mate 9
  5. Once the superuser-r275.zip found, Then you need to Swipe to Confirm Flash on the bottom of the screen to begin the flashing process.
  6. Just wait for the flashing process, then select Reboot System to reboot your phone.
  7. Once your phone boot up and ready to use, you need to install Superuser_2.0_Beta_9.apk from the file manager.
  8. Superuser_2.0_Beta_9.apk used to verify the root status of your phone.
    welcome to superuser
    welcome to superuser
  9. Done.

Friday, 24 November 2017

Guide | Flash TWRP 3.0.3-1 Huawei Mate 9 on EMUI 5.0

Guide | Flash TWRP 3.0.3-1 Huawei Mate 9 on EMUI 5.0.

Flash TWRP Huawei Mate 9. Actually, all Android devices have a built-in recovery. But this recovery but has limited features and designs. If you are interested to flash another custom recovery, you can try this guide. The following guide will explain to you how to flash a custom recovery into Huawei Mate 9. the type of recovery we use in this guide is TWRP recovery. by installing TWRP recovery, we can backup and restore firmware/stock ROM in case of boot failure (boot loop). And also you can install custom ROM, Kernel, Root, and ZIp files to your Huawei Mate 9. This guide proudly presented for you from this video.

For the information, Huawei Mate 9 is released in 2016, December. This device comes with 5,9 inches IPS LCD capacitive touchscreen, 16M colors. powered by Octa-core CPU, Hisilicon Kirin 960 chipset, and Mali-G71 MP8 GPU.

Ok, let's start this guide.
Flash TWRP 3.0.3-1 Huawei Mate 9

Prerequisite.

  1. Unlock Bootloader your Huawei Mate 9. You can read this guide to unlock bootloader Huawei phone.
  2. Enable USB debugging and OEM Unlock
  3. Downl0ad and install Hisuite or Huawei Driver. Here 
  4. Downl0ad ADB-fastboot-tool-2016.zip - Here 
  5. D0wnload TWRP custom recovery for Huawei Mate 9 - Here

Installation Guide.

  1. Make sure to backup everything stored in phone internal memory (contact, phone apps, files, message, etc) it will be deleted during wiping data.
  2. Connect your Huawei Mate 9 to the computer via USB cable.
  3. Install Hisuite or Huawei driver.
  4. Extract ADB fastboot tool 2016, the ZIP file contains the following files and folder;
    • adb
    • driver
    • XP
    • install.bat
      ADB fastboot mate 9
      ADB fastboot mate 9
  5. Then, copy twrp-3.0.3-1-hi3660.img to the adb folder.
  6. Now rename to recovery.img
    TWRP Huawei Mate 9
    TWRP Huawei Mate 9
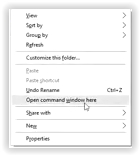
  7. Then, from the ADB fastboot folder right click and hold the shift button, and click open command window here.
    open command in adb fastboot
    open command in adb fastboot
  8. Once command prompt windows come up on the screen, now you need to ensure your Huawei Mate 9 successfully connected or not using the following command and press enter.
    • adb device.
  9. If your device is successfully connected to the computer, then the result will show your phone ID number.
    • list of devices attached ...
    • device ID
  10. Once your Huawei Mate 9 successfully connected to the computer. Now, reboot your device into bootloader using this command and press enter
      • adb reboot bootloader


  11. Just wait a minute, your device will reboot into fastboot and rescue mode.
  12. Once your device in the fastboot and rescue mode, it's time to flash TWRP recovery to your device. Therefore you need to type this command at prompt and then press the enter button

    • fastboot flash recovery recovery.img


  13. Just wait for 2 or 3 seconds for the complete flashing process.
  14. Done, now you have successfully installed/flashed TWRP 3.0.3-1 on Huawei Mate 9 with EMUI 5.0.
  15. Enjoy it.

How to Update Stock EMUI 4.1 B895/B896 Huawei P8Lite Via TWRP Recovery.

How to Update Stock EMUI 4.1 B895/B896 Huawei P8Lite Via TWRP Recovery.

Update EMUI 4.1 Huawei P8Lite. The following guide will show you how to update stock EMUI 4.1 on Huawei P8Lite. We use TWRP recovery to install or flash this zip file. Make sure the TWRP recovery already installed on your device. If TWRP is not installed yet, you can try to read the following guide to install it on your phone (how to install TWRP recovery on Huawei P8ite). EMUI update is one of the requirements to upgrade Huawei P8Lite to GZOSP Android Oreo 8.0.

Ok, let's the tutorial begin.

Prerequisite.

  • Stock EMUI 4.1
  • Enable USB debugging on your phone.
  • D0wnl0ad ADB and fastboot from Here 
  • Enable OEM unlock
  • TWRP recovery already installed on Huawei P8Lite. See this guide how to do it?

Installation Guide.

1. Reboot into Fastboot Recovery.

  1. Connect your Huawei P8Lite to the computer via USB cable.
  2. Copy Stock EMUI 4.1 to the internal phone storage.
  3. Boot your device into fastboot recovery.
    • Open a command prompt from ADB and fastboot folder. 
    • Press and hold shift + right click
    • Select open command here
    • Type the following command.
      • adb device
    • If your device successfully connected, you will see a device ID number at the command prompt.
    • Then type the following command to reboot into fastboot recovery.
      • adb reboot recovery
    • Now your device will reboot into TWRP recovery
  4. Done

2. Flash EMUI 4.1

  1. Once your device successfully reboots into TWRP recovery, you will see the following image comes up on your screen.
    how to enter recovery mode huawei P8Lite
    enter recovery P8Lite
  2. Tap Wipe
  3. Tap Factory Reset - Swap to Wipe - Tap Back to the main menu
  4. Tap Install.
  5. Then browse to find EMUI 4.1 Zip (B895_update.zip or B896_update.zip)
  6. Once this file found, now swap to confirm flash.

Thursday, 23 November 2017

Guide | Install TWRP 3.1.1-0 Huawei P8Lite By OpenKirin

Guide | Install TWRP 3.1.1-0 Huawei P8Lite By OpenKirin.

TWRP Huawei P8Lite. If you want to install TWRP recovery on your Huawei P8Lite, try to read the following guide. This is unofficial TWRP for stock EMUI 4.x device. This guide from the XDA thread surdu_petru, By installing TWRP on your device, you can install the custom ROM. TWRP is one of the widest recovery used by Android phone user, because it is easy to use and an easy-to-understand interface.

Why you should install this TWRP version compared the official version? Because, if you want to restore EMUI firmware you don't need to wipe: /data/cust. and there are many more advantages that you can get by installing TWRP OpenKirin.

Prerequisite.

  1. Downl0ad TWRP OpenKirin (md5 : 29e1c65cf48803892946e858ebe950cf). Here
  2. Make sure the Huawei P8Lite Bootloader is unlocked. see this guide to unlock Huawei bootloader.
  3. Enable USB debugging on your phone.
  4. D0wnl0ad ADB and fastboot from Here
  5. Enable OEM unlock

Installation Guide.

  1. Make sure your device is Huawei P8Lite in order to follow this guide.
  2. Make sure your Huawei P8Lite running EMUI 4.x
  3. Extract TWRP OpenKirin, now then put recovery.img into a platform-tools folder inside ADB folder.
  4. Now, connect your Huawei Honor P8Lite to the computer via USB cable.
  5. Run command prompt from the ADB fastboot folder, How to do it?
    • From the empty space, right-click the mouse and Hold down shift button.
    • Now, select open command here
  6. Then, from the command prompt window type the following command.
    • adb device
  7. The command prompt should return your device ID serial number. If so, you have successfully connected your phone to the computer.
  8. Once your Huawei P8Lite successfully connected, now type the following command.
    • adb reboot bootloader
  9. Just wait for a second, your Huawei P8Lite will reboot into fastboot and rescue mode.
  10. Once your device in the fastboot and rescue mode, it's time to flash TWRP 3.1.1-0 OpenKirin to your phone. Therefore you need to type this command at prompt and then press the enter button
    • fastboot flash recovery recovery.img
  11. Just wait for 2 or 3 seconds for the complete flashing process.

How to Boot Huawei P8Lite into Recovery.

  1. Make sure your device is still connected to the computer while check the TWRP is working or not.
  2. From the command prompt type the following command and press enter
    • adb reboot recovery
  3. Then, back to your phone and now it will enter the recovery mode as shown in the image below.
    enter TWRP recovery mode
    enter TWRP recovery mode
  4. And now your device will boot into TWRP recovery.
  5. Finish

How to Upgrade Huawei P8Lite to GZOSP Android Oreo 8.0

How to Upgrade Huawei P8Lite to GZOSP Android Oreo 8.0.

GZOSP Oreo on Huawei P8Lite. Feel the experience of the latest Android operating system on your Android phone is a fun thing. from one of the surdu_petru threads present in the XDA forum, the idea for the following guides comes up. In this guide, we will simply explain How to Upgrade Huawei P8Lite to GZOSP Android Oreo. This is not an official ROM, but this is The Ground Zero Open-Source Project (GZOSP) ROM. Because this is not official ROM, you will definitely find some features that are not working properly.

Below is a list of some features that really working on your Android Oreo Huawei P8Lite devices.
  • Touchscreen - Working
  • GPS - Working
  • WiFi - Working
  • adb & mtp connectivity -working
  • Audio & Video playback - working
  • Internal & External Storage - working
  • Lights - working
  • Bluetooth - not working
  • NFC Connectivity - not working
  • Radio Interface Layer - not working
  • Camera - not working
  • Sensor - not working
    Huawei P8Lite Android Oreo
    Huawei P8Lite Android Oreo

Prerequisite.

  1. Downl0ad Gzosp-alice-8.0.Beta.zip Here
    • md5 : 114e72d50148c24a991f4e2209603ad3
  2. TWRP must be installed on your Huawei P8lite. See this guide on how to install TWRP on Huawei P8Lite. 
  3. The Bootloader is Unlocked. See this guide to unlock bootloader Huawei phone.
  4. Your device must be updated to EMUI 4.1

Installation.

  1. Make sure your battery is fully charged, or at least have half of full battery capacity.
  2. Boot your device into TWRP recovery.
  3. If your device didn't come from AOSPA/RROS Android N, you need to format data into TWRP.
  4. Now, perform a factory reset on your P8Lite.
  5. Then, install GZOSP ROM via TWRP recovery.
  6. At last, reboot your device into the system.
  7. Enjoy it.

Wednesday, 22 November 2017

Bypass FRP Reset or Google Verification Huawei Mate 9

Bypass FRP Reset or Google Verification Huawei Mate 9

FRP Reset Huawei Mate 9. In this guide, we will explain to you how to bypass verification Gmail account after performing the hard reset on Huawei Mate 9. Now, on at least Lollipop-based Android systems are already using FRP or factory reset protection to protect Android device for an unauthorized user to access the phone after they perform a hard reset. If they are not the Huawei Mate 9 phone user, surely he does not know the Gmail account previously synced to the device. To bypass the FRP on Huawei Mate 9 you need to enter the correct Gmail user and password. But, what should you do if you forgot the Gmail account? while you are the phone owner?

Ok, here is the solution to your problem, this guide created from this video. The tutorial begins here.

Bypass FRP Huawei Mate 9.

  1. After a hard reset on this device completed, you will see the verifying your account screen as shown the image below.
  2. remove FRP Mate 9
    remove FRP Mate 9
  3. You must enter the Google account information previously synced with this device. If you forgot it then you continue to step no. 3 below
  4. Power Off your Huawei Mate 9.
  5. Then, Insert SIM card.
  6. Now, Power On again your phone.
  7. Just wait for your phone to boot up, once your phone comes to the following screen. You need to tap emergency call.
  8. remove FRP Mate 9
    remove FRP Mate 9
  9. At the dial screen, you need dial this number. *#*#6130#8#*
  10. remove FRP Mate 9
    remove FRP Mate 9
  11. It will enter the testing screen.
  12. From this screen, tap Phone Information.
  13. At the bottom of the screen, you need to select SIM card service.
  14. Then, you will see Phone Info screen.
  15. Tap three dots located at the top right of the screen, and then tap View SIM Address book.
  16. remove FRP Mate 9
    remove FRP Mate 9
  17. Tap back at Select contacts to import.
  18. Tap Edit contact.
  19. Tap SIM
  20. at new contact type 112, and tap check mark located at the top right of the screen.
  21. remove FRP Mate 9
    remove FRP Mate 9
  22. Then tap the message sign.
  23. remove FRP Mate 9
    remove FRP Mate 9
  24. Now, type www.youtube.com in the message area. Then tap send
  25. remove FRP Mate 9
    remove FRP Mate 9
  26. Now, open this URL
  27. Once the Youtube app already launched, tap three dots located on the top right screen and tap privacy policy.
  28. remove FRP Mate 9
    remove FRP Mate 9
  29. Then, it will open Google Chrome App on your phone.
  30. At the address bar type the following URL

    • cut-urls.com/pfrp
  31. Then download the Step-1 file (nova-launcher-5-0-3.apk), see the following image.
  32. remove FRP Mate 9
    remove FRP Mate 9
  33. Once the file successfully downloaded, then you need to install it.
  34. Refers to step no. 23 you need to download and install Step-2 (this file is QuickShortCutMaker.Apk)
  35. Then open it - Go to Applications - Scroll down - Tap Nova Launcher - Tap Try.
  36. Now, set up your phone
  37. Then, type another Gmail account to Add your account.
  38. Done.