smartdroid: October 2017

Monday 30 October 2017

How to Turn On or Turn Off Google TalkBack on Your Android Device.

How to Turn On or Turn Off Google TalkBack on Your Android Device.

Turn ON Google TalkBack. By default Google TalkBack already installed on your Android phone when you bought it. Because Google TalkBack is a standard Google's Android application suite. Google will automatically update these apps with new improvements and new features through Google play store.  So, what is Google TalkBack on your Android device? TalkBack is an accessibility service that helps blind and vision-impaired users interact with their Android phones devices. By default, this service is turned off. Even so, you can turn it on manually directly from your device.

It's mean when TalkBack is On, your Android phone provides spoken feedback to help blind and low-vision users. For example, it describes what you touch, select and activate on screen. And now, the following guide will explain to you how to disable or enable Google TalkBack on Android Smartphone. These tips work on most of Android device.

Turn On TalkBack in Your Android Phones.

  1. Open device's settings app. Most of Android phone assign the settings icon with gear.
  2. From the Settings screen, tap Accessibility.
  3. Then tap TalkBack to enable or disable this services.
  4. You will see a pop-up screen if you want TalkBack to enable you can click OK. otherwise, click Cancel.
    using TalkBack
    using TalkBack
  5. Finish, now your phone will provide feedback and you can explore your phone by touch it.

How to Suspend TalkBack.

When the TalkBack is activated on your device, you will see a green rectangle on the selected menu. So, how to disable or suspend the TalkBack service when it activated?
  1.  Press and hold both of volume button (the volume up and the volume down) at the same time.
    Talkback settings
    Talkback settings
  2. Then you will see a pop-up screen that asks you to suspend talkback? If so, tap OK.
    suspend talkback
    suspend talkback
  3. At the notification area, you will see that TalkBack is suspended.
  4. Finish.

Guide | How to Bypass FRP Google Account LG V20

Guide | How to Bypass FRP Google Account LG V20.

Remove FRP LG V20. The following guide will show you how to remove FRP or Factory Reset protection on LG V20 smartphone. The FRP protection will help you protect your phone from an unauthorized user who wants to use your phone after the performed the hard reset or factory reset. This guide purpose is the LG V20 owner only. So, if you forgot the Gmail account previously synced on your LG V20 after the hard reset process done, now you must need this information.

Just follow this guide to remove FRP protection on LG V20 smartphone.

Guide to Remove FRP LG V20.

  1. Make sure your device is LG V20 to follow this guide.
  2. Make sure your LG V20 is connected to the internet via WiFi connection.
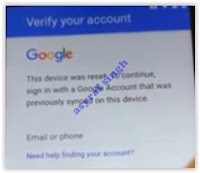
  3. We assumed you forgot the Gmail account previously synced with this phone and stuck on this screen.
  4. FRP LG V20
    FRP LG V20
  5. There is nothing you can do in this state, the only one you can do is entered a correct Google account previously synced on LG V20.
  6. From this screen, you can go back until you see the accessibility settings menu. as shown in the image below.
  7. FRP LG V20
    FRP LG V20
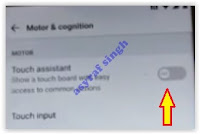
  8. Then, tap Motor & Cognition
  9. At the Motor & Cognition screen tap Touch assistant to turn it On.
  10. FRP LG V20
    FRP LG V20
  11. Then you will see an assistant icon appear at the bottom of the screen, now you can tap it.
  12. Now, tap and hold the Home icon in the middle of the screen. until you see a pop-up message that says complete setup to continue.
  13. Tap back until at the Accessibility menu, now tap Vision.
  14. From the Vision main menu, you can tap Talk Back to enable it.
  15. On the talkback confirmation screen, tap Turn On.
  16. It will open TalkBack tutorial screen.
  17. From this screen,  swap down to open a Global context menu.
  18. From the Global context menu screen, tap TalkBack Settings.
  19. Then, Press and hold both of volume button for 3 seconds to suspend TalkBack. See how to enable TalkBack. 
  20. At the pop-up screen, tap OK.
  21. From TalkBack Settings screen, scroll down and tap Help & Feedback.
  22. Then, you can tap any popular help shown on your screen. For example tap about switch Access for Android.
  23. Then, you will see youtube video.
  24. Tap share to get video link.
  25. Now, you will open youtube app
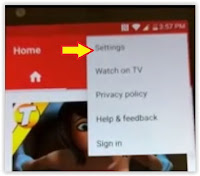
  26. From youtube app, tap 3 dots located at the top left of screen and tap settings.
  27. FRP LG V20
    FRP LG V20
  28. At the next screen, tap About
  29. Then, tap YouTube Terms of Service.
  30. It will open Google Chrome apps
  31. Now, you will see Welcome to chrome screen. At this screen, tap Accept & Continue.
  32. If you asked to sign in to chrome, tap No Thanks.
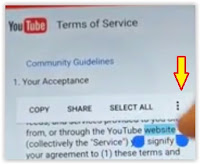
  33. Then, it will open Terms of Service screen. On this screen, you can highlight any text by press and hold on it.
  34. Once the text highlighted, it will open the context menu. Now, you can tap 3 dots on this menu for more menu and tab Web Search.
  35. FRP LG V20
    FRP LG V20
  36. Now, you will open the browser.
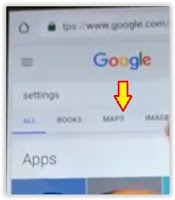
  37. From the search bar, type settings.
  38. Then tap maps.
  39. FRP LG V20
    FRP LG V20
  40. .Now, you will open Maps app on your phone.
  41. Tap skip
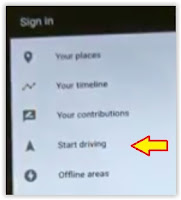
  42. Tap settings.
  43. Tap Start Driving
  44. FRP LG V20
    Add caption
  45. Then, tap got it.
  46. Tap Ok, at turn on location using Google's location service.
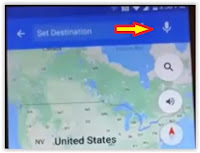
  47. Then, tap microphone and start to say open Google
  48. FRP LG V20
    FRP LG V20
  49. It will open the Internet browser.
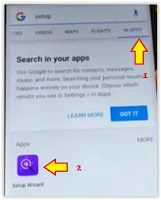
  50. Now, tap setup at the search bar. 
  51. Then, swipe to the left and tap IN APPS. and tap Setup Wizard at the bottom of the screen.
  52. FRP LG V20
    FRP LG V20
  53. It will open Account & Service 
  54. Then, tap Exit
  55. Now, your LG V20 will reboot.

Monday 16 October 2017

Guide | How to Reset Your Windows 10 PC to Restore Factory Setting.

Guide | How to Reset Your Windows 10 PC to Restore Factory Setting.

Reset Windows 10 PC. The following guide will show you how to perform Reset The Windows 10 Computer with an easy method. If you're having issues with your Windows 10 Operating System, ie your registry become unstable or corrupt, your Windows installation becomes corrupt, Maybe you had a Malware on the system, or your Windows 10 system running really really slow. I think as a beginner a Windows 10 user we don't know what should we do to fix the problem. The easy and simple task you can do is simply resetting the Windows 10 System, then you can resolve a lot of these issues.

To reset your Windows 10 computer, you don't need a have a Windows installer disc. This method is quickly reset the system back. Just read carefully this guide to get your Windows 10 back to factory setting.

Reset Windows 10 | Guide. (First Method)

  1. Before performing reset Windows 10, make sure your data and file already back up.
  2. To start proceeding this task, now click the Start button.
  3. Then, click Settings
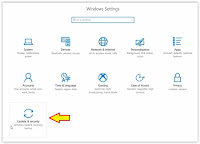
  4. It will open Windows settings. 
  5. At this windows, click Update & Security.
    reset windows 10 - update and security
    reset windows 10 - update and security
  6. Then, click Recovery.
  7. At the right pane, you can click get started button under reset this PC.
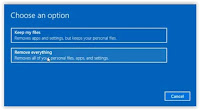
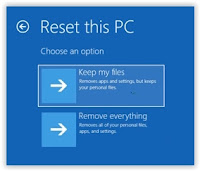
  8. To reset your Windows 10 PC you will need to select one of two reset options.
    • Keep my files: it will reset your Windows 10 and removes apps and settings, but keep your personal files.
    • Remove Everything: It will reset your Windows 10 computer and removes all of your personal files, apps, and settings.
      reset Windows 10 options
      reset Windows 10 options
  9. For examples, we select removes everything.
  10. Just wait minute, the system will prepare the next actions.
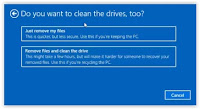
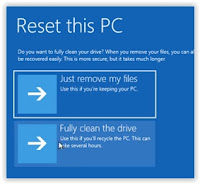
  11. At the next step, you will see two options again. 
    • Just remove my files; This option is quicker to reset your Windows 10, but less secure. Use this if you're keeping the PC.
    • Remove files and clean the drives; This option may take a few hours but will make it harder for someone to recover your removed files. Use this if you're recycling the PC.
      reset Windows 10 options
      reset Windows 10 options

Second Method (Reset Windows 10).

This is another option you can do to reset the Windows 10, this method using recovery options. Now, let's we proceed with this task.
  1. Click Windows 10 button.
  2. Then click the Power button while press and hold the Shift button at the keyboard.
  3. Now, click Restart.
    reset Windows 10 PC
    reset Windows 10 PC
  4. By press and hold the shift button when you restart the Windows 10 PC, it will give you this option.
    restart option Windows 10
    restart option Windows 10
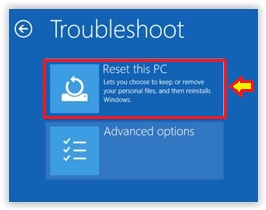
  5. At this screen, you can click Troubleshoot. 
  6. Then you will see two options again to reset the Windows 10 PC, 
    reset windows 10 PC
    reset windows 10 PC
  7. Now, you will get the same options.
    reset windows 10 PC
    reset windows 10 PC
    • Keep My files
    • Remove Everything.
  8. At this screen, you can select your desired options. 
  9. Now, your Windows 10 PC will restart the system. The Windows 10 will prepare for the wipe of your system now. This will take a few minute. 
  10. Once it ready, you will get two option again.
    reset windows 10 PC
    reset windows 10 PC
  11. You will get a warning, that resetting PC will remove;
    • All the personal files and user accounts on this PC
    • Any Apps and programs that didn't come with this PC
    • Any change made to settings.
  12. Then, press the Reset button.
  13. Just wait for the reset process, it will take awhile. 
  14. Finish.

Sunday 15 October 2017

How To Disable / Enable Windows Defender in Windows 10 Professional & Enterprise Edition.

How To Disable / Enable Windows Defender in Windows 10 Professional & Enterprise Edition.

Disable Enable Windows Defender. There are various versions of Windows 10, all versions of Windows 10 are already built-in with Windows Defender to protect the system and file from any viruses and malware. If you want to install antivirus from a 3rd party, you must disable the Windows Defender fists. Each version of Windows 10 has a different method to disable Windows Defender. And, this guide will show you how to disable or enable Windows Defender in Windows 10 Pro and Enterprise Edition.

If the current version of Windows runs on your PC is Windows 10 Home edition, you can use this guide to disable or enable Windows Defender in Windows 10 Home Edition.

Guide to Disable/Enable Windows Defender in Windows 10 Pro & Enterprise.

  1. To disable Windows Defender we need to open Group Policy Editor. Different from the previous versions of Windows, which using the registry editor.
  2. Click the Start button,
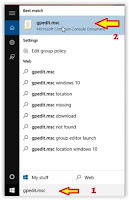
  3. Then, at the search the web and windows bar type gpedit.msc
    disable windows defender windows 10 pro
    disable windows defender windows 10 pro
  4. Once the Local Group Policy Editor window is launched, now go to the following menu;
    • Under Local Computer, Policy click Computer Configuration.
    • Then, click Administrative Templates
    • Click Windows Component.
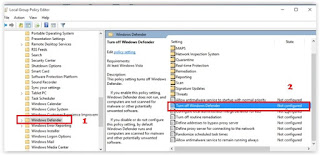
    • Scroll down, and click Windows Defender.
    • Then, see at the right-hand pane of the Local Group Policy Editor window.
      • Double click on Turn Off Windows Defender.
        Local Group Policy Editor Windows 10
        Local Group Policy Editor Windows 10
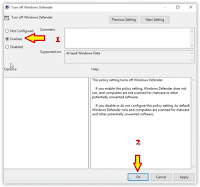
      • It will open Turn Off Windows Defender window.
        Turn off windows defender windows 10
        Turn off windows defender windows 10
      • Now, you must click Enable. And then click OK.
  5. Finish.

How to Check if Windows Defender Disable or Enable?

  • From the Desktop click Start button.
  • Then click Settings.
  • From the settings windows, click Update & Security.
disable or enable Windows Defender in Windows 10

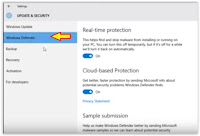
    •  Then, from the Update & Security windows click Windows Defender.
    disable or enable Windows Defender in Windows 10
    disable or enable Windows Defender in Windows 10

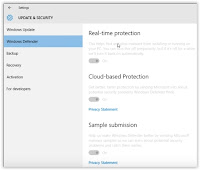
      • Make sure the Real-time protection, Cloud-based protection, Sample submission is turned Off.
      disable windows defender windows 10 pro
      disable windows defender windows 10 pro
      • To enable the Windows Defender in Windows 10 Pro and enterprise edition, you must set to disable at step 4 above.
      • Finish.

        Saturday 14 October 2017

        Guide | How to Disable or Enable Windows Defender in Windows 10 Home Edition.

        Guide | How to Disable or Enable Windows Defender in Windows 10 Home Edition.

        Disable Enable Windows Defender. The following guide will show you how to disable or enable Windows Defender in Windows 10 with an easy method. This guide work on Windows 10 home edition. Windows Defender program is malware protection to help you identify and removes any spyware, viruses, and other malicious software. Windows Defender included and built into Windows 8 and Windows 10. On the previous version of windows, you can use Microsoft Security Essentials. Which to enable Microsoft Security Essentials you must manually download from the official Microsoft Windows website. 

        Windows Defender will automatically load on Windows Startup, it will run in the background and notifies you when you need to take a specific action. If you want to use antivirus software from another product, you must uninstall Windows Defender first. For certain reason, you can disable or enable Windows Defender. And now, you can follow this guide how to do it.

        Guide to Disable / Enable Windows Defender.

        First Methode. (Some people are saying that it doesn't disable it properly)

        1. Turn On the Windows 10 computer.
        2. From the Desktop click Start button.
        3. Then click Settings.
        4. From the settings windows, click Update & Security.
          disable or enable Windows Defender in Windows 10
          disable or enable Windows Defender in Windows 10
        5.  Then, from the Update & Security windows click Windows Defender.
          disable or enable Windows Defender in Windows 10
          disable or enable Windows Defender in Windows 10
        6. Make sure the Real-time protection, Cloud-based protection, Sample submission is turned all.

        Second Method. (for Windows 10 Home edition - Using Registry Editor)

        1. Open registry editor.
        2. From the Start menu search bar type regedit.
        3. regedit windows 10
          regedit windows 10
        4. If the User Account Control Pop-up windows appear on screen, tap Yes. 
        5. Now, Registry editor windows will open.
        6. From the left registry editor window you must go to ; 
          • HKEY_LOCAL_MACHINE\SOFTWARE\Policies\Microsoft\Windows Defender.
            disable or enable Windows Defender in Windows 10
            disable or enable Windows Defender in Windows 10
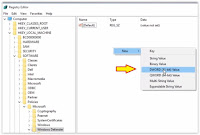
        7. Now, right click on the right window - click DWORD (32-bit) Value.
          disable or enable Windows Defender in Windows 10
          disable or enable Windows Defender in Windows 10
        8. Then, rename a new value to DisableAntiSpyware 
        9. Once it was done, double-click on DisableAntiSpyware to open Edit DWORD (32-bit) Value pop-up windows.
          disable or enable Windows Defender in Windows 10
          disable or enable Windows Defender in Windows 10
        10. Type the following value data.
          • Type 0 to enable
          • Type 1 to disable.
        11. Now, go to the first methods above,
          • If you disable Windows Defender, the Real-time protection, Cloud-based protection, Sample submission is turned off.
            disable windows defender
            disable windows defender
          • To enable Windows Defender again, you must delete the value. (refer to step 7 above)

        Friday 13 October 2017

        Guide | Disable Driver Signature Verification/ Enforcement on Windows 10.

        Guide | Disable Driver Signature Verification/ Enforcement on Windows 10.

        Disable Driver Signature Verification. The following guide will show you how to Disable Driver Signature Verification on Windows 10. This feature only loads drivers that have been signed by Microsoft Windows. And you can meet this feature only at the Windows 8 and Windows 10 64 Bit version. So, if you need to install less than an official driver, or old unsigned driver you must disable the driver signature verification/enforcement first. 

        Instruction.

        1. From the desktop, click Start menu.
        2. Click Power
        3. Click Restart
        4. You need to press and hold the shift button on the keyboard while the computer restart.
        5. It will bring your Windows 10 to the recovery.
        6. Just wait a minute, the system will restart the computer to the recover.
          recovery windows 10
          recovery windows 10
        7. Once your Windows 10 enter recovery windows, now click Troubleshoot.
          Windows recovery troubleshoot
          Windows recovery troubleshoot
        8. Now, click Advanced Option.
        9. recovery windows 10
          driver signature verification
        10. Now, click Startup Settings.
        11. From the Startup settings, you will need to click the restart button.
        12. Now, your Windows 10 will restart. Just wait for the restart process.
        13. Once your computer boots up, you will see this window comes up on your screen. This is Startup Settings windows.
          Disable Driver Signature Verification
          Disable Driver Signature Verification
        14. You need to Disable Driver Signature Verification/ Enforcement because you want to;
          • Install some drivers for download mode on your Android phone.
          • Unbreaking your Android phone.
        15. If  Driver Signature Verification/ Enforcement is enabled, you can't install the driver for your phone. The device manager will not load your phone driver or your drivers may say errors
        16. So, if you want to Disable Driver Signature Verification/ Enforcement on Windows 10. You must press F7 from the startup settings screen. (refers to the Step 12 above).
        17. Finish.

        Guide | Flash Any Recovery at Sony Xperia Phone Via ADB And Fastboot.

        Guide | Flash Any Recovery at Sony Xperia Phone Via ADB And Fastboot.

        Flash Sony Xperia Recovery Via ADB. This is a simple guide that explains to you how to install or flash any recover at Sony Xperia device via ADB and fastboot.

        What you need?
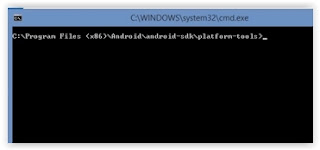
        1. Android SDK
        2. Driver for your Sony Xperia device. The driver will automatically installed on your computer when your phone connected.
        3. Setup ADB and fastboot on your Windows computer. See This Guide.
        4. Download recovery.img for your phone. you can use a google to search it

        Instruction Guide.

        1. Make sure your phone is fully charged, at least you have 78% of battery capacity in order to avoid the system down caused the battery capacity.
        2. Backup everything stored in the phone internal memory to avoid losing the important data.
        3. The following guide is for Windows PC only. But, if you running windows 8 then you need to disable driver signature verification. How to disable driver signature verification on windows? see this guide.
        4. Enable USB debugging on your Sony Xperia phone. How to enter download mode Sony Xperia phone?
          • Tap Settings.
          • Tap About Phone.
          • Tap Build Number 7 or 8 times, until your Sony Xperia phone say you are in developer now.
          • Back to the settings screen.
          •  Find Developer Option and then Tap it.
          • Now, tap USB debugging.
          • If you see a pop-up screen, just tap OK.
        5. Now, connect the phone to the PC
        6. Go to the drive C:\SDK\Platform-tools. -- this drive is where your ADB and fastboot installed.
        7. Now, paste your recovery image here and rename it to recovery.img
        8. Press and hold Shift key + Right click mouse at this folder, then click open command here. 
          sdk command prompt
          sdk command prompt
        9. Now, ADB is ready to be used.
        10. Type this command to start using ADB
          • adb devices
        11. It should return to the list of devices attached.
        12. Go to back your phone, it should see a pop-up screen that says Allow USB debugging? - Tap OK
        13. Now type this command.
          • adb reboot bootloader
        14. Your phone must reboot.
        15. Then, type this command.
          • fastboot devices
        16. Now, type this command to proceed to flash a recovery image.
          • fastboot flash recovery recovery.img
        17. Wait for the flashing process done, and you will see the command prompt look like this.
          adb and fastboot command
          adb and fastboot command
        18. Once the flashing process was done, now type this command.
          • fastboot reboot.
        19. Now you can safely disconnect your phone from PC
        20. Finish.

        Guide | How to Upgrade Sony Xperia X to Android 8.0 Oreo - Unofficial AOSP

        Guide | How to Upgrade Sony Xperia X to Android 8.0 Oreo - Unofficial AOSP.

        Upgrade Sony Xperia X to Android Oreo. There is a good news for the people who are now using Sony Xperia X. By default, this device run on Android 6.0.1 (Marshmallow), 7.1.1 (Nougat) and planned upgrade to Android 8.0 (Oreo) soon. But the official release of Android oreo for this device has not been released yet. Therefore, the senior user o XDA forum (lubik1) has released an unofficial test build of AOSP Android 8.0 Oreo for your Sony Xperia X device. So, if you wanna feel a new experience of Android Oreo feature, you can follow this guide to apply. Because this android version is unofficially released, you will find some features that don't work. For example, the call speaker and the 20MP and 8MP cameras. And the developer says, there may be more features doesn't work properly and that if you will face a boot loop. But, simply you can fix it by re-flashing without Gapps. 

        Before the upgrade process starting, let we know Sony Xperia X specs. This device released in 2016, May. Powered by Hexa-core (4x1.4 GHz Cortex-A53 & 2x1.8 GHz Cortex-A72) CPU, Qualcomm MSM8956 Snapdragon 650 chipset, and Adreno 510 GPU. Sony Xperia X runs on Android 6.0.1 (Marshmallow), 7.1.1 (Nougat), planned upgrade to Android 8.0 (Oreo). Supported by 3 GB of RAM, featured with 23 MP of primary camera, and 13 MP of secondary camera, also powered by Non-removable Li-Ion 2620 mAh battery.

        Prerequisite.


      1. D0wnload AOSP Android 8.0 Oreo for Sony Xperia X. Here 

        1. https://drive.google.com/drive/folders/0B1CJidSWx71kX244ZUhDaWNTUWM

        Instruction.

        1. Once the AOSP Android 8.0 Oreo for Sony Xperia X successfully downloaded on your computer, you must copy to the SD card at the root directory.
        2. Now, Power off Sony Xperia X and flash with ADB or shell.
        3. How to flash recovery at Sony Xperia via ADB and Fastboot ? See Here.
        4. Type this to start flash on ADB
          • fastboot flash oem SW_binaries_for_Xperia_AOSP_O_MR0_4.4_v02_loire.img
        5. You must put the SW_binaries_for_Xperia_AOSP_O_MR0_4.4_v02_loire.img at the same directory with running shell or ADB.
        6. Then, Flash GAPPS.
        7. Then flash SuperSU.
        8. Once it completed, you must reboot your Sony Xperia X phone.
        9. Finish.

        Tuesday 10 October 2017

        Guide | How to Unlock Bootloader on the ZTE Axon 7 Mini with Tuliptool

         Guide | How to Unlock Bootloader on the ZTE Axon 7 Mini with Tuliptool.

        Unlock Bootloader on the ZTE Axon 7 Mini. The following guide will show you how to Unlock Bootloader on the ZTE Axon 7 Mini. Generally, the people unlock their phone bootloader to make a root or flashing any custom ROM for their phone. So, if you need this information to unlock the bootloader on your ZTE Axon 7 Mini, you can try to use it. Before this guide starts, I would say special thanks to rombdeta as an XDA member for providing the OEM programmer binary.

        By unlocking the bootloader your ZTE Zxon 7 Mini, your device will get the following features;
        • Install a custom boot image 
        • Unlock your bootloader 
        • Lock your bootloader 
        • Install a custom recovery 
        • Check the status of your bootloader.
        To unlock the bootloader we need a special tool, this tool is tuliptool. This tool is not an official ZTE unlock tool. Please be careful in using this tool, It can render your ZTE Axon 7 Mini device permanently unusable. Your factory warranty will likely be void. You must accept all responsibility for the consequences when using this tuliptool tool. 

        This your ZTE Axon 7 Mini specs. This device released on 2016, May. Comes with 5.5 inches AMOLED capacitive touchscreen, 16M colors. Runs on Android 6.0.1 (Marshmallow), upgradable to 7.1.1 (Nougat). Powered by Qualcomm MSM8996 Snapdragon 820 chipset, and Quad-core (2x2.15 GHz Kryo & 2x1.6 GHz Kryo) CPU. 

        Preparations.

        1. This tutorial work on Linux and Windows 64 only.
        2. Make sure to backup the partitions before writing new contents on your device, Therefore you can get back to where you started before.
        3. Don't try to write both boot and recovery in one session.
        4. Locking or Unlocking the bootloader will delete everything stored on your internal memory, we highly recommend to backup everything before proceeding.
        5. Download tuliptool form Here
        6. Download Zadig Here 

        Unlocking Guide (Windows 64 Bit).

        1. Once the tuliptool successfully downloaded on your computer, now you can extract it.
        2. You will find a Linux binary and a Win64 binary.
        3. This is a command line utility, so you must open a command prompt to run it.
        4. Now, you must launch command prompt at the Win64 binary location (press and hold shift button on the keyboard, then right click at the empty screen and select open command window here).
          run command prompt
          run command prompt
        5. Now, you must install Zadig on your computer.
        6. Enter your ZTE Axon 7 Mini into EDL (emergency Download Mode). How to do it?
          • Power off your ZTE Axon 7 Mini.
          • Then, unplug the device. 
          • Hold both volume buttons (Volume Up +Volume down).
          • Plug device into your PC via USB cable. 
          • Then, Wait for about 5 seconds and release all buttons.
        7. Once your ZTE Axon 7 Mini enter download mode, you will never see a feedback on the phone (no light, no sound, no vibration, nothing). You will only see 05c6:9008 is visible on the PC to verify that your device enters EDL.
        8. Usage command.
          • (un) locking
            • tuliptool lock status 
            • tuliptool lock unlock 
            • tuliptool lock lock
          • reading boot/recovery
            • This will read the selected partition to name-backup.bin 
            • tuliptool read boot 
            • tuliptool read recovery
          • writing boot/recovery
            • This will write name.bin to the selected partition 
            • tuliptool write boot 
            • tuliptool write recovery
              • So, for example, to write the included TWRP image, first you must copy tulip-twrp-7.1.1.img to recovery.bin and then run tuliptool write recovery.

        Trouble Shooting (Windows 64 Bit).

        1. When the tuliptool says device not found. 
          • You can fix it by; first enter EDL (Emergency Download Mode) mode, then run the tuliptool.
        2. ZTE Axon 7 Mini is visible in device manager or lspci but cannot be found by the tuliptool.
          • You can fix it by connecting the device directly to the PC, not through a hub.
        3. The Windows says bad file descriptor.
          • Make sure the WinUSB driver is correctly installed.

          Wednesday 4 October 2017

          How to Flash and Update Firmware All ZTE Mobiles Via System Recovery.

          How to Flash and Update Firmware All ZTE Mobiles Via System Recovery.

          Flash Firmware All ZTE Phone. The following guide will show you how to flash and update a new firmware into your ZTE Phone device. So, if you need to flash your ZTE phones you can follow this guide below. There are various ways to flash or update ZTE phones. You can use a PC or computer to flash a new firmware with Flash tool or use the second's method via Android system recovery. In my opinion, the 2nd method is easy to use, just download the firmware from the official site and then transfer it to the SD card via USB cable.

          For more instructions, you can read the step by step tutorial below.

          Step by Step Flash Firmware ZTE phone.

          1. To avoid all data lose during the update process, we highly recommend to backup everything stored in phone internal memory.
          2. Make sure your ZTE phone battery is fully charged in order to avoid the system down when the update process is running.
          3. Download update.zip from the following link on your computer or PC. Here
          4. Once it completely downloaded, transfer update.zip file to the SD Card (you can connect SD Card to the computer using card reader and USB cable)
          5. Put update.zip file at the directory root for easy access later.
          6. Once the transfer process is finished, disconnect SD Card from the computer and re-insert it again to the SD Card tray on your ZTE phone.
          7. Install phone battery, and then power ON again by press and hold the following button. (the position of the buttons may vary depending on the type of ZTE mobile phone, generally located on the side and above of ZTE phone)
            • Power Button + Volume UP button. 
          8. When ZTE phone vibrates, release power button only, while Volume Up still hold.


          9. Now, release all button when Android logo comes up on screen. And your ZTE phone enters Android System Recovery. 
            ZTE Android System Recovery
            ZTE Android System Recovery
          10. At this screen, you can use Volume Up or Volume down to move highlight menu.  And, use the power button to select or confirm.
          11. Before proceeding flashing the firmware, you must perform a hard reset or factory reset on your device. Just follow this step to perform it.
            • Highlight wipe data/factory reset using volume up/down and press the Power button to confirm.
              wipe data/factory reset ZTE
              wipe data/factory reset ZTE
            • Then, you must confirm wipe of all user data by highlight Yes – delete all user data. Just wait a minute, the Android system will delete all user data.
              delete all user data ZTE
              delete all user data ZTE
          12. If you still want to proceed to flash a new firmware now follow this step.
            • From the Android System Recovery screen, highlight Apply update from external storage then press the power button.
              Apply update from external storage
              Apply update from external storage
            • Then, navigate to the Update.zip file locations.
          13. Once Update.zip file found, you can highlight it and press the power button to continue flashing process.
          14. The update or flashing process will begin, you will see green Android logo on screen with the process bar. It will take 1-5 minute.
          15. Finish.