smartdroid

Tuesday, 24 April 2018

Bypass FRP Google Account And Hard Reset Samsung A-Series A8/8 Plus (SM-A530F/SM-A730F)

Bypass FRP Google Account And Hard Reset Samsung A-Series A8/8 Plus (SM-A530F/SM-A730F).

Bypass FRP Samsung Galaxy A-Series A8/8 Plus. For Samsung phones that already use at least Android 5.0 operating system, the factory reset protection or FRP will automatically enable when you sync the device with your Google account. as well as Samsung Galaxy A8 / A8 Series, this device also has the FRP feature. This feature will help the user from unwanted people who want to access phone after they performed the hard reset on the current device. issues that appear on the phone screen after a hard reset process are as follows "this device was reset, to continue, sign in with a Google account that was previously synced on this device"

This occurs because you forget the Google account information previously synced with the device after a hard reset process. For people who need information on how to perform a hard reset on the Samsung Galaxy A8, you can follow this guide.

Warning: Hard reset will delete everything stored on the phone memory, it removes all data including.
  • Google™ account 
  • System and app 
  • data App settings 
  • Downloaded apps and etc

How to Hard Reset Samsung A8 | A8 Plus.

  1. This method is using the hardware button located on the phone body to perform a hard reset on Samsung Galaxy A8. Use this method to unlock forgotten PIN, password, or pattern lock.
  2. Power off phone. to force the phone off press and hold Power Button + Volume Button
  3. Once the phone completely power off, now press and hold the following button to turn on into Android system recovery.
    • Power button + Volume UP
  4. Release all button when the Samsung Galaxy A8 logo comes up.
  5. Just wait until your phone enters Android Recovery screen.
  6. Here, you can navigate the menu using Volume Up or Volume down button and use the Power button to confirm.
  7. Now, highlight Wipe data/factory reset. and press Power button to confirm.
  8. Then, on the next screen highlight Yes and press power button to confirm
  9. Now, the hard reset process will start to erase everything on your Samsung Galaxy A8 / A8 Plus and then restore all setting to default factory setting.
  10. Once the hard reset process completed, now choose reboot system now.
Here is step by step how to Bypass Factory Reset Protection on Samsung Galaxy A8 / A8 Plus.

bypass FRP Samsung A8

Prerequisite.

  1. ODIN Flash tool Here
  2. ROM or firmware (1 = Security level 1 Samsung Update If the device is in a high-level security update, the ROM must be at the same level of security.).
    • Samsung Galaxy A8 - SM-A530F Version
      • COMBINATION_OXM_FA71_A530FXXU1ARA1
      • http://123link.pw/wWPNk
      • Stock Rom  5File SM-A530FXXU1AQLC
      • http://123link.pw/VW6AoE
    • Samsung Galaxy A8 - SM-A730F Version
      • COMBINATION_OXM_FA71_A730FXXU1ARA1
      • http://123link.pw/5mDMVJc
      • Rom Stock 5File SM-A730FXXU1AQLE
      • http://123link.pw/XApE

Instruction - Video Guide.

(how to bypass Google account protection Samsung Galaxy A8 / A8 plus)

Wednesday, 18 April 2018

How to Hard Reset Samsung Galaxy J2 Pro (2018) and Bypass FRP Google Account.

How to Hard Reset Samsung Galaxy J2 Pro (2018) and Bypass FRP Google Account.

Hard Reset Samsung Galaxy J2 Pro. The following information contains a guide to performing a hard reset on Samsung galaxy J2 Pro. You can use this guide to help your phone from blank or frozen, app crash or unresponsive, and other minor problems. Besides that, you can also use the hard reset to unlock pattern or forgotten password and PIN. Important you know, that performing a hard reset on an Android device will erase all data stored in the phone memory. So, perform the hard reset only if absolutely necessary as it removes all data including system and app data, Google account, App settings, and downloaded apps. 

Before proceeding this task, we highly recommend to backup everything on your Samsung Galaxy J2 Pro device. Keep all data in the other safe place. Once you have successfully performed a hard reset, your phone will restore to the default factory settings. So, pattern lock, password or PIN you have previously created will also be deleted from the phone screen. This means you have successfully unlocked the pattern or password.

For devices running the Android 5.1 lollipop or higher operating system already integrated with the Factory Reset Protection or FRP feature. You need to remember or write down your Google account information before proceeding the hard reset. Otherwise, your phone will be locked after the hard reset done. Also, this guide will show you how to bypass FRP and remove Google account on Samsung Galaxy J2 Pro.

Hard Reset Samsung Galaxy J2 Pro 2018-

  1. Power Off phone
  2. Once the phone completely powers off, now you must turn it on again by press and hold the following button at the same time.
    • Volume Up button + Home Button + Power button
  3. Keep holding the button until the Android Logo comes up on the screen.
  4. When your phone enters Android System you can navigate all menu using volume button, and use the power button to confirm.
  5. Now, highlight Wipe data/factory reset using the volume button
  6. Then, press power button to confirm.
  7. At the next screen, you will be asked to continue the hard reset or no. Therefore, highlight Yes.
  8. Just wait for the hard reset process finish. Once the process is done. you need to reboot your Samsung Galaxy J2 Pro.

Bypass FRP or Remove Google Account Samsung Galaxy J2 Pro 2018

From the beginning of the post, I have reminded to always remember Google account information before proceeding hard reset Samsung Galaxy J2 Pro. Why? because we need this user and password to log in after successfully performing a hard reset. If you forget, then you need to continue to follow my guide as seen in the video below.

Before watching this video, you need to downl04d prerequisites file ;
  • FRP Bypass tool for Samsung Galaxy J2 Pro 2018
  • here
    Video Guide.


    Sunday, 15 April 2018

    How to Hard Reset And Remove FRP Bypass Google Account Samsung Galaxy S9.

    How to Hard Reset And Remove FRP Bypass Google Account Samsung Galaxy S9.

    Hard Reset Samsung Galaxy S9. The following guide will show you how to perform hard reset or master reset Samsung Galaxy S9 or S9 Plus. Hard reset is also called factory reset. After performing a hard reset, all data stored in memory will be erased. Including installed applications will also be deleted. Your phone will be restored to the default factory settings after reboot. Therefore, we strongly recommend doing any backups stored on the phone before performing a hard reset. This means, that the important data you need is not deleted during the hard reset process. You can keep the data in a safe place. You can backup it if your Samsung Galaxy S9 or S9 plus is not locked. 

    Before performing a hard reset, we will review the Samsung Galaxy S9 specs.
    • Released: 2018, March
    • Display: 5.8 inches, 84.8 cm2. Super AMOLED capacitive touchscreen, 16M colors
    • OS: Android 8.0 (Oreo)
    • Chipset: Exynos 9810 Octa
    • CPU: Octa-core (4x2.7 GHz Mongoose M3 & 4x1.8 GHz Cortex-A55)
    • GPU: Mali-G72 MP18
    • Camera: 12 MP on primary camera and 8 MP on secondary camera.
      hard reset samsung galaxy s9
      hard reset Samsung galaxy s9

    The reason's why people performing a hard reset on Samsung Galaxy S9.

    1. Phone become a blank or Frozen screen
    2. The App runs on the Samsung Galaxy S9 crash or freezing.
    3. You can't hear the phone speaker.
    4. The device making any noises.
    5. You can't make and receive calls from someone.
    6. You can't sync your account 
    7. You have forgotten the password, PIN, or security pattern lock screen.

    Hard Reset Samsung Galaxy S9 - (First Method).

    You can use this method if your Samsung Galaxy S9 is still responsive and can be powered on normally. Just follow this step below to perform a hard reset on Samsung Galaxy S9 with this method.
    1. Power On your Samsung Galaxy S9.
    2. Then from the home screen, you can swipe Up or Swipe down from the center of the display to access the apps screen.
    3. Now, navigate to Settings General management - Reset.
    4. Then, you can tap Factory data reset. Here you can review the tap Reset. If your phone needs to enter the PIN, password, or pattern. You must provide the correct PIN, password, or pattern previously setup on the phone.
    5. Then, Tap delete all.
    6. Here, you need to Allow several minutes for the factory data reset and reboot processes to complete. Once it complete, you need to set up the device after the process.

    Hard Reset Samsung Galaxy S9 - (Second Method.)

    If the first method is not possible for you to follow, because your device is locked by a forgotten PIN password or Pattern. You can perform a hard reset on your Samsung Galaxy S9 / S9 plus using the second method. This method will explain step by step how to perform a hard reset to remove a forgotten password, PIN, or pattern on your Samsung S9 / S9 Plus.
    1. Power Off the Samsung Galaxy S9 / S9 Plus.
    2. Once your phone is completely powered off. Now you can do the following step.
      • Press and hold the Volume UP + Power Button + Bixby Button 
      • Hold all three button at the same time.
    3. Release all button, when you see Android System recovery comes up on the screen.
      hard reset samsung galaxy s9
      hard reset Samsung galaxy s9
    4. You can scroll down across the menu using volume Up or volume down button. both volume buttons serve to navigate across menus.
    5. Now, highlight wipe data/factory reset.
    6. Then, hit the power button to confirm.
    7. On the next screen, you will select two options (Yes and No). You will be warned "Wipe All User Data, This Can not Be Undone". in order to continue, you need to highlight yes and hit the power button to confirm. Otherwise, you can select No.
      hard reset samsung galaxy s9
      hard reset Samsung galaxy s9
    8. Once you already to do, the hard reset process on Samsung Galaxy S9 / S9 Plus will begin. Let's go ahead and do it. The process gonna say that our wipe completes down shown at the bottom of the screen.
    9. That means, that your Samsung Galaxy S9 / S9 Plus was cleared out. Everything stored on the phone memory was erased.
    10. Now, we can back to the Android System recovery main screen. To end the hard reset process, you need to highlight the reboot system now and make your Samsung Galaxy S9 / S9 Plus reboot.
    11. After your phone turns on again, you will see a Password, PIN or pattern is gone from your phone.

    Bypass FRP or Remove Google Account or Remove Android Device Protection Samsung Galaxy S9.

    Samsung Galaxy S9 or S9 plus already support FRP protection, to protect your phone from unauthorized people after they perform a hard reset. They must provide a correct Google account information previously synced with your Samsung Galaxy S9. So, what will you do if you have forgotten your Google account information? here you can find the solutions.

    Prerequisite.

    1. Original/Genuine USB Cable for Samsung Galaxy S9 / S9 Plus
    2. Make sure you have at list 80% of battery capacity, it will keep your phone alive during removing FRP process.
    3. Always backup everything before proceeding with this task.
    4. Files.
      • Samsung USB Driver. Here
      • ODIN software Here
      • Z3X Tool Pro - Samsung Tools Pro C**cked Version! Here
      • Samsung Jx Combination files. Here  
      • Samsung Jx Firmware. Here
        • (where Jx stands for your phone model. for example, J530F 2017)

    Instruction Guide.

    1. Once all files above already downloaded, now put all file in the same folder.
    2. Install Samsung USB driver
    3. Now, install Z3X Tools, you must disable antivirus currently run on your computer. Install in the same folder where you have tnt enforcer and Z3X 24.3 loader
    4. Run tnt enforcer as Administrator and then enable it.
    5. Then run Z3X 24.3 loader as Administrator.
    6. Now, extract combination files.
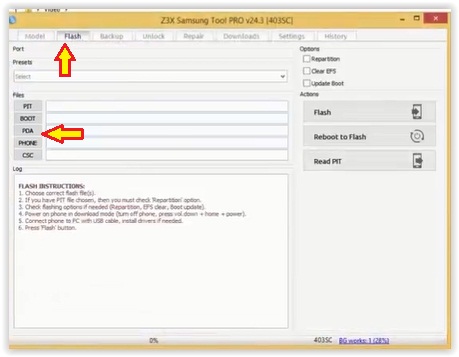
    7. Once Z3X Samsung tool pro windows come up, select Flash tab - then click PDA to browse the combination file.
      bypass FRP Samsung S9 and S9 plus
      bypass FRP Samsung S9 and S9 plus
    8. Now, connect your Samsung Galaxy S9 to the computer via USB cable and enter your phone into download mode. How to enter Samsung Galaxy S9 / S9 Plus into download mode?
      • Press and hold the Volume down button + Bixby Button + Power Button.
      • Then press Volume Up button to continue.
    9. Then, you must click Flash button to start flashing process.
    10. Just wait until finish, and your phone will reboot.
    11. When your phone start, it will have a strange look. Don't worry about it. This is normal.
    12. When phone starts to boot menu, press Reboot to flash to get back to download mode.
      bypass FRP Samsung S9 and S9 plus
      bypass FRP Samsung S9 and S9 plus
    13. Now, extract original firmware and ODIN in the same folder.
    14. You should extract these 3 files: AP, HOME CSC, and BL
    15. Now, flash with ODIN
      bypass FRP Samsung S9 and S9 plus
      bypass FRP Samsung S9 and S9 plus
    16. Start to flash the original firmware, click the start button on ODIN windows.
    17. Just wait the process done, you can see the flashing progress on your phone in download mode.
      Download mode Samsung S9 and S9 plus
      Download mode Samsung S9 and S9 plus
    18. Once it finishes, your phone will boot. And you can make the initial setup.

    How To Hard Reset LG G4 Dual.

    How To Hard Reset LG G4 Dual.

    Hard Reset LG G4 Dual. Today'sguidebelajarwill explain to you how to perform a hard reset on LG G4 Dual smartphone. LG G4 Dualis the smartphone with 5,0 Inchi wide LCD, work onAndroid OS, v5.0.1 (Lollipop) and supported with Qualcomm MSM8916 Snapdragon 410, Processor Dual-core 1.82 GHz Cortex-A57 & quad-core 1.44 GHz Cortex-A53, GPU Adreno 418, combined with 3 GB of RAM and 16 MP. Some People say that Hard reset process is called with master reset or factory reset. Many people asking why should we perform a hard reset on our phone. The logical answer that can I say this asking is :
    • Because we will sell ourLG G4 DualAndroid phones.
    • Our LG G4 Dual has been lagging and stuck on android logo, this call with boot loop
    • There are many bugs in LG G4 Dual.
    • We want to remove all personal data and setting that was stored in LG G4 Dual.device.
    • We have forgotten about PIN or Pattern Lock at LG G4 Dual.
    • and many other reasons.

    1st Method. Hard Reset LG G4 DualUsingMenu :

    1. Make sure your battery is fully charged, Recommended you have 80% of battery capacity
    2. Then Backup your LG G4 Dual.see this guide
    3. Go to menu: System Setting
    4. Select Backup and Reset
    5. Factory Data Reset
    6. Reset Phone
    7. ChooseErase everything to confirm that you already to perform a hard reset on LG G4 Dual
    8. LG G4 Dual will continue hard reset process to restore factory default.
    Unlock Forgotten Password, PIN, Pattern Lock Screen Without Losing data.

    2nd Method. Hard Reset LG G4 DualUsingHardware Keys:

    1. Make sure your battery is fully charged, we recommend that your battery has 80% power
    2. Always BackUp your important data that store in LG G4 Dual. see this guide
    3. Turn Off your LG G4 Dual hold and press Power Button for a second.
    4. Release any SIM card and SD card that was installed on your LG G4 Dual smartphone.
    5. Now turn your phone on again by a press and hold these buttons at the same time.
      • Volume Down + Power button.
    6. Release all button when your phone vibrates and show Android logo on the LCD screen.
    7. Wait a while, you will enter the Factory Data reset menu.
    8. On this screen, you can use the Volume Up or Volume down button to select menu and execute your choice using the power button.
    9. If you select Yes your phone will start to erase all user data and restore the default setting, and your phone will show a screen like this picture.
    10. Hard Reset LG G4 Dual.
    11. You can wait a while for LG G4 Dual reboot system
    12. Done, your hard reset process success now.

    Guide To Flash LG G2 D801 / D802 / D802T / D803 / VS980 / VS985 with Stock ROM using LG Flash Tool (KDZ method).

    Guide To Flash LG G2 D801 / D802 / D802T / D803 / VS980 / VS985 with Stock ROM using LG Flash Tool (KDZ method).

    Flash / Install Stock ROM LG G2. Many methods used to perform flash on Android smartphone, especially on LG Android smartphone, we can flash this smartphone using KDZ method or TOT mode, and now guidebelajar will show you how to flash stock ROM on Android LG smartphone using KDZ method. And we use LG G2 device. For information, LG G2 has many series according to where this device launched in some country:
    1. LG G2 D800 for AT&T. (KDZ file for this series is not available on this guide)
    2. LG G2 D802 for Europe
    3. LG G2 D801 for T-Mobile
    4. LG G2 D802TR for Turkey
    5. LG G2 D802T for Australia
    6. LG G2 D803 for Canada
    7. LG G2 VS980 for Verizon
    8. LG G2 VS985
    This device us announced in August 2013 and Released 2013, September. This guide is very easy and simple task you can do to solve any problem on LG G2 device. Such as bootloop, unstable on Android system, or when you failed to install stock ROM Mod.

    Flashing on Android device is similarly install a new operating system (OS) on PC or computer, like windows and Linux PC. So. when flashing process is done, you will get a new performance on your device like a new device. When you failed to completed flashing process, your LG G2 device will enable to reboot to your Android system, but you can fix this problem by performing hard reset or factory reset on your LG G2 Android device.

    This LG G2 is the smartphone with 5,2 Inchi wide True HD-IPS + LCD capacitive touchscreen, 16M colors, work on Android OS, v4.2.2 (Jelly Bean), upgradable to v5.0.2 (Lollipop), and supported with Quad-core 2.26 GHz Krait 400 CPU, Qualcomm MSM8974 Snapdragon 800 Chipset, combined with 2 GB of RAM and 13 MP of Main camera and 2,1 MP on secondary camera.

    Now, follow the instruction list below, do it at your own risk.

    Requirement Tool For Flash LG G2.

    Before you perform flash or install your firmware on LG G2 you must download all requirement tool below ;
    1. Download Stock Rom LG G2:
      • This Stock is KDZ file, remember to copy this KDZ file into LG Flash Tool 2014 folder
      • Check the firmware that matches with your phone version,
        • The V10 is the KitKat version
        • The V20 is for the Lollipop Version
        • And, you can see a letter, that is little updates, you can download the one with the "last" letter
      • Download LG mobile support tool and install.
      • Download Driver LG:
      • Latest LG FlashTool:

      #1. Guide To Flash LG G2.

      Video Guide.


      Please follow this guide carefully to flash LG G2.
      1. Make sure you have downloaded all requirement tool above
      2. Then Install the drivers with your phone connected to your Computer, when it finished disconnecting your LG G2 phone from your computer.
      3. Now turn your LG G2 phone off, then click continuously on the up volume and connect your phone to your PC.
      4. Now, enter your LG G2 into download mode. (visit this guide)
      5. Run LGFlashTool2014.exe.
      6. If you cannot run LGFlashTool2014.exe, You must install Visual C++ Runtime Library,
      7. There are two options to flash your LG G2
        • Normal Flash: You can select this option if you want Flash ROM without losing any data. Only use this when you need to fix system error.
        • CSE Flash: You can choose this option when you need a fresh format. All data will be deleted. It's suitable for upgrading or downgrading ROM or simply use this when you need to back to Stock.
        • LG flash tool normal flash / CSE flash
          LG flash tool normal flash / CSE flash
      8. Select Type: CDMA
      9. PhoneMode: DIAG
      10. Select KDZ file: browse your KDZ file in your drive
      11. Then you can Click on Normal Flash or CSE Flash (see step 7 to decide this option)
      12. Then click Start.
      13. Then click on Clear Phone Software update registry.
      14. Clear Phone Software update registry
        Clear Phone Software update registry
      15. No need to choose the desired language, it automatically changes to English as a default setting.
      16. Finally, you can click OK.
      17. You must wait a minute for the LG Mobile Support tool to recognize the LG G2 device.
      18. When you wait this process, may take 5 minutes the tool to recognize it.
      19. The software will start the extraction on your device.
      20. When the process reaches 100% your LG G2 will reboot.
      21. Then, you must Unplug your LG G2 from your computer by remove USB Cable from it.,
      22. Finish.

      #2. Guide To Flash LG G2.

      If #1 method is failed to flash your LG Android device, you can use this second method, flashing LG device using R&D Test Tool. Here

      How to Flash Firmware LG X Mach Return to Stock and Fix a Bootloop.

      How to Flash Firmware LG X Mach Return to Stock and Fix a Bootloop.

      Flash LG X Mach Firmware.  If your phone gets bootloop it will only show an LG logo and stuck at this screen, and then return to reboot automatically and show this screen again. So, it's also called failed to boot the Android system and go to phone menu. At this state, your phone is still can access recovery menu or enter download mode. On this guide, we will try to fix this boot loop issue on Android LG X Mach by flashing this phone using a new firmware with kdz method. Simply just download the firmware from the available link below and then run LG Flash tool 2014 to help to flash firmware into LG X Mach via download mode. You don't need to take your phone to the service center and you can try it by yourself to fix this issue.

      Also, this guide will solve the soft-brick on LG X Mach. Before this flashing guide starts lets we know more about LG X Mach specifications. For some countries, LG X Mach is also known as with LG K600 or LG X Fast.
      • This device released at 2016, September.
      • Comes with 5.5 Inches, IPS LCD capacitive touchscreen, 16M colors
      • Powered by; Hexa-core (4x1.4 GHz Cortex-A53 & 2x1.8 GHz Cortex-A57) processor, Qualcomm MSM8992 Snapdragon 808 chipset, and Adreno 418 GPU.
      • Supported by: 3000 MB of RAM
      • Run on Android 6.0.1 (Marshmallow)
      • Camera specs; 12,3 Mp of primary camera, and 8 MP of secondary camera.
      • Battery specs; Removable Li-Ion 3000 mAh battery.
      Now, let's we start to flash the LG X Mach phone. Below is step by step guide you can try by yourself. Please read carefully in order to avoid your device totally damaged.

      Preparations.

      The following files are used to help you run flashing process on your LG X Mach. Download it one by one until completed.
      1. This flashing method using kdz file, therefore you must provide the LG KDZ firmware to proceed this guide. There is two way you can try to download this file.
      - Download LG Kdz file by yourself using the web browser and IMEI phone number.

      Flashing Guide.

      Video Guide.


      1. Extract Kdz Firmware and the other file to your computer local disk, we recommend saving this kdz and LG driver to the desktop for easy access later.
      2. Make sure your LG X Mach is fully charged or at least has 75% of battery capacity before flashing process.
      3. To avoid failed when detecting your LG phone the LG driver should installed correctly on your computer or PC.
      4. If you see any error when installing LG driver, try to install Visual C++ Runtime Library first.
      5. Now, go to LG flash tool 2014 folder, and run it as administrator. (right click at LG Flashtool2014.exe - select run as administrator).
      run as administrator - Flash LG X Skin
      run as administrator - Flash LG X Skin
      6.Once the LG Flashtool 2014 window is launched. Now you can set this windows as the following guide.
      flash LG X Skin
      flash LG X Skin
      • Number 1: At Select type, you can choose 3GQCT
      • Number 2: Select DIAG at phone mode drop-down menu.
      • Number 3: Browse where your kdz saved on your computer drive.
      • Number 4: Click normal flash, it will Flash ROM without losing any data. Only use this when you need to fix system error. For some selected type, you will see CSE flash beside normal flash. CSE flash used for fresh format your phone. Also, it used to downgrade or upgrade phone firmware.
      7. If you click the normal flash button, then you will see next window as shown in the picture below. On this window, you can continue the process by click Start button
      flash LG X mach
      flash LG X mach
      8. Now, you will see country & Language window, on this window click clear phone software update registry button.
      9. Now, go to your phone and turn off your LG X Mach.
      11. Then connect your LG X Mach to the computer via USB cable while press and hold Volume Up button.
      12. Release volume up button when your LG X Mach enter download mode. And your phone will show this screen.
      enter download mode LG X Mach
      enter download mode LG X Mach
      13. Now, back to LG Flash tool 2014 window (country & Language window) and click OK button.
      14. Now, you will automatically launch LG Mobile Support Tool window on a screen.
      LG Mobile Support Tool
      LG Mobile Support Tool
      15. Just wait for the flashing process until it done. It will take a while depending on firmware size and phone models.
      16. Once it reaches 100% completed, your LG X Mach will reboot automatically, and you can click the exit button.
      17. Now, you can unplug your LG X Mach form USB cable, and while it boots up and ready to use you can set up your phone as the first time you bought it.

      Saturday, 14 April 2018

      Guide to Flash Stock Firmware LG M700TV aka LG Q6 Plus KDZ Method With LGUP and Uppercut.

      Guide to Flash Stock Firmware LG M700TV aka LG Q6 Plus With LGUP and Uppercut.

      Flash LG Q6 Plus with LGUP. Please use the following guidelines to solve the boot loop problem on your LG mobile phone. This guide will show you how to flash a new stock firmware on LG Q6 Plus. We will show with the KDZ methods, which this guide requires LG UP to help flash the stock firmware. generally, to flash the firmware to LG mobile phone using LG UP you have to provide DLL file. But, now you can use UPPERCUT. By using UPPERCUT it will allow LGUP to instantly work with a ton of different Android LG phones models. You don't need to hunt around for specific model files or being stuck without your model being detected by the LGUP. Just install and run LGUP and then double-click the UPPERCUT.exe and your LG phone model will be detected.

      If you understand all the risk to flash a new stock firmware into your Android LG Q6 Plus, let's start this guide.

      Prerequisite.

      1. A PC runs on the Windows Operating System.
      2. LG's Windows USB drivers. 
      3. https://goo.gl/7p2FeA
      4. LGUP tool 
      5. https://goo.gl/aqd2sc
      6. Download Uppercut from 
      7. https://goo.gl/eU8mBE
      8. Download Stock ROM LG M700TV aka LG Q6 Plus.
        • Here 
        • https://goo.gl/z2P5b2

      Instruction How to flash LG Q6 PLUS.

      1. Make sure all required files above are successfully downloaded on your computer. Then, do the following step.
        • Install LG USB Driver
        • Install the latest LG UP software
        • Extract or Unzip Uppercut.zip
      2. Then, double-click the uppercut.exe before running LGUP. Uppercut.exe requires LGUP 1.14 (not 1.11) installed on the computer.
      3. uppercut LGUP
        uppercut LGUP
      4. Now, put your LG Q6 PLUS Smartphone into download mode, you can manually do it by ;
        • Turn Off your LG Q6 PLUS Smartphone device.
        • Then press and hold Volume UP button while connecting your LG Q6 PLUS Smartphone to the computer using the USB cable.
      5. Then run LGUP tool.
      6. Wait a moment until LGUP detect and recognize your LG smartphone. This will install a necessary USB Drivers for your device.
      7. Now, your LGUP should show up on your computer screen.
      8. Flash LG Q6 using LGUP
        Flash LG Q6 using LGUP
      9. From LG UP screen above, go to process tab and select Upgrade. 
      10. Then click on BIN file under file type.
      11. Flash LG Q6 using LGUP
        Flash LG Q6 using LGUP
      12. Then click the button on the right side of bin file shown in the picture below.
      13. Flash LG Q6 using LGUP
        Flash LG Q6 using LGUP
      14. This action will browse your kdz/tot file you just download.
      15. Once your kdz/tot file already in the LGUP software, now click Start.
      16. Flash LG Q6  using LGUP
        Flash LG Q6 using LGUP
      17. Now, LGUP will start flashing process, this is indicated on the progress bar.
      18. Flash LG VQ6  using LGUP
        Flash LG Q6 using LGUP
      19. Just wait until the step on progress bar shows 100% complete. Once it completed LG Q6 PLUS will automatically reboot.
      20. Now, you can unplug your LG Q6 PLUS device from the computer.