smartdroid

Wednesday, 22 August 2018

Guide Flash a New Firmware Samsung Galaxy J2 Pro (2018) to Fix a Boot loop.

Guide Flash a New Firmware Samsung Galaxy J2 Pro (2018) to Fix a Boot loop.

Flash Samsung J2 Pro (2018) with Odin. Many things that cause your Android phone to experience boot loop. in the boot loop state, the phone will start and stop on the logo or boot screen, then restart again and continue without stopping. Bootloop is usually caused by several actions that affect the Android operating system. For example, you have done custom flashing ROM, installed mods, incorrectly set system permissions, etc. The following guide provides a solution for how to flash the firmware using Odin to resolve the boot loop problem on an Android phone before you take it to the service center. 

This flash guide is specifically made for the Samsung Galaxy J2 Pro (2018). Where this device is released on the market in January 2018. With 5.0 inches Super AMOLED capacitive touchscreen, 16M display colors. powered by Quad-core 1.4 GHz Cortex-A7 CPU. And, runs on Android 7.1 (Nougat), planned upgrade to Android 8.0 (Oreo) Operating system.

Now, let see step by step guide to flash the firmware to the Samsung Galaxy J2 Pro (2018).
flash firmware Samsung J2 2018

Prerequisite.

  1. Before flashing, check the battery condition. Make sure the battery is 75% charged. This is to keep the system burning during the flashing process.
  2. Always back up on important data. this is to avoid the data being lost after the flashing process
  3. We highly recommend installing a USB driver that matches your current Samsung device. Download the USB driver from the following page.
  4. Now download Odin, this software is used to transfer firmware from PC to cellphone. ODIN can you get from the following page.
  5. In this guide, there are 3 methods for downloading Samsung firmware. Please use one
    • You can use one of the three methods available to download the firmware.
      • One. Download Official firmware file for the model number of your device, download it from - SamMobile.com, or you can visit the other site, samsung-updates.com. 
      • TwoUse the following guide to download Samsung Firmware.  Here
      • Three. Download firmware Samsung Galaxy A8 and A8 Plus 2018 directly from the following link, you must Log In to download firmware via this link.

Insert Part of Firmware into ODIN. 

  1. Do not try to apply this guide to cellphone modes other than Samsung Galaxy J2 Pro (2018), or your cell phone will be damaged or totally dead
  2. Now, Extract ODIN software in certain folders that are easy to find. For Example (desktop)
  3. Then, Unzip the Samsung Galaxy J2 Pro (2018) Stock ROM or Firmware.
  4. Now, power off the phone using the power button.
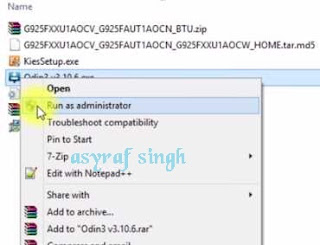
  5. Now, go to the ODIN folder and run the ODIN.exe application by right-clicking choose run as administrator.
  6. launch ODIN flash tool
    launch ODIN flash tool
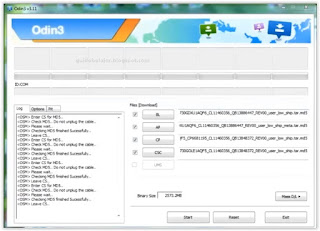
  7. Once the application window is open, now you can click the following button at the ODIN application windows, and navigate to the *.tar or *.tar.md5 firmware file to load it into ODIN window. 
    • BL button,
    • AP button
    • CP button
    • CSC button
      flash Samsung Galaxy J2 Pro (2018)
      flash Samsung Galaxy J2 Pro (2018)
  8. Make sure all firmware already inserted into ODIN windows. 

Enter Phone into Download Mode

  1. Make sure your phone completely shut down to start the flashing process.
  2. How to enter Samsung Galaxy J2 Pro 2018 into download mode?. You can press and hold the following button simultaneously
    • Volume Down + Power Button + Home button.
  3. Release all button when your phone showed this image on the screen.
  4. download mode Samsung Galaxy J2 Pro 2018
    download mode Samsung Galaxy J2 Pro 2018
  5. To continue entering download mode press the volume UP button.
  6. To cancel entering download mode and restart the phone press the volume down button.
  7. More instructions, see this page.

Final Step, Flash Firmware With Odin.

  1. Once your phone in download mode screen, now connect it to the computer via USB cable.
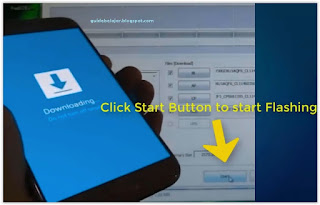
  2. Make sure your Samsung phone screen shows downloading.
  3. Now return to the ODIN application window, then click the start button to start the flash process.
    flash Samsung J2 Pro Via ODIN
    flash Samsung J2 Pro Via ODIN
  4. Wait a while until the ODIN window displays a green PASS. this means the flash process is complete, and the Samsung mobile phone will automatically reboot.
  5. Finished, if you succeed in reaching this step means the flash process is complete. it is now safe to disconnect the USB cable from cellphones and computers.

How to Flash Firmware Samsung Galaxy J7 Duo With ODIN.

How to Flash Firmware Samsung Galaxy J7 Duo With ODIN.

Flash Stock ROM Samsung J7 Duo. This guide will explain step by step how to flash the firmware on Samsung Galaxy J7 Duo. You can try this guide to fix some problems with Samsung phones. as an example to fix a boot loop problem. During boot loop, the cell phone will restart continuously without stopping. So that the boot process will never reach the home screen and your phone can't be used. To flash the firmware, a software tool called Odin is needed. Odin only works on computers with a Windows operating system.

We will flash the firmware on the Samsung Galaxy J7 Duo device. Where this device was released by Samsung to the market in April 2018. with 5.5 inches Super AMOLED capacitive touchscreen, 16M colors display.  Powered by Octa-core (2x2.2 GHz Cortex-A73 & 6x1.6 GHz Cortex-A53). Samsung Galaxy J7 Duo runs on Android 8.0 (Oreo) OS.

Now, let see step by step flashing firmware into Samsung Galaxy J7 Duo.
flash firmware Samsung J7 Duo

Early preparation Before Flashing.

  1. Make sure the battery is at least 70% charged so the system stays alive during the flashing process. If the system turns off during the flashing process there will be severe damage to the cell phone
  2. Backing up important data to avoid data loss after flashing.
  3. We highly recommend installing a USB driver that matches your current Samsung device. Download the USB driver from the following page.
  4. Now download ODIN, this software is used to transfer firmware from PC to cellphone. ODIN can you get from the following page.
  5. Next, download firmware or stock for your Samsung cell phone model.
    • You can use one of the three methods available to download the firmware.
      • One. Download Official firmware file for the model number of your device, download it from - SamMobile.com, or you can visit the other site, samsung-updates.com. 
      • TwoUse the following guide to download Samsung Firmware.  Here
      • Three. Download firmware Samsung Galaxy A8 and A8 Plus 2018 directly from the following link, you must Log In to download firmware via this link.

Load Firmware to ODIN. 

  1. Actually, this method can work for almost all types of Samsung phones, but we strongly recommend using only the Samsung J7 duo. Because the downloaded firmware belongs to the device.
  2. Now, Extract ODIN software in certain folders that are easy to find. For Example (desktop)
  3. Then, Unzip the Samsung Galaxy J7 Duo Stock ROM or Firmware.
  4. Now, power off the phone using the power button.
  5. Now, go to the ODIN folder and run the ODIN.exe application by right-clicking choose run as administrator.
  6. launch ODIN flash tool
    launch ODIN flash tool
  7. Once the application window is open, now you can click the following button at the ODIN application windows, and navigate to the *.tar or *.tar.md5 firmware file to load it into ODIN window. 
    • BL button,
    • AP button
    • CP button
    • CSC button
      flash Samsung Galaxy J7 Duo
      flash Samsung Galaxy J7 Duo
  8. Make sure all firmware already inserted into ODIN windows. 

Enter Phone into Download Mode

  1. Make sure your phone completely shut down to start the flashing process.
  2. How to enter Samsung Galaxy J7 Duo into download mode?. You can press and hold the following button simultaneously
    • Volume Down + Power Button + Home button.
  3. Release all button when your phone showed this image on the screen.
  4. download mode Samsung Galaxy J7 Duo
    download mode Samsung Galaxy J7 Duo
  5. To continue entering download mode press the volume UP button.
  6. To cancel entering download mode and restart the phone press the volume down button.
  7. More instructions, see this page.

Final Step, Flash Firmware With Odin.

  1. Once your phone in download mode screen, now connect it to the computer via USB cable.
  2. Make sure your Samsung phone screen shows downloading.
  3. Now return to the ODIN application window, then click the start button to start the flash process.
    flash Samsung J7 Duo Via ODIN
    flash Samsung J7 Duo Via ODIN
  4. Wait a while until the ODIN window displays a green PASS. this means the flash process is complete, and the Samsung mobile phone will automatically reboot.
  5. Once the flashing process is complete, unplug your cell phone from the computer. then do the initial settings like when you first buy the cellphone.

How to Flash Firmware Samsung Galaxy C7 2017 With Odin Flash Tool.

How to Flash Firmware Samsung Galaxy C7 2017 With Odin Flash Tool.

Flash Firmware Samsung C7 2017. All Android phones that have boot loop problems must be resolved immediately. So that system damage doesn't get worse. Every brand of Android phones also has a special method to solve boot loop problems. Now, we will make a guide with a special method to solve the boot loop problem on the Samsung Galaxy C7 2017. To solve this problem, we recommend using the Odin flash tool. Because Odin has been designed specifically for Samsung phones. So, this method can be said a very effective at solving boot loop problems. Odin can only be run on a computer with a Windows operating system. For that, you must prepare everything before flashing the firmware on an Android phone.

Ok, now we will flash the firmware on the Samsung galaxy C7 2017. This device was released by Samsung in October 2017. with Super AMOLED capacitive touchscreen 5.5 inches, 16M colors display. powered by Octa-core (4x2.4 GHz & 4x1.7 GHz) CPU. this device runs on the Android 7.1 (Nougat) operating system. Samsung Galaxy C7 2017 Also known as Samsung Galaxy J7+ in Thailand, Malaysia, Philippines and Samsung Galaxy C8 in China

Here is step by step flashing guide.
Flash Firmware Samsung Galaxy C7 2017
Flash Firmware Samsung Galaxy C7 2017 

Preparing.

  1. Make sure the battery is charged at least 80%, this is to keep the system ON during the flashing process.
  2. The flash process will erase all stored data. For this reason, backing up must be done to avoid data loss.
  3. make sure the USB driver is installed on the computer, so that the communication between the two hardware runs smoothly, download the USB driver from the following page.
  4. ODIN is the main software tool to flash the firmware, make sure it is installed on a Windows computer. ODIN can you get from the following page.
  5. Then download the firmware that matches the Samsung Galaxy C7 2017
    • You can use one of the 3 following methods of downloading Samsung firmware below
      • One. Download Official firmware file for the model number of your device, download it from - SamMobile.com, or you can visit the other site, samsung-updates.com. 
      • TwoUse the following guide to download Samsung Firmware.  Here
      • Three. Download firmware Samsung Galaxy A8 and A8 Plus 2018 directly from the following link, you must Log In to download firmware via this link.

How to Load Firmware into Odin. 

  1. This guide can only be applied to Samsung Galaxy C7 2017. So don't try on Samsung devices with other models.
  2. Now, Extract ODIN software in certain folders that are easy to find. For Example (desktop)
  3. Then, Unzip the Samsung Galaxy C7 2017 Stock ROM or Firmware.
  4. Now, power off the phone using the power button.
  5. Now, go to the ODIN folder and run the ODIN.exe application by right-clicking choose run as administrator.
  6. launch ODIN flash tool
    launch ODIN flash tool
  7. Once the application window is open, now you can click the following button at the ODIN application windows, and navigate to the *.tar or *.tar.md5 firmware file to load it into ODIN window. 
    • BL button,
    • AP button
    • CP button
    • CSC button
      flash Samsung Galaxy C7 2017
      flash Samsung Galaxy C7 2017
  8. Make sure all firmware already inserted into ODIN windows. 

Put Samsung Galaxy C7 2017 to Download Mode

  1. Make sure your phone completely shut down to start the flashing process.
  2. How to enter Samsung Galaxy C7 2017 into download mode?. You can press and hold the following button simultaneously
    • Volume Down + Power Button + Home button.
  3. Release all button when your phone showed this image on the screen.
  4. download mode Samsung Galaxy C7 2017
    download mode Samsung Galaxy C7 2017 
  5. To continue entering download mode press the volume UP button.
  6. To cancel entering download mode and restart the phone press the volume down button.
  7. More instructions, see this page.

Flashing Firmware.

  1. Once your phone in download mode screen, now connect it to the computer via USB cable.
  2. Make sure your Samsung phone screen shows downloading.
  3. Now return to the ODIN application window, then click the start button to start the flash process.
    flash Samsung C7 2017 Via ODIN
    flash Samsung C7 2017 Via ODIN
  4. Wait a while until the ODIN window displays a green PASS. this means the flash process is complete, and the Samsung mobile phone will automatically reboot.
  5. After the flashing process is successful, your mobile will be in factory settings. For this reason, the initial setting must be done.

How to Flash Stock Firmware Samsung Galaxy A8 and A8 Plus 2018 With Odin.

How to Flash Stock Firmware Samsung A8 and A8 Plus 2018 With Odin.

Flash Samsung A8 and A8+ 2018. Bootloop issue can occur on any Android mobile device. the bootloop phone when turned on will only stop at the logo or boot screen without ever reaching the home screen. So that the cell phone cannot be used properly. In this case, the boot loop device is Samsung Galaxy A8 and A8+.  Each Android device has a different solution to the boot loop problem. From the easiest to the most difficult. a lightweight boot loop can be overcome by entering the cellphone recovery system and clean the Dalvik-cache. For higher levels of bootloop can be solved with flash a new firmware. to flash Samsung Galaxy Odin flash tool is needed.

Ok, now we will flash the firmware on Samsung Galaxy A8 and also A8 +. this device was released in January 2018. With 5.6 inches Super AMOLED capacitive touchscreen, 16M display colors. powered by Octa-core (2x2.2 GHz Cortex-A73 & 6x1.6 GHz Cortex-A53). Samsung A8 runs on Android 7.1.1 (Nougat), upgradable to Android 8.0 (Oreo) operating system.

Now, let's see how to flash Samsung Galaxy A8 and A8+ with Odin.
flash firmware A8 2018

Prerequisite.

  1. Charge the battery fully before making a flash, so the system does not shut down during the flashing process because the battery runs out.
  2. We strongly recommend backing up all data before the flashing process. Flash firmware will delete all stored data.
  3. To ensure the connection between the mobile phone and the PC can run properly make sure the USB driver is installed correctly., download the USB driver from the following page.
  4. Now download ODIN, this software is used to transfer firmware from a PC to Samsung devices. ODIN can you get from the following page.
  5. Then, download the fresh firmware for Samsung Galaxy Galaxy A8 and A8 Plus 2018. 
    • There are Three methods to download Samsung firmware.
      • One. Download Official firmware file for the model number of your device, download it from - SamMobile.com, or you can visit the other site, samsung-updates.com. 
      • TwoUse the following guide to download Samsung Firmware.  Here
      • Three. Download firmware Samsung Galaxy A8 and A8 Plus 2018 directly from the following link, you must Log In to download firmware via this link.

Insert the Firmware into ODIN Window.

  1. This guide can only be applied to Samsung Galaxy A8 and A8 Plus 2018. Depending on which firmware is used. and does not work on other Samsung models.
  2. Now, Extract ODIN software in certain folders that are easy to find. For Example (desktop)
  3. Then, Unzip the Samsung A8 and A8 Plus 2018 Stock ROM or Firmware.
  4. Now, power off the phone using the power button.
  5. Now, go to the ODIN folder and run the ODIN.exe application by right-clicking choose run as administrator.
  6. launch ODIN flash tool
    launch ODIN flash tool
  7. Once the application window is open, now you can click the following button at the ODIN application windows, and navigate to the *.tar or *.tar.md5 firmware file to load it into ODIN window. 
    • BL button,
    • AP button
    • CP button
    • CSC button
      flash Samsung Galaxy A6 and A6+ 2018
      flash Samsung Galaxy A6 and A6+ 2018
  8. Make sure all firmware already inserted into ODIN windows. 

Enter Samsung Galaxy A8 and A8 Plus 2018 Into Download Mode.

  1. Make sure your phone completely shut down to start the flashing process.
  2. How to enter Samsung A8 and A8 Plus 2018 into download mode?. You can press and hold the following button simultaneously
    • Volume Down + Power Button + Home button.
  3. Release all button when your phone showed this image on the screen.
  4. download mode Samsung A8 and A8 Plus 2018
    download mode Samsung A8 and A8 Plus 2018
  5. To continue entering download mode press the volume UP button.
  6. To cancel entering download mode and restart the phone press the volume down button.
  7. More instructions, see this page.

Flash Firmware With ODIN.

  1. Once your phone in download mode screen, now connect it to the computer via USB cable.
  2. Make sure your Samsung phone screen shows downloading.
  3. Now return to the ODIN application window, then click the start button to start the flash process.
    flash Samsung A8 and A8 Plus Via ODIN
    flash Samsung A8 and A8 Plus Via ODIN
  4. Wait a while until the ODIN window displays a green PASS. this means the flash process is complete, and the Samsung mobile phone will automatically reboot.
  5. The cellphone will reboot after all processes are complete. make sure you make the initial settings so that the phone can be used properly.

Monday, 20 August 2018

How To Remove Forgotten Password, Pattern Lock, PIN, Without Hard Reset and Losing Data.

How To Remove Forgotten Password, Pattern Lock, PIN, Without Hard Reset and Losing Data.

How to Unlock Android Pattern or Pin Lock without losing data. The following guide will explain how to unlock an Android phone that is locked in a pattern lock screen, password or PIN code. In this case, you forget the password combination or the pattern lock screen of the Android phone. Forgot passwords or screen lock patterns can be caused by too complex character combinations or drawn patterns to lock the screen. As a suggestion that passwords and screen lock patterns are not easy to forget, make a combinations character that is easy for you to remember but difficult for others to guess it. It's exactly what you do by protecting your cell phone from irresponsible people by giving screen lock. Then, what if you really forget the password, PIN code, or screen lock pattern? 

Don't worry, if you find this tutorial guide then you are one of the very lucky people. To unlock the screen because you forgot the password or pattern lock screen it's very easy. You don't need to perform a hard reset, master reset, or factory reset that will erase all important data and files stored on the Android cell phone. You also don't need to worry about losing data.

So, let start this guide.

There are several methods to unlock the Android screen which I will present in this tutorial.
remove password without losing data

1#. Unlock Password, Pattern Lock, PIN Without Losing Data with Android SDK Tools.

This guide fully works on gingerbread, ice cream sandwich, and jellybean.
  1. First, you need to download Android SDK 
    • Open your favorite browser, e.g. Google Chrome.
    • Then type 'android sdk tool' on the Google search bar. (without quotes)
    • Then, in the search results click the available link, it will usually appear on the first search.
    • Or, you can directly click the following link
  2. Once the file completely downloaded, open and then install it on the computer. It may take 5 to 10 minutes to install the Android SDK tool.
  3. Make sure USB debugging has been enabled before your Android phone is locked or blocked by the forgotten password, PIN, or pattern lock screen. This guide might not be helpful to unlock your Android phone if USB debugging is not activated before.
  4. You need to install a specific and compatible USB driver for your Android phone.
  5. Then, connect your locked Android phone with PC or laptop via USB cable.
  6. Now, open the folder where you install Android SDK tools. usually, the SDK installation folder tool is located on the following drive. 
    • User
    • App data
    • Local
    • Android
    • Android-SDK
    • Platform-tools
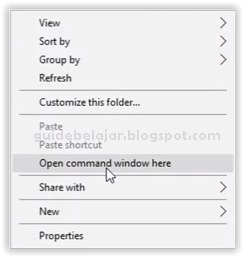
    • when you reach this folder, hold down the shift key then right click and select 'open command window here'
      open command window here
      open command window here
  7. The above step will open the command window, now you need to type or copy some command in the command prompt window. Now, Type the following command.
    • adb devices
    • This command will be checking your devices connected or not. If your device connected, it will return with a list of devices attached and device ID.
    • Then type or copy the following command. How to copy paste text from the command prompt?
    • adb shell
      cd /data/data/com.android.providers.settings/databases
      sqlite3 settings.db
      update system set value=0 where name='lock_pattern_autolock';
      update system set value=0 where name='lockscreen.lockedoutpermanently';
      .quit
    • Each line is a separate command so hit enter after typing each line.
    • If the above command doesn't work, you can use the second command. It will remove the pattern lock screen.
    • adb shell rm /data/system/gesture.key
    • To remove the password, you can use the following command.
    • ADB SHELL RM /DATA/SYSTEM/PASSWORD.KEY
  8. Once you have done this step, you need to restart your Android phone. After you boot your phone, you will see the password or the pattern lock screen will disable.
  9. Once again I remind you, make sure the USB debugging on your device is always enabled before the Android phone is locked. If USB debugging is not enabled then you can not proceed with this guide.

2#. Unlock Password, Pattern Lock, PIN Without Losing Data with Aroma File Manager.

Your device must be rooted with CWM or TWRP installed in it
  1. The second method to unlock the Android phone without hard reset and losing data is using Aroma file manager.
  2. Open the google search engine, then type 'aroma file manager' in the search box. (without quotes)
  3. Or you can directly go to this link.
  4. Copy the zip file into your sd card.
  5. Then, power off your phone. Make sure it fully shut down.
  6. Once your Android phone completely powers off, now put your phone into recovery mode. each cell phone has a different way to enter recovery mode. Here are some examples;
    • Samsung Galaxy: Volume Up + Home Button + Power Button.
    • Nexus: Volume Up + Volume Down + Power Button
    • Motorola Droid X: Home + Power Button
    • for other models please search on Google.
  7. Release all button when your phone enters recovery mode.
  8. In recovery mode, you can use the volume up or volume down buttons to navigate the menu. and power button to confirm.
  9. Now, highlight install zip from SD card.
  10. Then find the zip Aroma file that you copied to the sd card.
  11. Then install the zip file.
  12. Once Aroma File manager successfully installed, now open it.
  13. From the Aroma app screen, navigate to the Data folder - System folder - find gesture.key or password.key.
    unlock Android phone via Aroma File Manager
    unlock Android phone via Aroma File Manager
  14. Delete the gesture.key or password.key file, and then exit form aroma file manager and reboot your Android phone.
  15. After reboot, the password, PIN, or pattern lock screen is not removed. But don't worry draw any pattern and you will open your Android phone.
  16. Finish.

    Sunday, 19 August 2018

    Guide - Flashing a New Firmware on Samsung Galaxy A6 and A6+ 2018 Via ODIN.

    Guide - Flashing a New Firmware on Samsung Galaxy A6 and A6+ 2018 Via ODIN.

    Flash Firmware Samsung A6 and A6 Plus. Flashing the firmware on an Android mobile device is very easy. but in some people, it will seem difficult to do it. Flashing firmware is usually used to solve problems on an Android phone. for example, a boot loop or stuck on the logo. When the boot loop occurs, the Android phone will restart and restart when phone turned on. So it will never reach the home screen. Therefore, I will make a guide on how to install firmware on Samsung Galaxy A6 and A6+. To install the firmware, the ODIN software tool is needed, ODIN is a flash tool software made specifically for Samsung devices. Odin can only run on a computer with a Windows operating system.

    Besides bootloop problems, flashing firmware can also be used for system upgrades and downgrades. in fact, it can also be used to return the phone to factory settings. The device that we will flash this time is Samsung Galaxy A6 or A6 +. Where this device was released to the market in 2018, may. has 6.0 inches Super AMOLED capacitive touchscreen, 16M colors display. and runs on the Android 8.0 (Oreo) operating system.

    Ok, now we start how to flash the firmware on Samsung Galaxy A6 and A6 plus.

    Initial Step.

    1. Try to charge your cell phone fully, because the flashing process usually takes a long time depending on the firmware size.
    2. Always back up on important data, before flash firmware. Because the flash process will delete all data.
    3. Make sure the USB driver is installed correctly because the driver will guarantee a good connection between the two devices via USB cable, download the USB driver from the following page.
    4. Now download ODIN, this software is used to transfer firmware from a PC to Samsung devices. ODIN can you get from the following page.
    5. Then, download the fresh firmware for Samsung Galaxy Galaxy A6 and A6+ 2018. 

    Load the Firmware into ODIN Window.

    1. This guide can only be applied to Samsung Galaxy A6 + or A6 2018. Depending on which firmware is used. and does not work on other Samsung models.
    2. Now, Extract ODIN software in certain folders that are easy to find. For Example (desktop)
    3. Then, Unzip the Samsung A6 and A6+ 2018 Stock ROM or Firmware.
    4. Now, power off the phone using the power button.
    5. Now, go to the ODIN folder and run the ODIN.exe application by right-clicking choose run as administrator.
    6. launch ODIN flash tool
      launch ODIN flash tool
    7. Once the application window is open, now you can click the following button at the ODIN application windows, and navigate to the *.tar or *.tar.md5 firmware file to load it into ODIN window. 
      • BL button,
      • AP button
      • CP button
      • CSC button
        flash Samsung Galaxy A6 and A6+ 2018
        flash Samsung Galaxy A6 and A6+ 2018
    8. Make sure all firmware already inserted into ODIN windows. 

    Put Samsung Galaxy A6 & A6+ Into Download Mode.

    1. First, Turn Off your phone.
    2. How to enter Samsung Galaxy A6 & A6+ into download mode?. You can press and hold the following button simultaneously
      • Volume Down + Power Button + Home button.
    3. Release all button when your phone showed this image on the screen.
    4. download mode Samsung A6 & A6+
      download mode Samsung A6 & A6+
    5. To continue entering download mode press the volume UP button.
    6. To cancel entering download mode and restart the phone press the volume down button.
    7. More instructions, see this page.

    Final Step, Flashing With ODIN.

    1. Connect your mobile device with a PC using a USB cable
    2. Make sure your Samsung phone screen shows downloading.
    3. Now return to the ODIN application window, then click the start button to start the flash process.
      flash Samsung A6 & A6+ Via ODIN
      flash Samsung A6 & A6+ Via ODIN
    4. Wait a while until the ODIN window displays a green PASS. this means the flash process is complete, and the Samsung mobile phone will automatically reboot.
    5. After all the flashing process is complete, your mobile phone will boot and please make initial setup until the phone displays the home screen and is ready for use.

    Saturday, 18 August 2018

    How to Flash Firmware Samsung Galaxy J8 SM-J810F, SM-J810Y, SM-J810G.

    How to Flash Firmware Samsung Galaxy J8 SM-J810F, SM-J810Y, SM-J810G.

    Flash Stock Firmware Samsung J8 Via ODIN. We often hear the term of flashing in an Android phone. why should someone flash on an Android device? the question certainly has several reasons. basically, flashing will install or update the firmware status that is already installed on an Android phone.in addition to downgrading and upgrading firmware, flashing can also be used to resolve boot loop and bricked problems. How to do flashing is also not difficult, you must prepare a new and fresh firmware. Besides that, the main software tool used is ODIN. In this tutorial, I will present how to flash the firmware on Android J8 using ODIN. why do I use ODIN? because this software is specially designed by the Samsung manufacturer to install firmware from a PC to Samsung phones.

    I use Samsung J8 in this guide because this device has just been released by Samsung in May 2018. Super AMOLED capacitive touchscreen, 16M colors. Powered by Octa-core 1.6 GHz Cortex-A53, and run on and runs on the Android 8.0 (Oreo) operating system.

    Now you see how to flash the firmware on Samsung Galaxy J8 using ODIN.

    Prerequisite.

    1. Make sure the battery is fully charged, flashing the firmware takes quite a long time depending on the firmware size.
    2. Backup data is important to avoid the data being lost after the flashing process because the flashing process will delete all data and files stored on the cell phone.
    3. Make sure the USB driver is installed correctly because the driver will guarantee a good connection between the two devices via USB cable, download the USB driver from the following page.
    4. Now download ODIN, this software is used to transfer firmware from a PC to Samsung devices. ODIN can you get from the following page.
    5. Then, download the fresh firmware for Samsung Galaxy J8. 
      • There are Three methods to download Samsung firmware.

    Insert Firmware into ODIN.

    1. This guide runs on Samsung Galaxy J8 only. So, do not try flashing the firmware on Samsung devices other than those mentioned.
    2. Now, Extract ODIN software in certain folders that are easy to find. e.g (desktop)
    3. Then, Unzip the Samsung J8 Stock ROM or Firmware.
    4. Now, power off the phone using the power button.
    5. Now, go to the ODIN folder and run the ODIN.exe application by right-clicking choose run as administrator.
    6. launch ODIN flash tool
      launch ODIN flash tool
    7. Once the application window is open, now you can click the following button at the ODIN application windows, and navigate to the *.tar or *.tar.md5 firmware file to load it into ODIN window. 
      • BL button,
      • AP button
      • CP button
      • CSC button
        flash Samsung Galaxy J8
        flash Samsung Galaxy J8
    8. Make sure all firmware already inserted into ODIN windows. 

    Enter Samsung Galaxy J8 Into Download Mode.

    1. Make sure your cell phone is powered off.
    2. How to enter Samsung Galaxy J6 into download mode?. You can press and hold the following button simultaneously
      • Volume Down + Power Button + Home button.
    3. Release all button when your phone showed this image on the screen.
    4. download mode Samsung J8
      download mode Samsung J8
    5. To continue entering download mode press the volume UP button.
    6. To cancel entering download mode and restart the phone press the volume down button.
    7. More instructions, see this page.

    Start Flashing Samsung Galaxy J8.

    1. Now it's time you connect the Samsung J8 device to PC Via USB cable.
    2. Make sure your Samsung phone screen shows downloading.
    3. Now return to the ODIN application window, then click the start button to start the flash process.
      flash Samsung J8 Via ODIN
      flash Samsung J8 Via ODIN
    4. Wait a while until the ODIN window displays a green PASS. this means the flash process is complete, and the Samsung mobile phone will automatically reboot.
    5. At this time you have successfully installed a new firmware for Samsung J8 after the cellphone boots please make initial settings like when you first bought the cellphone.